Browsing Tag

Marc Jacobs Beauty

Roundup

10 Mascaras Tried and Tested

June 6, 2016


I’ve been playing with quite a few mascaras over the past several months – some from early January. As I’ve worked my way through a few tubes I’ve made notes on thoughts for these and kept them to photograph next to each other so you can see the brush sizes and shapes. I have really straight relatively wimpy lashes that are often barely visible unless I have mascara on. I rarely ever wear anything on the bottom lashes because most brushes are too big to catch the tiny lashes. That combined with the fact that most mascaras smudge on me is another factor for why I don’t wear anything on the lower lashes.


I have tested a few lash growth serums but am still undecided – I suspect that they require months of use to see results. I received a sample tube of Rapidlash earlier this year and as of today I’ve hit the 71 day mark of use. I have started to see some results but they are still on the subtle side. If you have ones you’ve tried that worked let me know.


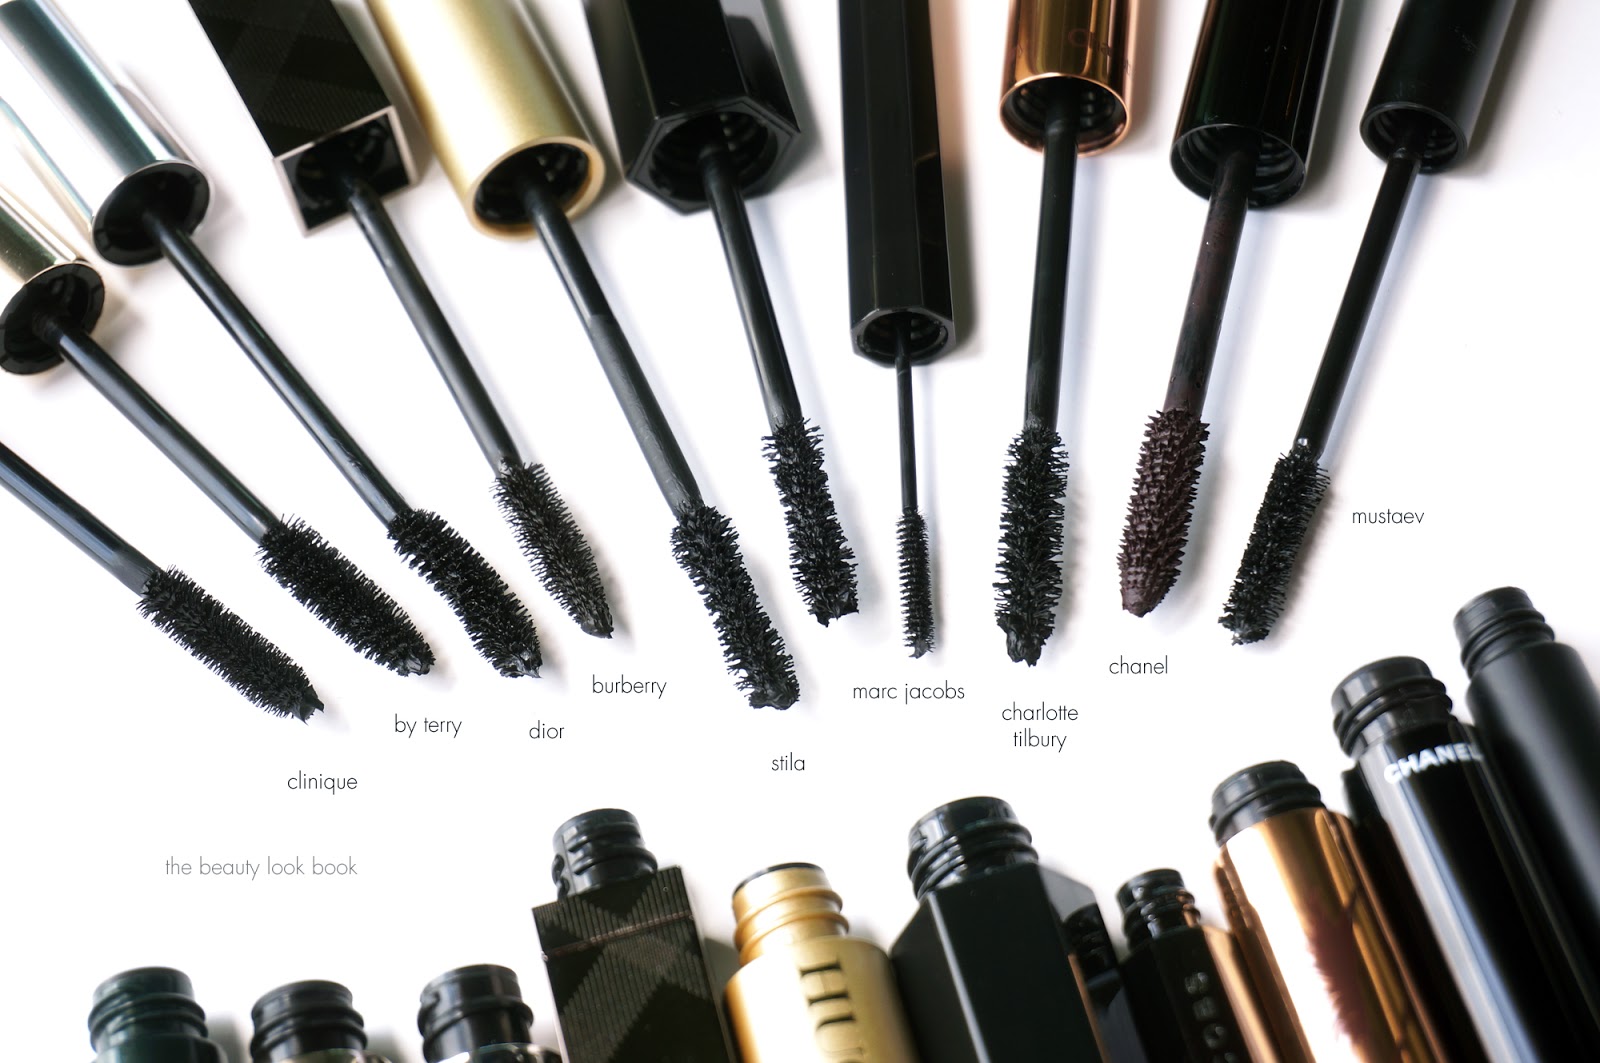
Onto the mascaras I’ve tested out. Some are repeats of classic staples. I usually like waterproof versions because they are the ones that really don’t smudge on me. However there are quite a few that leave the lashes looking and feeling a bit crunchy or that turn slightly greyish when they dry so I’m really picky with formulas. The image below is interactive so you can click on the icons below to shop the mascaras:

Shown above from bottom to the top:
  • Clinique High Impact Mascara ($16.50) is one of the mascaras I’ve used for the longest, I discovered it years ago and it’s a great basic mascara to add definition and volume, it’s not the most volumizing formula but the black is a true black color and doesn’t smudge, flake or clump.
  • By Terry Terrybly Growth Booster Mascara ($48) is one I received as a gift with purchase at a counter a year ago, it’s a formula that is very expensive but gives a really nice lush look to the lashes, it is supposed to have a growth formula inside it, I haven’t noticed any visible growth from this one but it’s not one I use daily, I like this because it doesn’t flake, irritate or clump, it holds the curl and adds nice volume you can layer.
  • Diorshow Iconic Overcurl Mascara ($29.50) I love Dior mascaras but often times they just don’t hold the curl for me, I gave this a try in hopes of finding one that does and was thrilled to find that it did for me. There were a lot of mixed reviews online – people either love it or hate it. I found it held the curl and did not smudge. I would have liked a bit more noticeable drama for me, you can layer it but on me it was easy to over-layer where you get that slightly cakey look. The fact that it held the curl and didn’t smudge moved this into my thumbs up list.
  • Burberry Bold Lash ($29) is one I used a few years ago, loved it and repurchased once. I gave it another buy and have no regrets. This is best on me with one good coat. I apply at the base of the lashes and wiggle the tube to apply – it coats lashes evenly without clumping and it does not smudge on me.
  • Stila Huge Extreme Lash Mascara ($23) is one I tried in the Birchbox Beauty in Bloom Box (review here and it’s still available). It far exceeded my expectations and I proceeded to search for it in stores. I could not find it anywhere near me so I ordered online. It’s my new favorite formula although it is a bit hard to remove in the evening. I like this for the most drama and definition. It holds the curl and doesn’t smudge and looks like a true black.
  • Marc Jacobs Velvet Noir Major Volume Mascara ($26) is one I had high hopes for because I really love the O!Mega Lash Mascara (that one has been my most repurchased formula over the past year). The Velvet Noir has an ultra deep color. It has a unique curved brush that dips in the middle of the wand to match the curve of the eye and get the corners. Application is really easy and it looks incredible. Unfortunately for me it does not hold the curl. Smudging is minimal but still happens a tiny bit on me with this one.
  • Marc Jacobs Feather Noir Mascara ($24) is an ultra skinny mascara – one of the tiniest wands I’ve ever seen! It’s made mascara application on lower lashes possible for me. I have super sensitive eyes so it does tickle a little when I apply this but it has such a fine wand it will catch tiny lashes without touching the skin. It did not smudge on me when I used on lower lashes. I think this is a winner if you’re one who is looking for a lower lash mascara.
  • Charlotte Tilbury Legendary Lashes Mascara ($32) I love all things Charlotte Tilbury so when this launched I had high hopes. The regular mascara from her line is ok in my experience. This one is like a face lift for the lashes. I rarely notice the smell of mascara but this one smells like it has a tiny bit of perfume and it smells amazingly fresh and pretty. I have mixed feelings on this one. I’ve put this to the test over the last month. It gives that faux mascara look by adding incredible volume and definition – it’s really impressive. It holds the curl, doesn’t flake and is non irritating. However half the time it smudges. The other half of the time it does not. Even when I have an extra powdered under-eye sometimes it still smudges. If this came in a waterproof formula I think it would be 100% flawless for me. Right now it’s 50/50 on the smudge factor.
  • Chanel Le Volume Mascara ($32) is a classic. I like the regular black version but try to buy the plum shades when they launch because they are often limited-edition. There are two formulas the regular Le Volume and Le Volume Waterproof. I like both but for me waterproof is the way to go especially in humid warmer months. It adds volume and doesn’t smudge.
  • MustaeV Maxi Lash Volume Mascara ($18) is one of the deepest black mascaras I’ve tried. It has a super skinny wand so it’s easy to grab all the lashes – even the ones around the edges. I was really impressed how well it stayed put – no smudging for me on all testing occasions. It’s not the most volumizing for me because I have such wimpy lashes but it’s a good everyday kind of mascara that never clumps on me and I love the true black color.
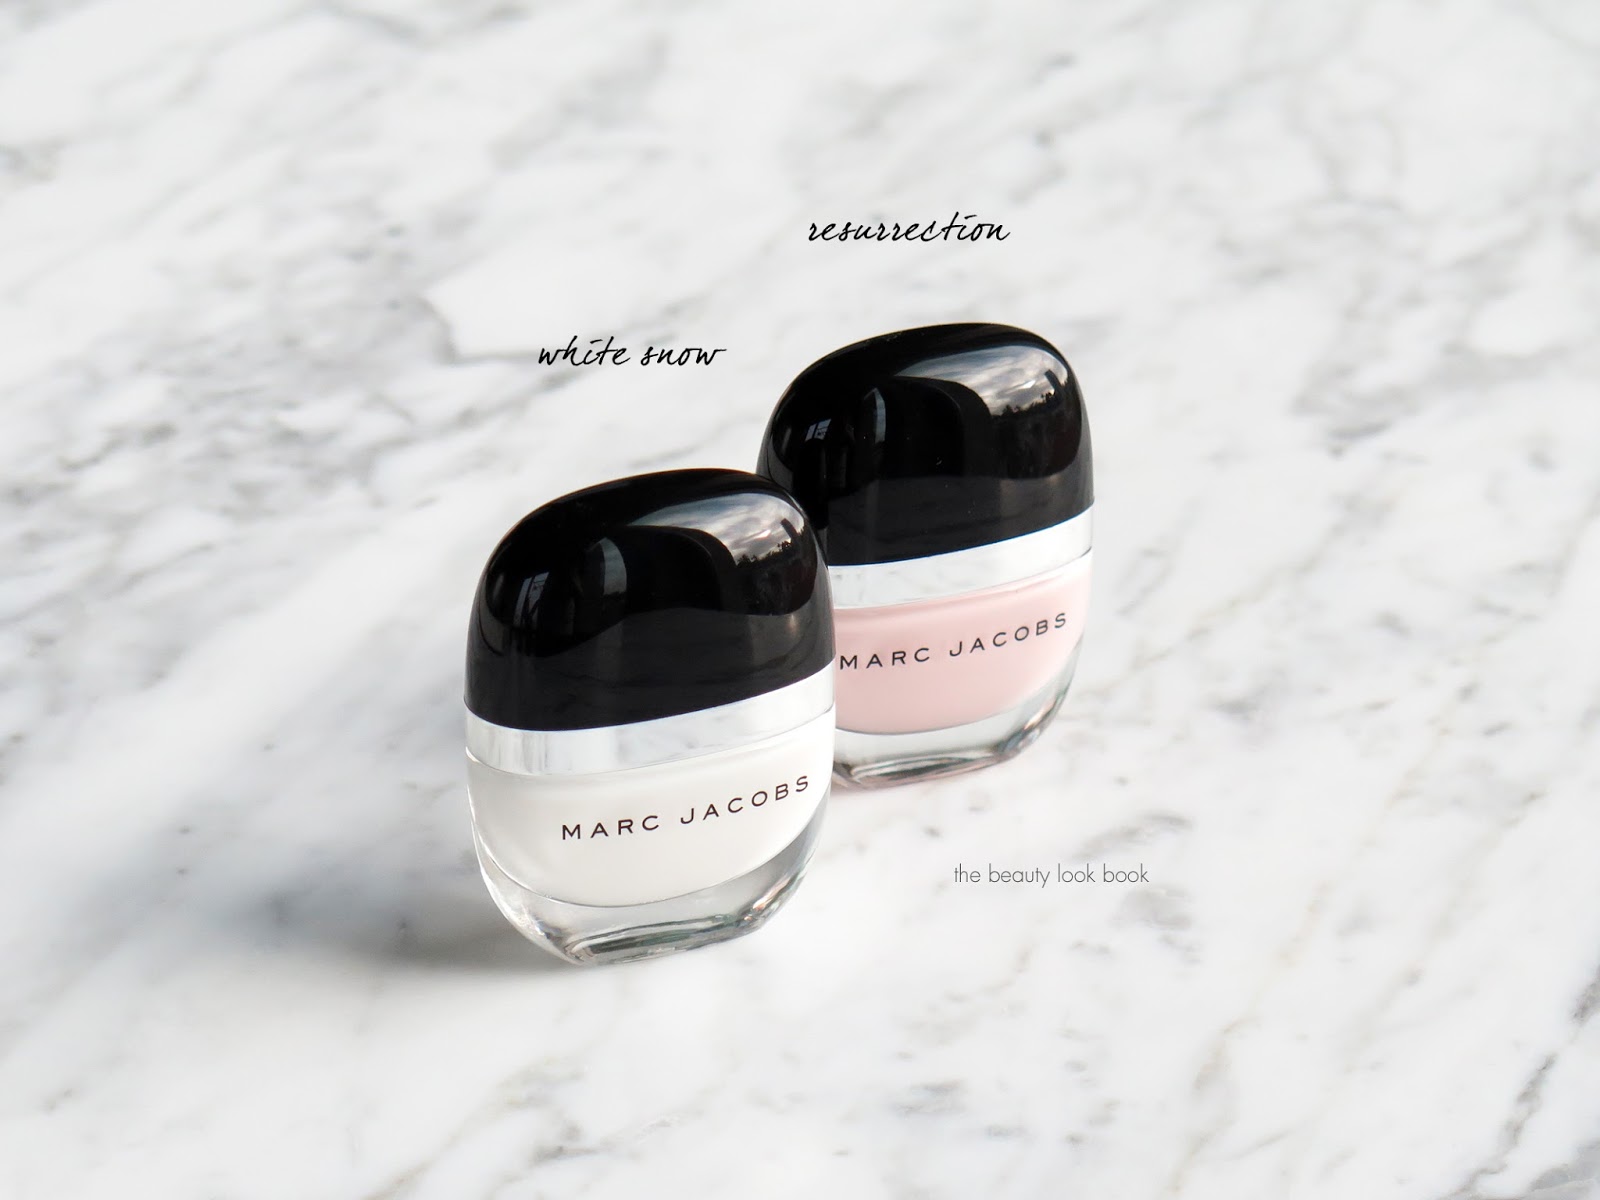
Another view of the mascaras, different angle:


So which one is my favorite? Right now it’s a three-way tie between the Stila Huge Extreme Lash Mascara, the By Terry Terrybly Mascara and Chanel Le Volume. The Charlotte Tilbury Legendary Lashes is almost perfect – it smudges on me half the time I wear it.


If you’re looking for a new mascara I hope you found this roundup helpful! As always – I’d love to hear about your recommendations! At this time I don’t use a base/primer or a top coat for the lashes. I know several of you have recommended the Clarins Double Fix as a way to prevent smudging. I still have yet to try it but just ordered it so will let you know how it works. I’ve played with a few false lashes on occasion but find them too time consuming to apply on a daily basis – I know it just takes practice to get used to but it’s something I just haven’t gotten into yet.


If you have any tips, tricks or advice on lash growth serums I’m all ears!
Press samples featured include the Charlotte Tilbury, MustaeV, RapidLash. Gifted item includes the By Terry Mascara.


Marc Jacobs Beauty Uncategorized

Marc Jacobs Beauty Enamored Hi-Shine Nail Lacquers in White Snow and Resurrection

March 27, 2016

There are a few new shades of the Marc Jacobs Beauty Enamored Hi-Shine Nail Lacquers ($18 each for 13 ml/0.43 oz) for spring and I picked up two from Sephora in White Snow and Resurrection. White Snow is a sheer milky cloud white and Resurrection is an opaque powdery pink cream. For those curious about the other new colors, there are 6 total in pastels and creams. The other four shades include Sundays Cool (lavender), Good Friday (mint), My Peeps (cool pink) and Confession (grey).

I find pastels can be hit or miss for my medium olive skintone. I love the look of white polish on other girls but on me it often looks like white out. Marc Jacobs White Snow has a sheer finish which requires 3 coats for me, but the sheerness helps make it more wearable on my hands compared to a pure white polish. Opaque pastel pink creams are often streaky or look too powdery on my hands. Marc Jacobs Resurrection is a high-maintenance pink in the sense that the first coat is a streaky mess, but it evens out to a smooth finish with the second or third coat. Each coat dries faster than most other polishes so I don’t mind the extra work and the color has just the right mix of white and pink so it’s not too contrasted with my skintone.

I just bought these and applied them so I didn’t give them a week-long test run to see how long they lasted. However in my experience with other Marc Jacobs Nail Lacquers – lasting power is very good and I can get up to 7 days of wear without any tip wear or chipping. I usually combine the Marc Jacobs Nail Lacquers with the Formula X Base Coat and the Nails Inc. 45 Second Top Coat. A closer look at both shades.

White Snow:

Above: Sweater by Rag & Bone, Bag by Celine, Jeans by J.Brand

Resurrection:

Both are fairly standard classic colors so I suspect they can be easily duped however I’m always on the hunt for a classic sheer white that isn’t too sheer and that also isn’t too opaque. White Snow is pretty darn good if you don’t mind layering more than 2 coats. Resurrection is nice but not a must – especially if you already own a lot of pale pink cream colors.

You can find Marc Jacobs Beauty Nail Lacquers online and in store at Sephora. Also online at Marc Jacobs Beauty. Have you tried any of their nail polishes before? If so what are your favorites? A few of mine include Daisy, Wine-Not and Petra.

Enjoy the rest of your weekend!
Base Makeup Sephora

Color Correcting for Beginners

March 17, 2016

Last week I stopped by Sephora at South Coast Plaza for a Correct and Conceal Mini Makeover to learn more about the color correcting trend happening right now. I was curious to see if there was anything that could cover dark spots and redness better than a full coverage concealer or foundation. I had a session with artist Dre who was one of the most knowledgeable artists I’ve ever worked with. She was very thorough in explaining color correcting, going through all the options and application techniques, gave me awesome skin prep recommendations and I could not have had a more fun experience. If you’re like me you and consider yourself a novice or beginner when it comes to color correction you might be intimidated by the whole concept. I’ll share my makeover experience, what was used, what I bought and some thoughts on the product testing process. I hope this will help give you some tips and ideas of what to try on yourself. If you have a Sephora near you I highly recommend you call them to schedule a mini-makeover. They can be as quick as 15 minutes and I think you will be impressed with how much you learn – I learned a lot. Scheduling one in advance is probably best to make sure they have someone on site to sit down with you although they can accommodate walk ins sometimes and they are free of charge!

First a quick run through of the mini-makeover I had at Sephora. She started by assessing my skin type and skin concerns. I mentioned I had super sensitive skin and told her about a few products I had allergic reactions to. Personal concerns for my skin were to improve texture, cover dark spots from scars that were healing, under-eye darkness and redness in general. I also mentioned that I liked a streamlined easy approach to applying base face makeup so she picked out her four favorite color correcting products for my skin type that would be easy to use and incorporate along with some skincare items for me to try for calming and radiance.

For a bit of background on Color Correcting it’s not a new trend but it has been very popular right now. The concept of color correcting is that you can use certain colors to counter or diffuse others. Green will correct red, peach will help with dark spots and undereye circles, pink and purple will counter dullness and brighten the skintone. I initially thought using a full coverage concealer or foundation would be sufficient but I often find it leaves the face looking a bit flat and sometimes those dark spots still show through. This is where color correcting can help. Here’s a look at the Sephora Beauty Studio in store – it varies per store but most have a station with mirrors, makeup remover and tools for artists to apply product on your face.

A run through of all the products she used on me from start to finish:

Step 1: Prep the skin

She started by having me remove my makeup with the Ole Henriksen The Clean Truth Cleansing Cloths which are super gentle and non-irritating for my sensitive skin. This one cleans, balances and hydrates in one step which is convenient for on-the-go makeup removal. Next she used the First Aid Beauty Radiance Pads to help with surface texture. She followed with the Caudalie Vinoperfect Radiance Serum and Ole Henriksen Nurture Me since I mentioned my face was prone to irritation and flare ups. Skin felt smooth, nicely hydrated and calmed down.

Step 2: Base

Dre’s theory of using color correcting was to use apply in steps and use it with your current foundation routine. She started by applying the Algenist Reveal Concentrated Color Correcting Drops in Blue to help brighten the overall skintone as a base which did indeed brighten the skin without looking scary blue. Blue helps to neutralize sallow skin. She followed with the Make Up For Ever Ultra HD Invisible Cover Stick in 128 mentioning one’s foundation will do a lot of the color correcting as a starting point to neutralize uneven skintone or dark spots.

Step 3: Color Correct

At this point even with a fuller coverage foundation on my skin you can still see dark circles under the eyes and dark spots from acne scars that are healing still show through. Rather than layer on the foundation color correcting helps add coverage without caking on product. I was skeptical but was really impressed with how literally all the dark spots disappeared with a green color corrector and undereye circles disappeared with a peach/melon corrector. She applied the Sephora Collection Bright Futures Color Correctors in Green and Melon. The key here was to apply and let set so that colors don’t get muddied when you blend them wet. For the green she dotted on spots and then blended with a detailed concealer brush in a cross hatch method to help blend and cover naturally. For the melon she applied directly under my eyes in a downward swiping motion and blended with the sponge tip applicator.

Step 4: Conceal, Set and Finish

Once the color correctors have properly set (takes maybe 3 minutes at most, as long as you don’t pile on the creams) finish by taking concealer or foundation and pat it on top. She used the Sephora Collection Pro Foundation Brush #47 which is a more affordable similar version of the Marc Jacobs Beauty Sculpting Foundation Brush to roll and dab on the foundation over the corrected spots gently and then blend everything out gently with a beautyblender. You don’t want to take a sponge or brush and press too hard on the face or else it will drag and mix colors to make it look muddy. The final step she used was to set with a loose powder. She showed me the difference between the Laura Mercier Translucent Loose Powder and also the Besame Brightening Face Powder in Violet (both applied with a puff). She said the Laura Mercier is her favorite (it’s one of mine too) but if I wanted to try something new she recommended the Violet to brighten the skin, for fairer skins she recommended the Pink (which I already own).

Step 5: Add color and makeup

She added a bit of blush and bronzer on my skin so my face wouldn’t look flat from all the base makeup, but I asked her to keep it minimal so I could see how the correctors and foundations performed through the afternoon. We skipped everything else and I was impressed that my makeup lasted well into the late evening without any touchups needed. Her skincare recommendations and application made it so nothing budged or creased or faded. Once I use up some of my moisturizers I will need to buy some of the items she used on me.

I have never been so impressed with a makeup session as I have been with my visit to Sephora. Dre taught me so many things – I really appreciated her taking the time to go through application tips and recommending products specific to my needs. My brother tagged along to help me take photos and afterwards I asked him if he thought my face looked ok. He said yes, it looked natural and he couldn’t tell that there were any weird colors. So it passed the brother test 🙂 In discussing the different color corrector options, I asked her why she recommended the Sephora Collection Color Correctors over the ones from Urban Decay Correcting Fluids or YSL Touche Eclat Neutralizers or even the ones that come in cream compacts. She said it was a matter of preference – the cream palettes can definitely multi-task with all the options for color correction and concealer, but to keep things simple she said the Sephora Collection correctors were her favorite for consistency, texture and coverage. (I bought one each of the Urban Decay and YSL to test against the Sephora Collection and I’ll say right now she was right.)

Next up is a run through review of everything I bought and tried along with a mini tutorial of how I’ve been recreating the color correcting look to diffuse dark spots and dark circles. Here are the items she used on me during the makeover. I bought all the items she tried with the exception of the Violet powder because I already own the Pink although I’m seriously considering going back to the store to pick it up this weekend.

Left to right are:

  • Micro Mini Correct Four by beautyblender – there are some new beautyblender options, for the color correcting trend they launched a set of four in different colors, I really like these for blending under the eyes or in the creases of the nose, it’s nice to have different colors on hand to match the correctors so you don’t have to worry about mixing colors together 
  • Algenist Reveal Concentrated Color Correcting Drops in Blue – you can use these alone or mixed in with foundation to help color correct the skin. I’ve been using this as a base, almost like a primer to help counter my sallow undertones with my olive yellow skin. It brightens the skin without looking too blue. You can even mix it in with moisturizer to blend all over to make it a bit more sheer. I really like the way this performs. 
  • Make Up For Ever Ultra HD Invisible Cover Stick Foundation in 128 (looks dark but blends out to a slightly lighter finish, that being said I am getting lighter right now so I will probably have to purchase a different shade soon to mix) is one of the most amazing foundation sticks I have ever tried (it rivals Tom Ford’s) – I’ll have a separate review in the upcoming weeks once I’ve given it a thorough test drive but it offers medium to full buildable coverage that looks amazing
  • Sephora Collection Bright Future Color Correctors in Green and Melon – After testing this compared to YSL and Urban Decay, I have to say that my favorites for texture and consistency on my face are the Sephora Collection ones, they don’t crease or emphasize fine lines and they have enough coverage and pigment to truly neutralize my face issues, the Urban Decay Naked Skin Color Correcting Fluid in Peach has a similar coverage to the Sephora ones and looks great on the skin but if I don’t have enough primer under my eyes it emphasizes all the fine lines that I don’t want to show up, the YSL by comparison is a lot more sheer in finish and I need more coverage
    • A quick side note, during my make over I mentioned my favorite under eye concealer of the moment was the Make Up For Ever Ultra HD Concealer and that I liked the ones with peachy tones (mainly R32) to warm up and brighten under eyes, Dre did mention that this was also one of her favorites to use, but she showed me the Sephora Collection in Melon for me to try something new
  • Estee Lauder Double Wear Stay In Place Flawless Wear Concealer in Warm Light Medium – she used this to highlight my face and I was so impressed with the coverage and texture I had to try it out – it offers smooth flawless coverage and really does stay in place without caking or creasing through out the day
  • Besame Brightening Face Powder in Vanilla Rose (she used Violet on me in store)
  • Laura Mercier Translucent Loose Powder – I already own this and have repurchased numerous times, it’s one of my favorite loose setting powders, if you haven’t tried it I will say you need to
A simple step by step mini tutorial showing before and after. I took the tips learned at my appointment to recreate a flawless base at home. I hoped to take an after show last week but the store lighting wasn’t ideal. In the first shot I did prep my skin with a thin layer of foundation, but as you can see dark spots and dark circles are still highly visible:

Below are the tools I recommend using, but you can shop your stash and find what works:

A look at packaging and different applicators for each kind of color corrector that I’ve been testing out ranging from droppers, sponge tips, squeeze tubes and click brush applicators:

Side by side swatches of the color correctors and some concealers:

A look at the Sephora Collection Bright Future Color Correctors, note there is also Orange/Deep and Lavender available online but when I was in store they didn’t have those colors yet:

In case you missed the Make Up For Ever Ultra HD Concealer post, here are all the shades swatched:

I hope you enjoyed this overview on color correcting! If you’re a novice like me I hope the rundown of my makeover, all the options I tried and swatches help make the color correcting concept seem less confusing or intimidating. I went into my appointment thinking that there wasn’t going to be much that could be done for my dark spots but I went in with an open mind and learned so much. Sometimes makeovers can be a daunting process especially if you get a pushy artist or one who just doesn’t listen to your needs or who doesn’t care preferences. I really recommend trying to book an appointment at your local Sephora – I am already planning on going back for a second appointment hopefully in the next couple of months because my experience was that good. If you’re in the area of South Coast Plaza try to book one with Dre – she’s awesome. If you can’t make it into the store, there is an online survey on the Sephora Color Correcting Makeup page to guide you and help narrow down the picks according your specific concerns and skin type.

Have you tried color correcting recently or is it something you’ve always done for your base makeup routine? Please let me know what you’ve tried and your thoughts. I always learn new tips and tricks from you and would love to hear about what you have been testing or if you have any favorites.
This post was created in partnership with Sephora. As always all opinions my own. Most products picked out and purchased by me, press samples include the Besame Powder and Make Up For Ever Ultra HD Concealers.

Eye Makeup Marc Jacobs Beauty

Marc Jacobs Beauty Style Eye-Con No. 7 The Social Butterfly // Neiman Marcus Exclusive

February 4, 2016

Marc Jacobs Beauty just recently launched the beauty line at Neiman Marcus. It appears they have the full line of products online, I haven’t spotted anything in store yet, but I suspect it will launch in a few select locations to start (if you’ve spotted it at your local Neimans please share in the comments!). As a huge fan of Marc Jacobs Beauty I was thrilled to find a new eyeshadow palette in the Style Eye-Con No. 7 called The Social Butterfly ($59 for 7 g/0.247 oz) which is exclusive to Neiman Marcus. I ordered it as soon I saw it and it made a quick sneak peek appearance on my Instagram here. Today I have swatches + thoughts to share. As a neutral eyeshadow lover this one does not disappoint and conservative eyeshadow wearers will be happy to know it’s glitter-free. The pigment is super rich and soft with this one, similar in texture to many of the other Style Eye-Con No. 7 Palettes. There is a slightly powdery kick up with these shades when you dip your brush into the palette, but the colors apply easily on the lids, blend well and they stay put.

I will call this a neutral warm smokey eyeshadow palette, althought it has a few cool-toned colors. The overall effect gives a unique natural eye look but you can use the darker shades to intensify the color for a more soft smoldering dramatic effect. Urban Decay Naked Smoky pulled on the cool-side for me overall. The Social Butterfly by Marc Jacobs Beauty is a warmer smokey palette and has a more conservative feel. It comes in a small buttoned pouch just like the other palettes. I don’t store them in these but they are nice to have if you travel, it will keep the outside from getting scratched if it’s stored in a travel bag with other makeup items.

The colors from left to right in the palette are:

  • Matte cream, this is a shade lighter than my natural skintone, it works as a good evening base color, or you can use it as the last step to softly buff any harsh edges from other shades
  • Matte tan, this looks neutral, it pulls a bit warm on me, but it’s not orangey or too warm, pigment is excellent
  • Shimmering golden sand, this one has slight olive tones (very very slight) in it, I suspect it pulls that way because of my olive skin, on the eyes it pulls more true to pan
  • Soft shimmering lavender, most readers know I am not a fan of light purples on my eyes, they often look odd on my skin and give me a pink-eye look but this one is so so beautiful, it’s a soft shade that I think is my favorite, it adds a pop of color to the eyes in a pretty and unexpected way
  • Shimmering warm taupe, my favorite kind of eyeshadow color, this one is stunning
  • Matte brown, this one is best used with a detail brush, it blends well, but if you dip a large shadow brush and try to blend, it will look blotchy
  • Dark intense black with tiny flecks of gold shimmer, also best used with a detail brush
Close ups and then swatches:

Bottom line a classic that I will get regular use out of. It’s a very pretty neutral palette that will give a natural smokey eye look. It’s easy to use and layer the colors together. You don’t need use all seven shades at once, I usually use 5 colors at the most, but layering them does allow you to add depth and more dimension. Although this is different from the Dior Eye Reviver palettes (reviewed here and here), I can’t help but feel that Marc Jacob’s The Social Butterfly is what I wanted those palettes to be. I highly recommend that you check it out. I like that the colors are all neutrals and that each color looks distinctly different on the eyes. With some neutral palettes all the colors can often look the same once swatched.

For quick reference if you’re new to Marc Jacobs Beauty, here are a few other reviews I’ve done in the past linked below including all the Style Eye-Con No. 7 Palettes I own (or you can click the Marc Jacobs Beauty tag at the bottom of this post).

Enamored Hi-Shine Lip Lacquers (all shades swatched)
Le Marc Lip Crèmes (all shades swatched)
You can find Marc Jacobs Beauty products now at Neiman Marcus, Marc Jacobs Beauty and Sephora. The Social Butterfly Palette is exclusive to Neiman Marcus.

Do you have any Marc Jacobs Beauty favorites? 
Uncategorized

Best in Beauty 2015: The Beauty Look Book Favorites for Hands and Nails

December 31, 2015

Hands and nails get their own favorites category this year. There were a lot of really good colors launched this year – unfortunately quite a few were limited-edition. My top picks for hand creams, treatments, polishes and other basics. Previous reviews linked for reference:
  1. Marc Jacobs Hi-Shine Enamored Nail Lacquer in Daisy – this is one I’ve owned for a couple years but everytime I wear it I always get asked “what’s on your nails?” it’s the prettiest soft pearly color that makes the hands look polished
  2. Chanel Le Vernis in Beige Rose – best baby pink cream nail color
  3. Dior Vernis in Lady – so sad this was limited-edition, the prettiest powder pink, I wish I bought a backup bottle
  4. Dior Vernis in Sunkissed – also limited-edition but still available at Macy’s and Saks Fifth Avenue, the best nude peach cream
  5. Tom Ford Sugar Dune – this was a limited-edition color from spring 2014 but made a comeback this year and was added to the permanent lineup, it’s the closest one to Dior Lady and such a polished beauty
  6. Louboutin Scarabée Nail Polish Collection – the three had to be the prettiest nail colors launched this past year, I was happy to get them before they sold out, looking forward to what they will release this upcoming year
  7. Rescue Beauty Lounge everything, in particular the R29 Collection – RIP RBL, you were one of my favorite nail polish lines, I was very sad to see the line go, but their polishes will always have a very special place in my heart
  8. L’Occitane x Pierre Hermé Hand Creams – L’Occitane launched such an amazing with their holiday collection this year, I fell in love with everything in the Pierre Hermé line and am embarrassed to admit how many shower gels and hand creams I stocked up on because they are limited-edition, right now you can still find Miel Mandarine and Pamplemousse Rhubarbe online but I don’t suspect they will be available for long
  9. Deborah Lippmann Cuticle Remover and Cuticle Oil – both of these remain at the top of my list for DIY nail essentials, I use them weekly and had to replace both because I use them so often
  10. Molton Brown Hand Cream in Pink Pepperpod – the most unique refreshing scent I’ve tried
  11. Tweezerman Pushy Cuticle Pusher – still the best one I’ve tried, although if you have any good ones to recommend I’m all ears
  12. Chanel Chataigne – from the fall collection earlier this year, initially I thought it was so similar to other vamps but it grew on me, best vampy shade launched this year
  13. Chanel Top Coat Lamé Rouge Noir – prettiest gold glitter top coat launched this year, I hope you were able to get one! It’s limited-edition
  14. Marc Jacobs Hi Shine Enamored Nail Lacquer in Wine Not – best metallic wine color released this year, it sold out almost instantly but was restocked online at Marc Jacobs Beauty, if you haven’t tried it you need to
  15. Nails Inc. 45 Second Top Coat – I don’t think I reviewed this in detail although I did mention it in this post here, one of the best top coats I tried this year and doesn’t cause shrinkage with other nail polish brands
  16. Formula X Nail Cleaner and Base Coat – I’ve found the Nail Cleaner to be a game changer, having a completely clean nail surface makes all the difference in helping polish adhere to the nails, the Base Coat has been a staple all year long, it’s what I’ve used the most and I can’t recommend it enough
Nail polish and hand cream fanatics – what were your favorites this year?

Roundup

Best in Beauty 2015: The Beauty Look Book Makeup Favorites

December 30, 2015

I look back on the last twelve months and can’t believe an entire year has gone by. This has been one of the most challenging yet rewarding years I’ve had yet and I have lots to look forward to for 2016. I took a quick look at my blog posts for the past year along with an inventory of my favorite beauty products. I started with a massive list – there were so many good launches this past year, especially for lipsticks. Brands have really upped their beauty game with better formulas. I’ve edited my list as much as I could to what I considered game changers this year.

I have four categories of best in beauty this year. The first up is makeup favorites. I have 20 of my top makeup picks for lips, eyes and face – nails have their own category (up next).

  1. NARS Chelsea Girls Lip Gloss is this year’s best creamy nude (review here)
  2. Charlotte Tilbury Penelope Pink, Iconic Nude + Seduction make for the best nude lip combo ever, I used up an entire tube of Penelope Pink this year! (swatched here and here)
  3. Marc Jacobs Hi-Shine Enamored Lip Glosses = the best lip gloss launch (swatches here)
  4. Rouge Louboutin Silky Satin = most luxurious lipstick formula created and the best red lipstick I’ve ever swatched (3 formulas swatched here
  5. MAC x Ellie Goulding Lipsticks were the best pinks launched (swatches here)
  6. Burberry Kisses Lipstick = the best lipstick formula launch this year huge plus that they are unscented and also non-drying on the lips (my picks swatched here
  7. Tom Ford Lip Color Sheers in Skinnydip and Rose Soleil (swatches here) were the best new colors launched for the entire year (so good I have backups even though they are permanent)
  8. Hourglass Lip Treatment Oil in Icon is best new tinted lip treatment formula (swatched here)
  9. Urban Decay Naked3 was my most-used eyeshadow palette of the year (swatches here)
  10. Burberry Wet & Dry Glow Eyeshadow in Shell = best all over eyeshadow shimmer color for the lids ever made (review here)
  11. Clio Kill Bill Liquid Liner was the best liquid eyeliner discovery (review here)
  12. NARS Yeux Irresistible Palette wins for the best smoky eye palette of the year (swatches here)
  13. Charlotte Tilbury Eyes to Mesmerise colors are the best cream shadow launched this year for formula and color selection (swatched here)
  14. Hourglass Ambient Lighting Bronzer wins for most luminous bronzer + highlighter combination (swatches + review here)
  15. Tom Ford Moodlight is the best highlighter launch of 2015 (look + review here)
  16. Charlotte Tilbury Filmstar Bronze and Glow in Medium Dark = the best bronzing duo launched and also the one I used the most this past year (look shown on face here)
  17. Charlotte Tilbury Airbrush Flawless Finish Powder in #2 is best setting powder of the year, if it ever gets discontinued I will literally want to die (thoughts + review here)
  18. Sephora Pro Full Coverage Airbrush Foundation Brush #53 best foundation brush discovery for flawless streak-free coverage (review here)
  19. Wayne Goss Anniversary Set = the best brush set launch of the year (review here)
  20. Edward Bess All Over Seduction = most-used cream highlighters of the year (swatches here)
What were your favorite makeup picks this past year?

Marc Jacobs Beauty

Marc Jacobs Beauty #Blacquerfriday Black Friday Deals

November 26, 2015
For Black Friday, Marc Jacobs Beauty has two sets that are one-day exclusives. Both are limited-edition value sets and I highly recommend you put this on your shopping list so you don’t miss out. The first is a three piece brush set called Contour and Glow Brush Collection $105. I already own several of the Marc Jacobs Beauty brushes and they exceeded my expectations. Two foundation brushes that I’ve tested give flawless streak-free foundation coverage.

The brushes priced individually total $151, so the Black Friday set does offer some savings. It includes:
  • The Shape Contour Brush is a flat-tipped super dense brush with a synthetic blend of white and black bristles. It’s incredibly soft and perfect for contouring powders or creams. It also doubles as a foundation brush for a flawless finish.
  • The Blush Angled Blush Brush is an angled brush that is soft, but not quite as soft as the duo-fiber brushes from Marc Jacobs. This is perfectly angled for precise blush application but soft enough to blend color nicely. It picks up color really well and applies blush smoothly.
  • The Bronze Bronzer Brush

    Bronze is the bronzer brush of all bronzer brushes. It’s huge! Super soft and tapered to give a diffused look. I like that it’s dense so it’s not floppy but at the same time it’s plush and will lightly dust bronzer across the face.

The second set has three color items. It’s called the Paint it Blacquer Collection, retails for $50 and includes the following:
  • O!Mega Lash Volumizing Mascara is one of my most favorite mascaras ever. It volumizes, holds the curl and doesn’t smudge or flake. I like that it’s a true black.
  • Magic Marc’er Waterproof Liquid Eyeliner is another cult classic. I’ve gifted several to a few friends who are liquid liner fanatics and it’s passed their test of approval as one they like and are willing to repurchase. It offers a precise stay-put line and dries to a semi-glossy black.
  • Enamored Hi-Shine Nail Lacquer in Blacquer is a new color that’s a pure glossy black cream. I’m a fan of the polishes in general and this one, although super dark, does look rather pretty and edgy on the hands. The polishes offer full coverage with two coats, apply super smooth and last at least 5 days without tip wear.
Swatches of the Marc Jacobs Blacquer, two coats:

In case you’re new to Marc Jacobs beauty, I’ve linked a few other previous features for reference. I’ve been a fan since they launched at Sephora. I have liked everything I’ve tried so far which is huge.

Wine Not Nail Lacquer (swatched here)
Enamored H-Shine Lip Lacquers (all shades reviewed here)
Instamarc Contour Duos (swatched here)

Style Eye Con No. 7 in The Dreamer (swatches here)
(P)Outliner Lip Liners (reviewed here)
Le Marc Lip Cremes (all colors swatched here)

To recap:

The Contour and Glow Trio retails for $105
Paint it Blacquer retails for $50

You can find both #Blacquerfriday sets exclusively
online at Marc Jacobs Beauty starting tomorrow. The brush trio is a bit
of a splurge but I think it’s worth it as the brushes are very good in
quality and made extremely well.

Do you have any Marc Jacobs Beauty favorites? 
Many thanks to Marc Jacobs Beauty for sending me an early preview of the Black Friday Sets.