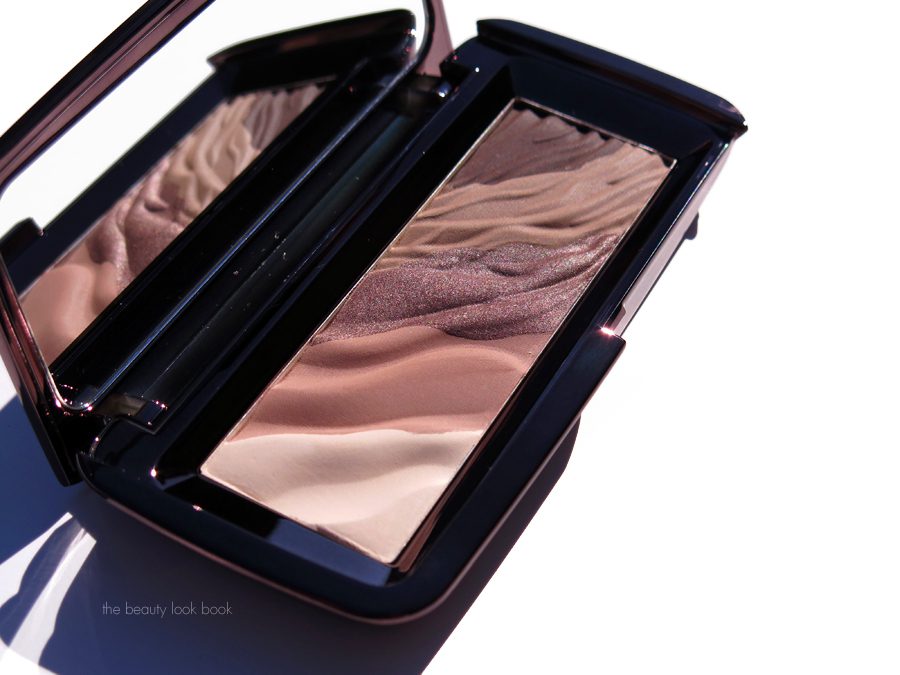
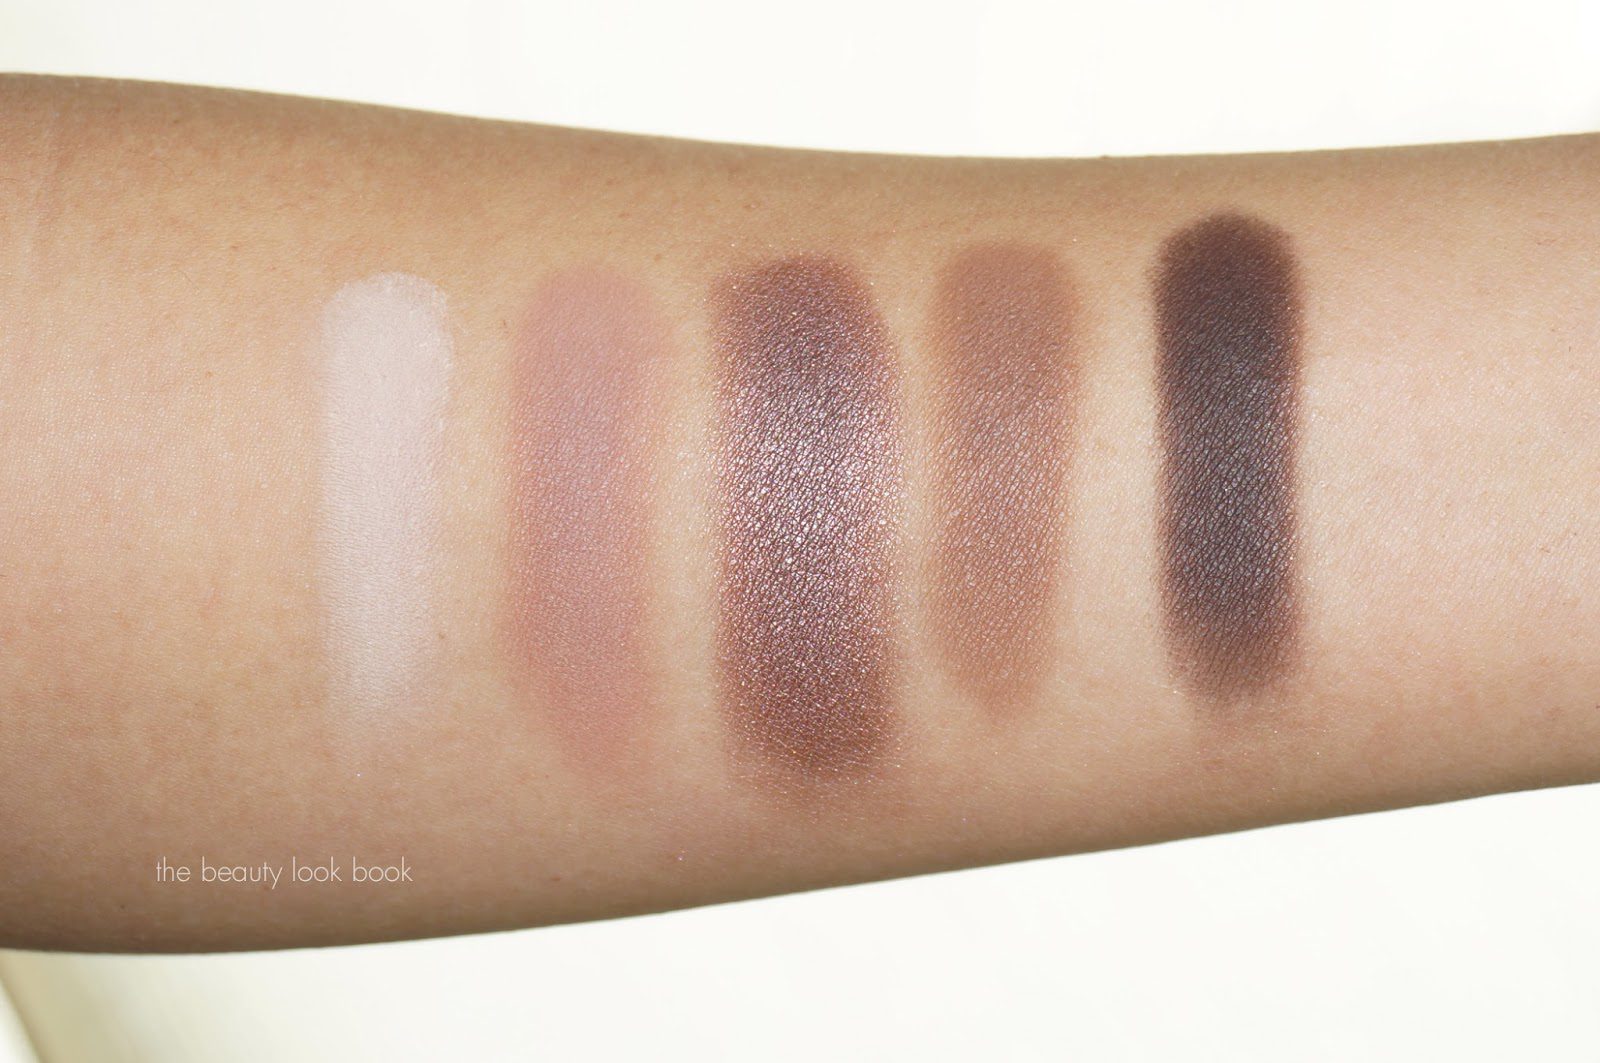
Hourglass just released seven new eyeshadows called the Modernist Eyeshadow Palette ($58 each for 5 x 0.035 oz/1.0g). Each palette seems to offer a diverse range of textures and finishes. There are different color variations for a soft to more dramatic eye. I went with the safe option and purchased Infinity a soft palette of warm neutrals which includes Warm Ivory, Dusty Rose, Bronzed Mauve, Cool Taupe, Dark Cocoa.
The shadows are extremely soft powders with an easy to blend texture. Pigment is very good on this palette and easy to blend and layer for a softly defined eye. Many of my readers have commented on the lack of soft satiny matte palettes in the high-end beauty market. If you’ve been on the hunt for a good palette of soft mattes (with one wearable shimmer) this is the answer to what you’ve been searching for. The only downside is the soft texture is so soft that there is a lot of powder kick-up when you swipe the palette with the brush. I didn’t find that the powder fallout translated to how it applied on the eyes though. With a good brush (like MAC 217, 219 or 239) I was able to get a soft medium gradient.
With soft neutral mattes like these sometimes the colors can end up looking muted or the same on the lids. I like to start with the medium shimmer shades first and then add the others to either highlight or contour the rest of the eye. The middle shimmer color is very soft but adheres well to the lids. The other mattes are softer and lighter in texture (although they have good pigment) and for me are better used as washes. The darkest color is best used with a damp brush or over a creamy liner to help the enhance the pigment.
The packaging and product design is incredibly unique. The powders in the compact are pressed together making them look like a wave pattern. When there is no separator between colors in palettes I usually get worried. I like tiny dividers because I find they make it easier for me to dip my brush into the palette without having to worry about mixing colors. The stripes are large enough for my MAC brushes for now. I do wonder how it will work once the surface is worn down after use.
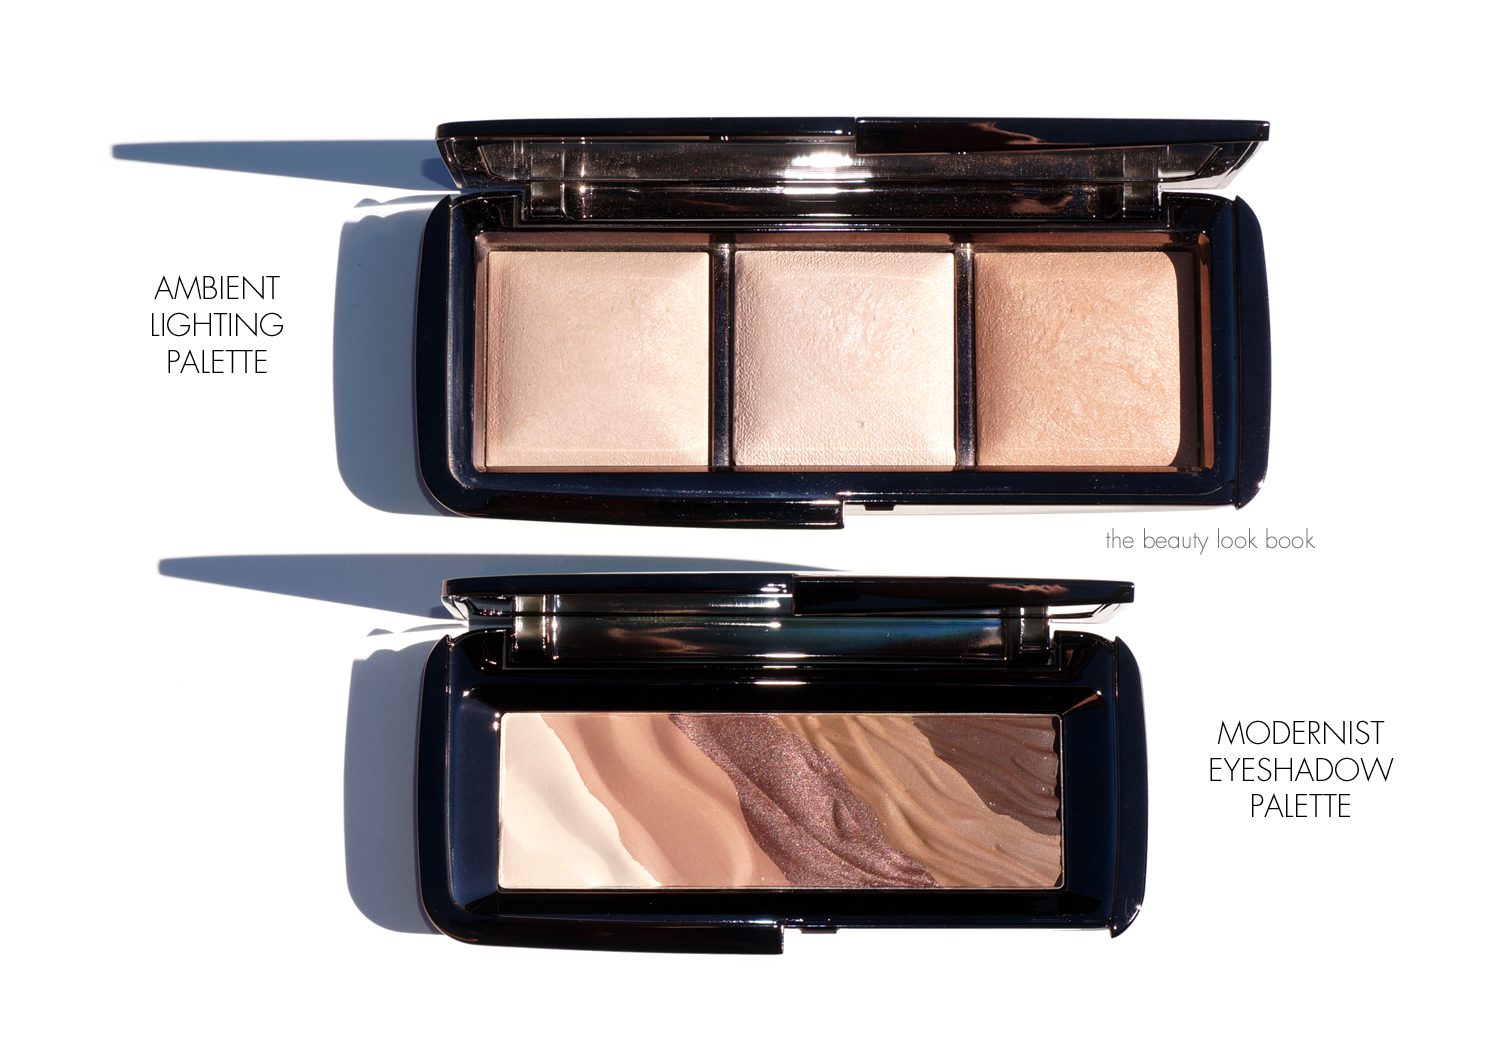
They come packaged in a similar design to the Ambient Lighting Powder Palette, but the Modernist Eyeshadow Palettes are smaller. For the price and for consistency, I do wish they were larger in size.
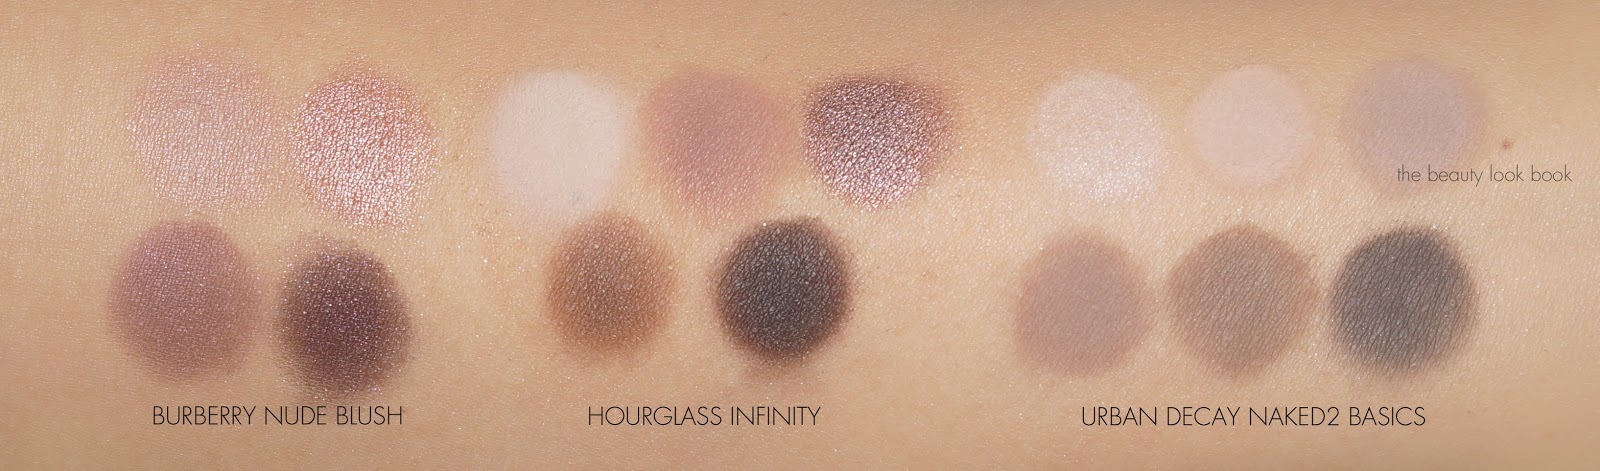
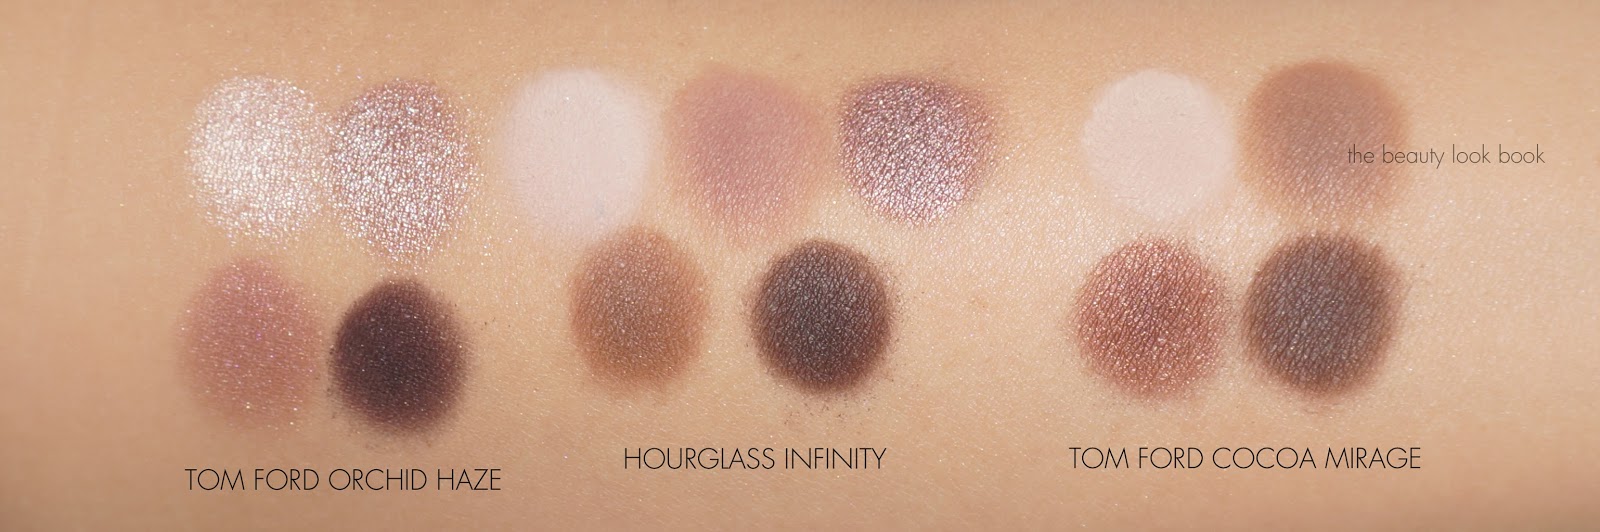
Based on the comparisons above you can see similarities in the shades to other palettes. If you own a lot of neutrals you may find this easy to dupe. To me it seems to be a cross between Orchid Haze and Cocoa Mirage from Tom Ford. I’ve found this palette beautiful to wear and gives a lovely soft defined eye. I do wish the powder texture was a bit less soft because the palette itself can get quite messy with the powder kick-up, although as mentioned above, they meld nicely on the eyes and I experienced no fall out once I put it on the skin.
I know from reading other reviews that there are mixed thoughts on this, my recommendation is try before you buy if you are skeptical. Reviews with thumbs up from Goss Makeup Artist. Lukewarm review from Color Me Loud. Thumbs down from Temptalia.
I personally am really happy with my purchase, I haven’t seen or tested the others to give you a review on the entire collection of the Modernist Palettes (some look like they have more dramatic sparkles). Given the mixed reviews I don’t suspect this will be a universally loved palette, but I do know I’m not alone with my thumbs up thoughts on this.
You can find the Hourglass Modernist Eyeshadow Palettes now at Sephora, Barneys New York and Hourglass Cosmetics. It will be available at other retailers later this month.
Did you try any of these palettes? What did you think?
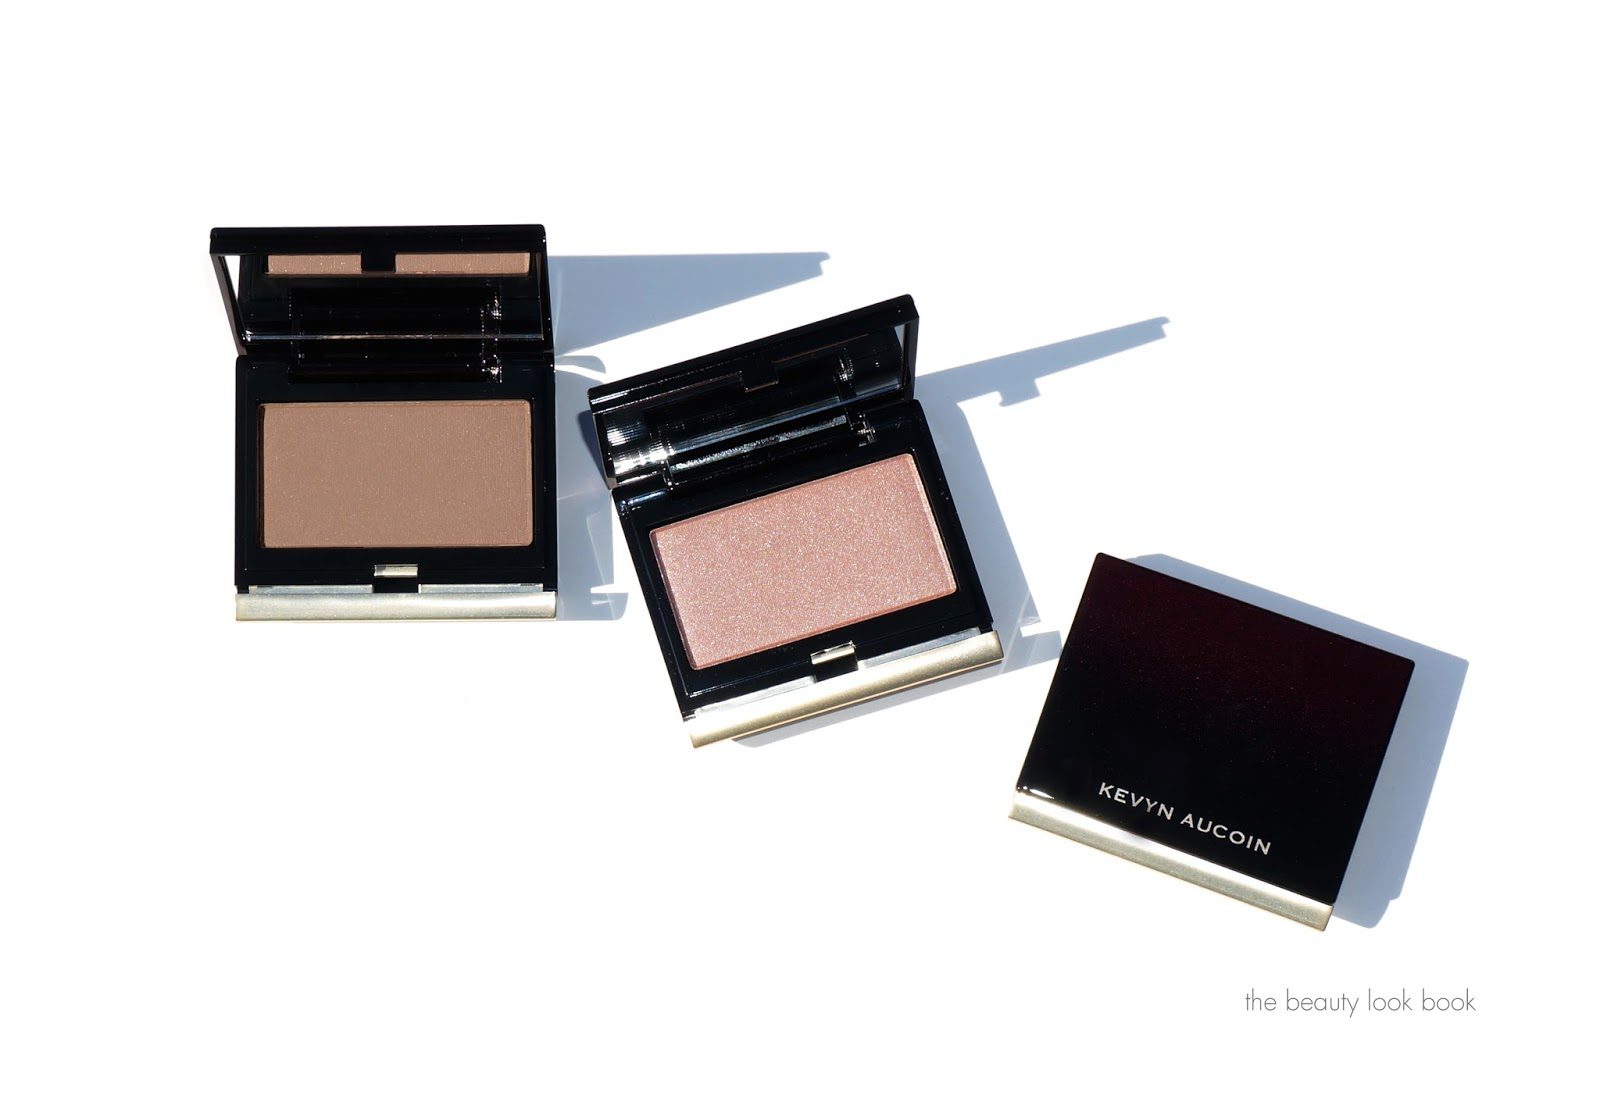
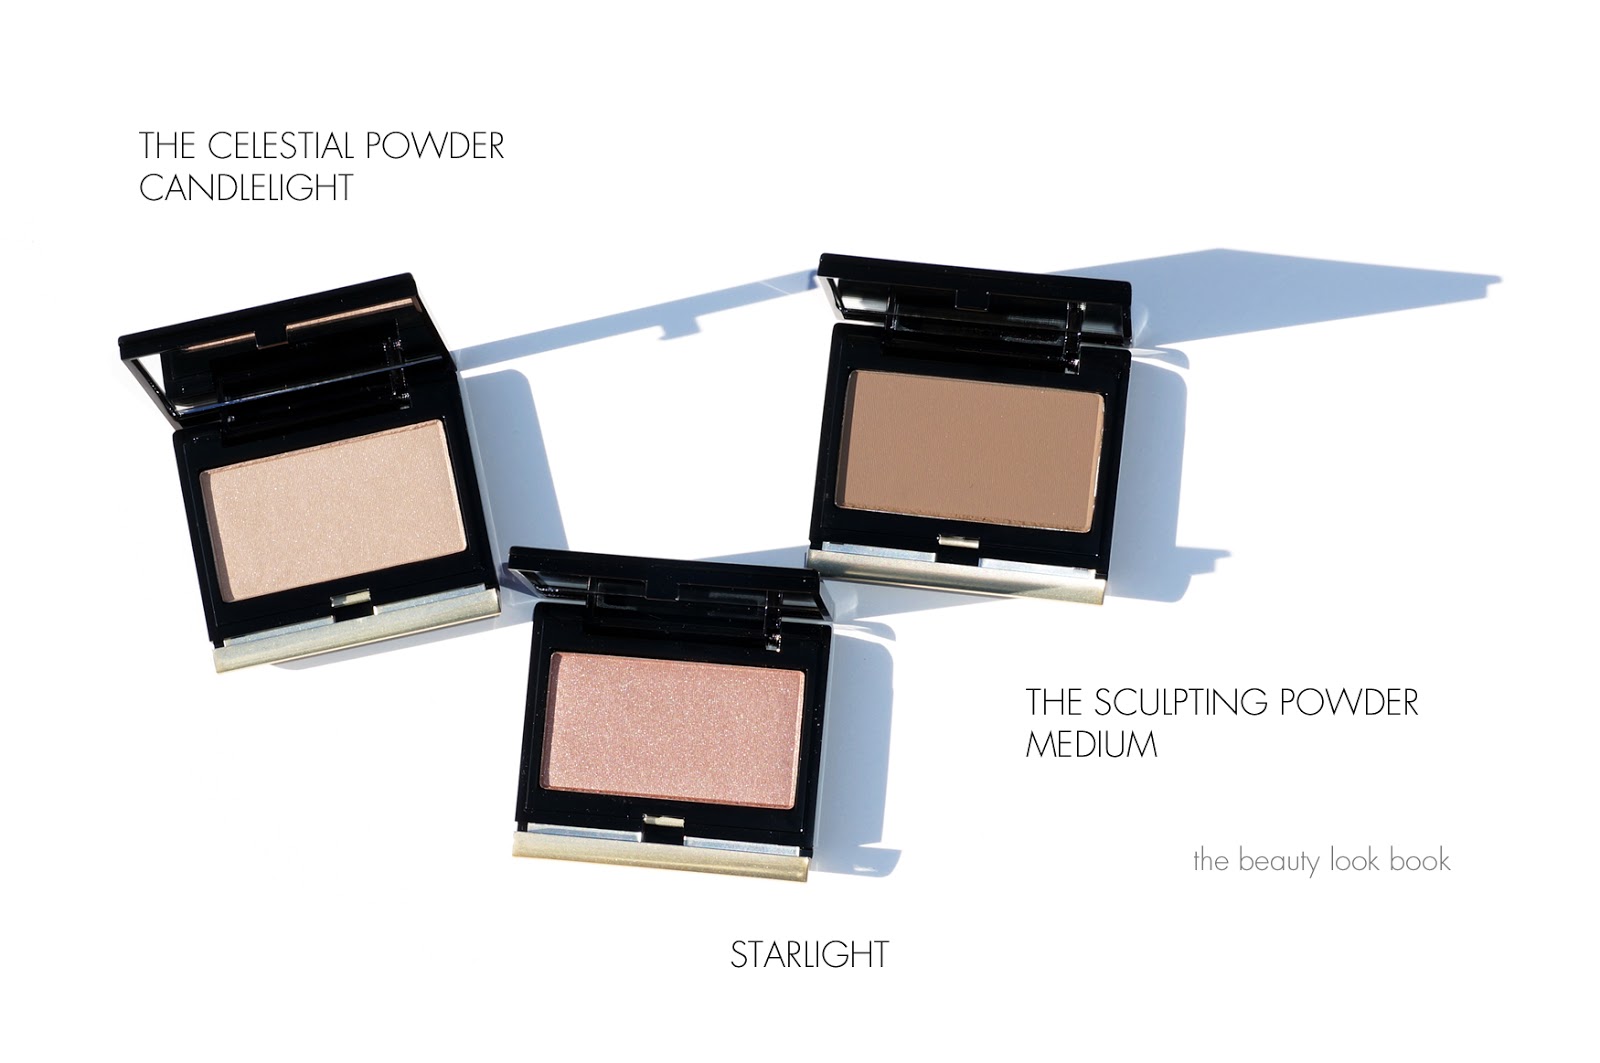
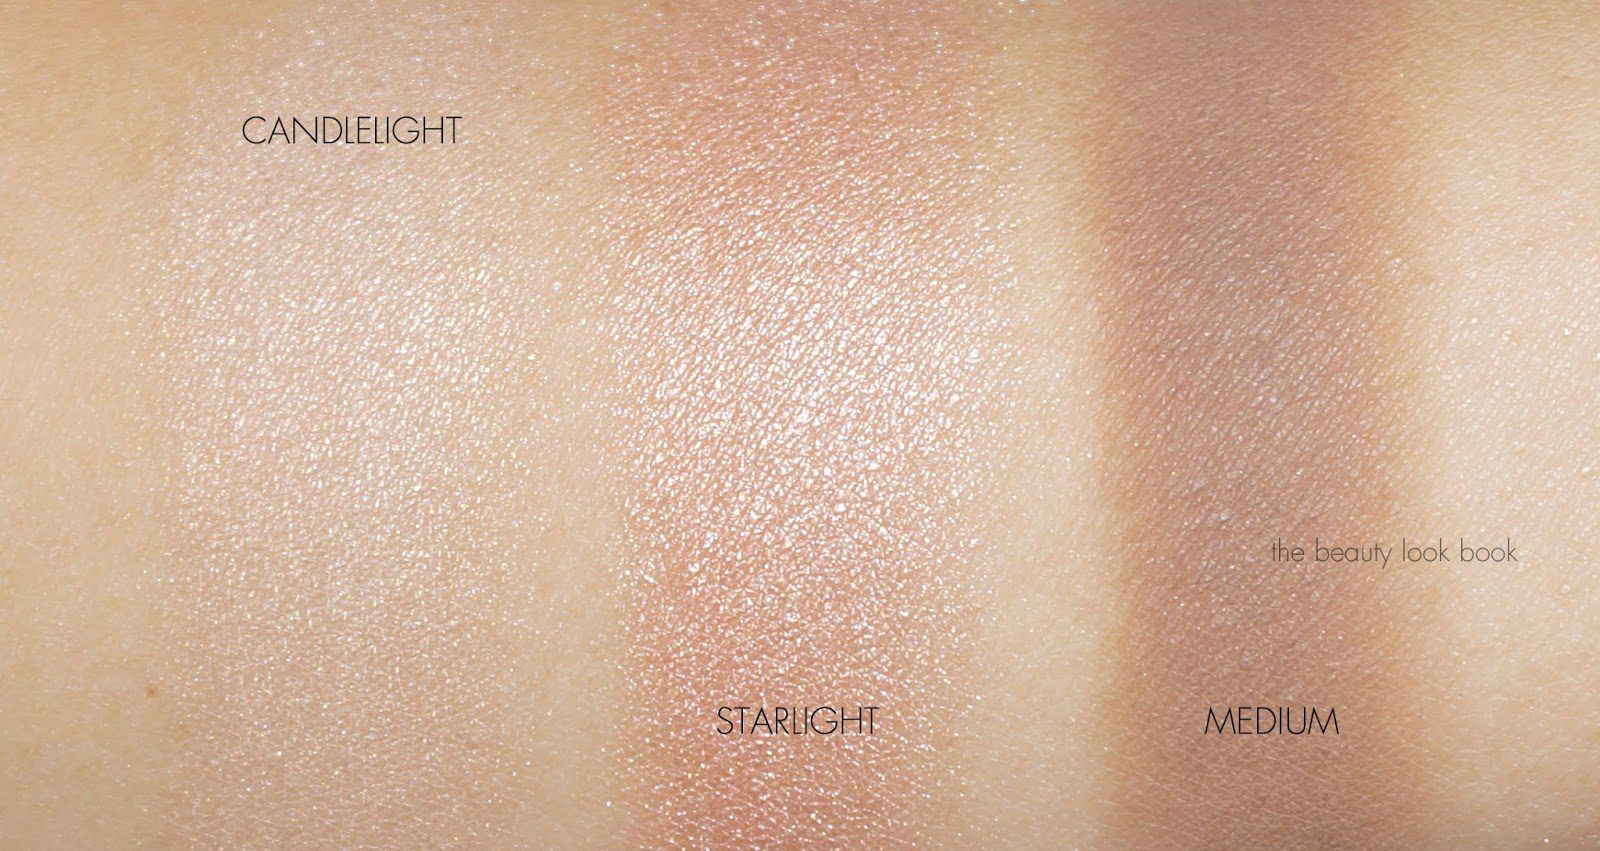
I’m a newbie to the Kevyn Aucoin beauty line. I used to use his Celestial Powder in Candlelight a long time ago when it came in the large compact packaging and liked it for a soft glow, but after using it up never really explored much of the line. Recently I decided to give the brand a closer look. I ordered both of The Celestial Powders ($44 each for 3.1g/0.11 oz) in Starlight and Candlelight and The Sculpting Powder ($44 for 3.1g/0.11 oz) in Medium.
The Celestial Powders are small compacts of finely milled shimmery powders. Candlelight is a soft champagne color with a very smooth shimmer. In the pan it’s neutral and almost has a slight yellow/gold tinge. On my olive/medium skin it pulls more cool-toned. The shimmer is apparent but very natural. It does give a lovely glow and I know it’s reached cult status for many. For me it makes a lovely highlight and also can double as a shadow, but my heart still belongs to Hourglass Luminous Light as my favorite for a light powder highlighter. I favor the Hourglass because it glows more and the color is more luminous on my specific skin tone. If you want a cooler-toned or neutral champagne highlighter that glows but won’t emphasize pores and is on the subtle side, this is a good option.
above, Candlelight
_______________
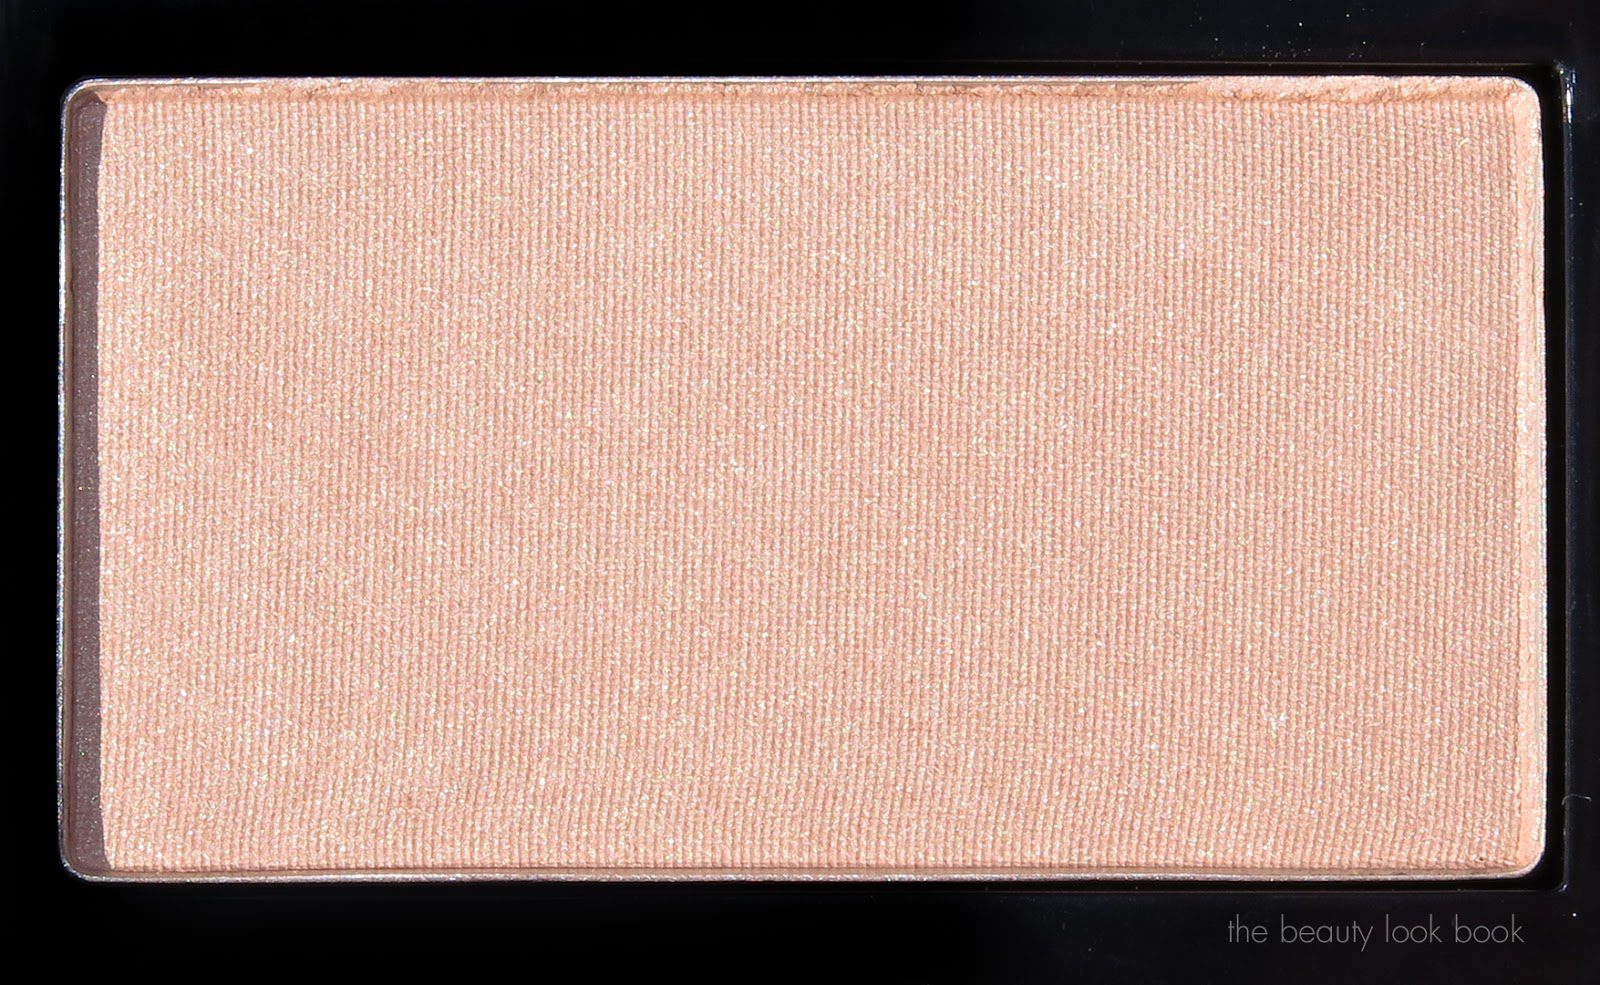
The Celestial Powder in Starlight is a soft warm pink highlighter with a medium level shimmer. On me this one has more visible shimmer and frost on the skin but the color is darker than your traditional highlighter. It has a lovely medium but soft pink base mixed with a hint of silver sheen. This one is just so beautiful on the skin. I don’t think I have anything like it. It’s hard to find a light to medium pink shimmer that isn’t too dark or light. The shimmer in this one is more visible but not frosty.
above, Starlight
_______________
The Sculpting Powder in Medium has been one of the most-raved about contouring powders. I am not a contouring kind of person. I think the contouring process can result in really good photographs but in person/real life I find it often looks overdone and fake. That being said I am all for a subtle contour that looks natural. Medium is a medium color that is a neutral grey/taupe/tan. There’s no orange undertone and no shimmer. It’s pulls neutral-cool and is very finely milled. On my skin it blended beautifully with a very soft but layerable texture. The only problem for me is that I found it too grey and too brown. For contouring I need something softer or warmer, but I think I’m in the minority – I know many prefer the opposite wanting something cooler with good pigment.
above, Medium
_______________
Some comparisons below to some other shades for reference:
After testing these products I feel all three are very good and of high quality. The powders are smooth and blend nicely on the skin without streaking of fall out. The texture melds beautifully with the natural skin texture and they lasted all day without fading. I also found that the three powders photograph phenomenally well especially with a flash. In real life however, I found The Celestial Powder in Candlelight and The Sculpting Powder in Medium didn’t fit what I was looking for, mainly because of how these worked with my skin tone. Candlelight is a bit too cool for me, Medium is a bit too dark and brown for my medium/olive Chanel B30/Tom Ford Bisque 04 skin. The price of these powders is on the steep side for the amount of product given. I think Starlight is worth the price tag for the unique color and formula. For the others, I’m not so sure.
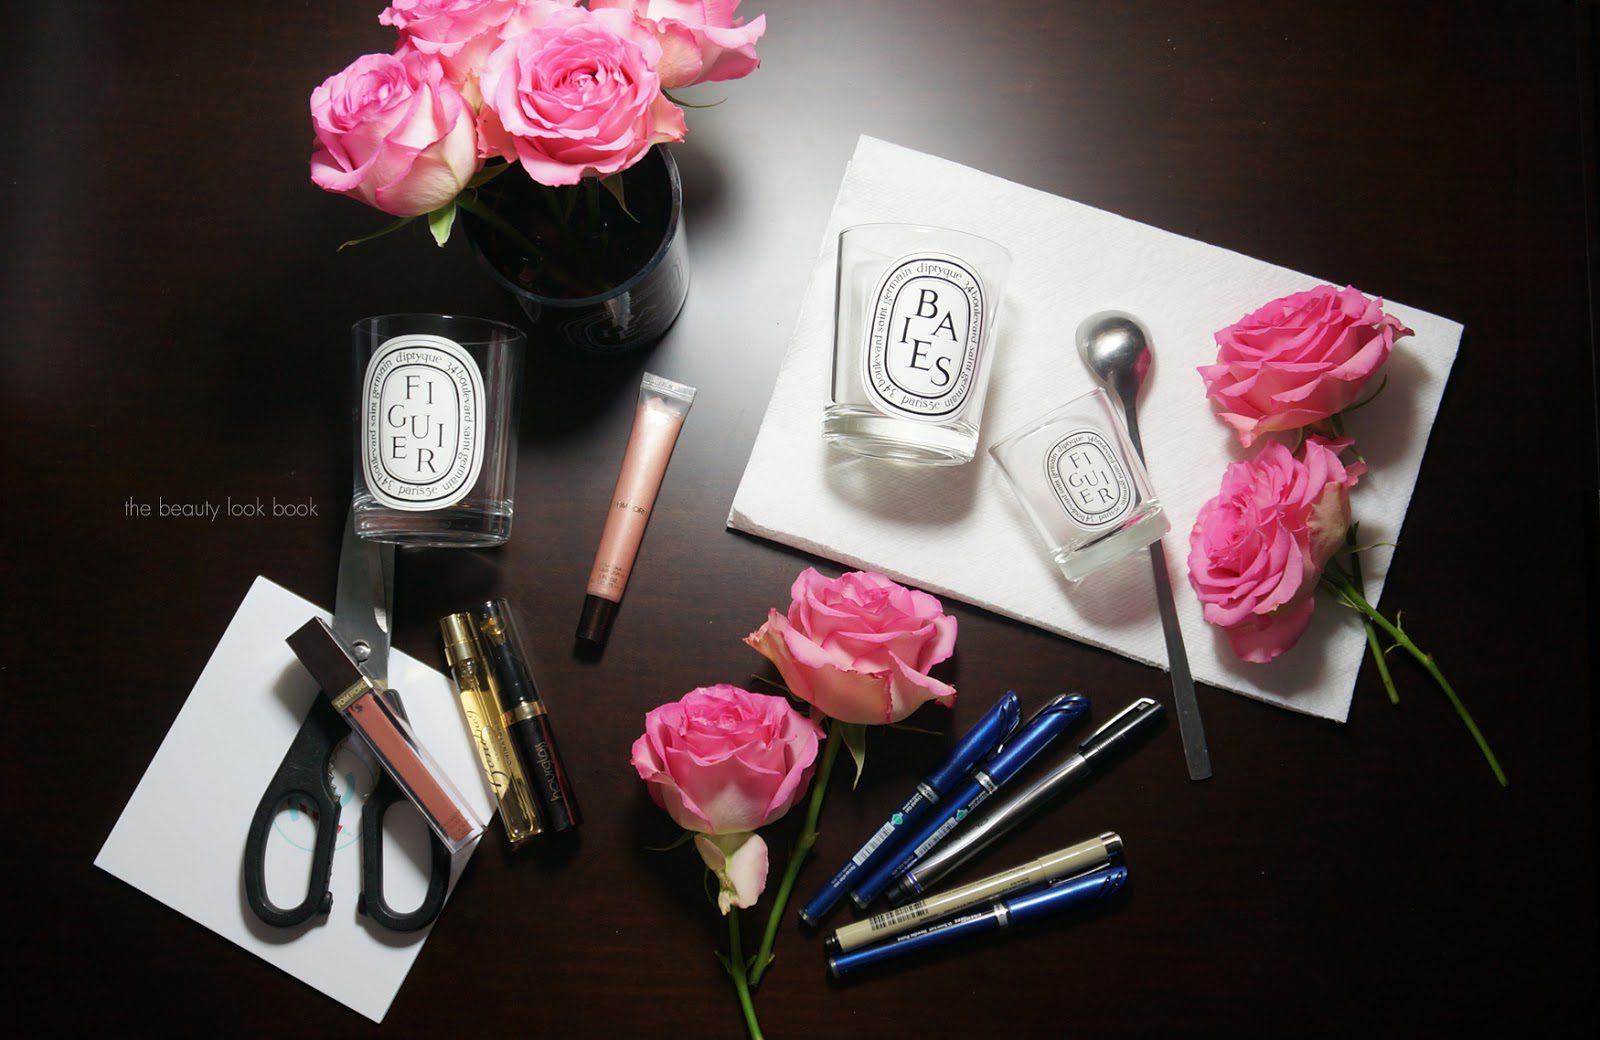
I’ve received a number of questions on candle care so today I’m sharing some simple tips on how I burn and care for your candles. Once you own a luxury candle you will want to burn it and care for it properly in order to get the most out of it’s life. I’ve burned quite a few candles in the past few years and didn’t realize until recently that I was burning some of my candles incorrectly.
____________________________________
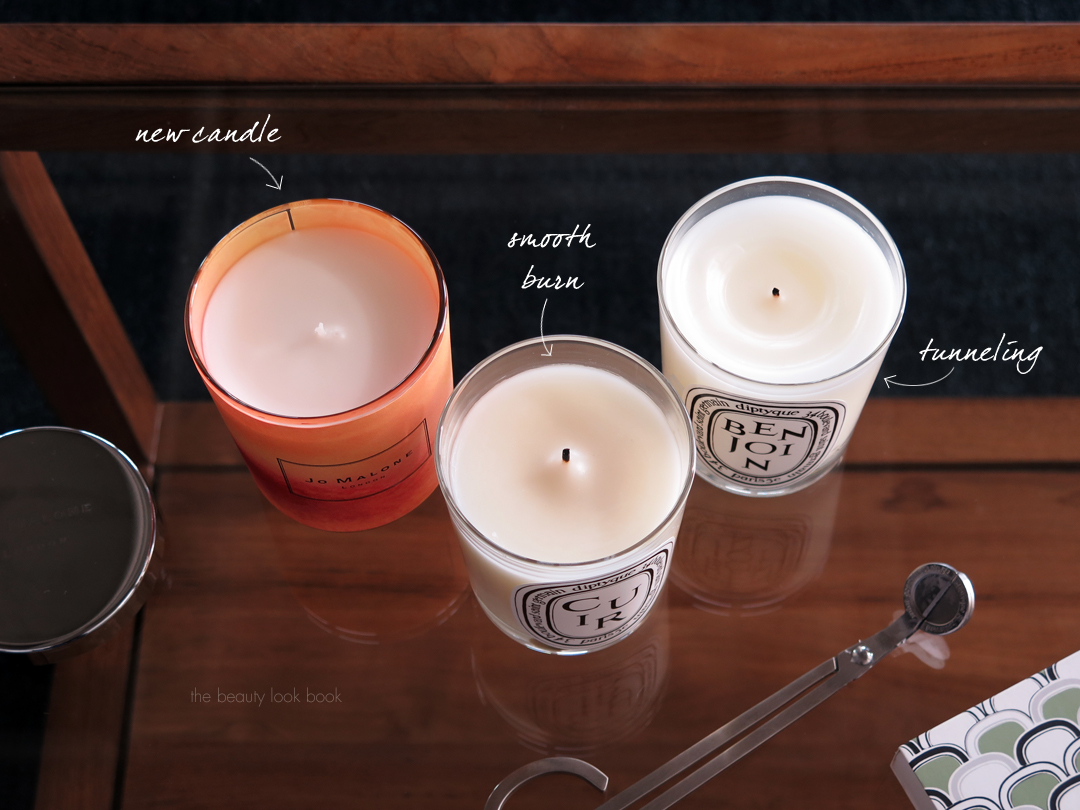
Question 1: Some of my candles don’t burn evenly and tunnel. How do you prevent this?
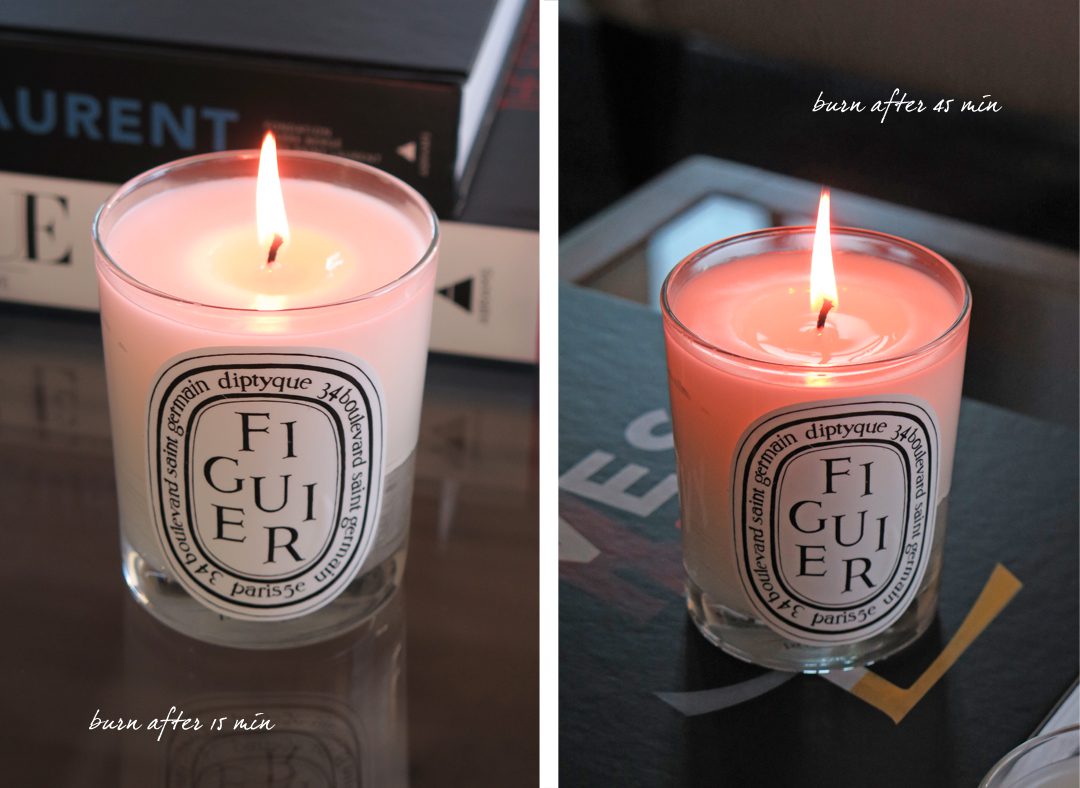
I just recently discovered the phrase “candle tunneling” which refers to an uneven burn where the wax of the candle near the center/wick melts but the edges do not. Some of my candles haven’ burned all the way to the edge for a smooth flat burn while others have – I did not know what caused this. I just found out at a recent trip to a Diptyque store that the first burn is extremely important to prevent tunneling. The reps at the store said that you want to make sure the first time you burn the candle you want to let it burn long enough to melt the entire surface of the candle which can take several hours. Depending on the size of the candle, they recommended about 1 hour per inch in diameter. I thought 30 minutes of burn time would be sufficient to melt the surface of my standard Diptyque candles so I timed it at a few intervals. At 45 minutes the surface was nowhere near being completely melted.
It took a full three hours for the surface of my standard size Diptyque candle to melt and liquify completely and evenly on the surface for the first burn. Jo Malone 7.0 oz candles and Diptyque 6.5 oz candles are very similar in size, after testing the timing for the initial burn, I found they both took about the same time for the surface to melt. Below is a Jo Malone Candle where the diameter is about 3 inches. So the 1 hour burn time per inch of diameter proved to be pretty accurate.
So what do you do if you burned the candle incorrectly the first couple of times? There are a lot of other resources online on how to fix it, but this depends on how deep the tunnel is. If the tunneling is minor I’ve been able to fix some of mine by burning for a few hours and scooping out the hard unmelted wax around the edges to even out the surface. Other recommendations on Scent Snob and Nouvelle Daily.
In addition to the first burn, to make sure you candle burns evenly, you also need to make sure the wick stays centered. It can migrate sometimes or burn at an angle. Use a sturdy object to re-center or straighten the wick – I’ve done this while the candle is burning with a small butter knife although I recommend you do this with caution to avoid burning yourself or anything else. It’s better to re-center the wick after you’ve blown out or snuffed the flame. Sometimes I’ll push the wick with the tip of scissors. Whatever you use, if you dip it in melted liquified wax, you’ll have to clean the item.
____________________________________
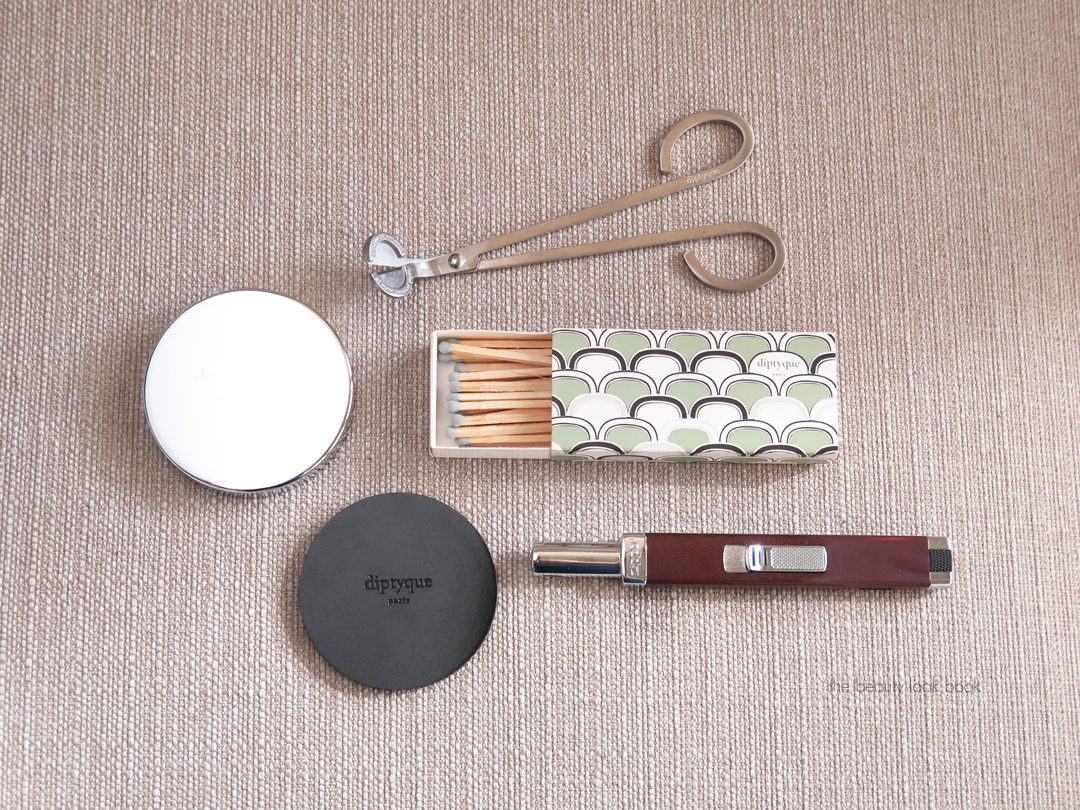
Question 2: Why invest in a wick trimmer? Can I just use my regular scissors?
Trimming the candle wick after they burn is important to prevent them from smoking on the next burn or from burning the sides of the glass. It’s commonly recommended that you trim them as short as possible without cutting them too short. I trim mine after they’ve cooled just in case I don’t catch the end of the trimmed wick. Sometimes I accidentally drop it into the candle and it ends up getting the melted wax very messy or sinks to the bottom of the liquified portion.On wick trimmers vs scissors, I find they both work, but it is nice to have a dedicated tool just for trimming wicks. It took me a long time before I splurged on a Diptyque wick trimmer but I’ve found it well worth the investment and I use it all the time. Now I no longer have to worry about getting my scissors dirty. They also double as a decorative accessory. Wick trimmers are more aesthetically pleasing than basic scissors and I can leave them laying on the coffee table or desk. Also because of the beveled tip it cuts the wick straight versus scissors which will cut the wick at a slant if you have to insert it into the jar and a angled cut wick won’t burn straight.
Most wick trimmers have a beveled tip which makes it easy to catch the trimmed wick. This is perfect for people like me who find it difficult to balance tiny things on small surfaces.
____________________________________
Question 3: Are accessories like lids or photophores really useful? Or worth it in general? What about candle snuffers?
Some candles come with their own lids. Henri Bendel Travel Candles and full-sized Jo Malone Candles come with lids. Diptyque carries candle lids you can purchase separately. I’ve received a couple Diptyque lids as gift with purchases before and also purchased several. I find that they work to keep out dust and debris and really help to keep the surfaces clean. Some have asked if it keeps the scent in the candle from fading – if you have input on this I’d be really happy to hear your thoughts. I have had several candles that I left open or in a box over 6 months and found they retained their scent and strength without a lid. With the lids that come from Diptyque, Jo Malone or Henri Bendel, they sit on top of the candle but it won’t seal them shut completely so air can still get in and out. I like my lids mainly to keep them clean and dust-free.
Photophores are decorative accents for me. They can be on the pricey side but I do think if you are willing to splurge on something to decorate your home these are very beautiful. I received one from Diptyque as a gift from my husband and really love it. Below is the Large Full Twist option.
One of the candle accessories I don’t own yet is a candle snuffer. I’ve looked at them numerous times at the stores but haven’t splurged yet.
____________________________________
Question 4: How do you clean out the wax from the interior to recycle your candles?
If you google how to recycle or clean out candles, you will find a number of different methods. I’ve shared my personal candle recycling tips before. I don’t always get a completely clean burn and there is often remnants of wax on the sides so the freezer method doesn’t work for me. I don’t like using really hot water because it can impact the stickers on the sides of the jars. I like to use the warm water + dish soap with paper towels or a sponge to soften the wax and clean the interior.
____________________________________
Question 5: What are your all time favorite candles?
I’ve purchased quite a few different candles, each time I go to a Diptyque store or visit Henri Bendel I discover something new. Personal favorites change depending on time of year. My most frequently repurchased candles include:
I also really like Frederic Malle, Byredo and Lumira candles as well, but for me they are harder to find so I don’t purchase them as frequently as I would like to.
I hope you found this candle care post helpful! If you have any tips you’d like to share please do so in the comments! What are your favorite candles or scents?
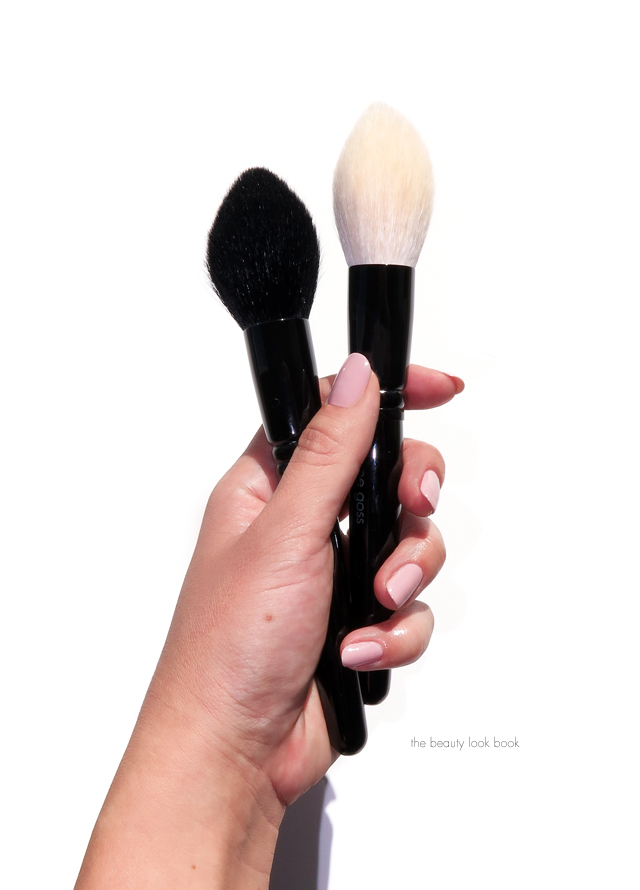
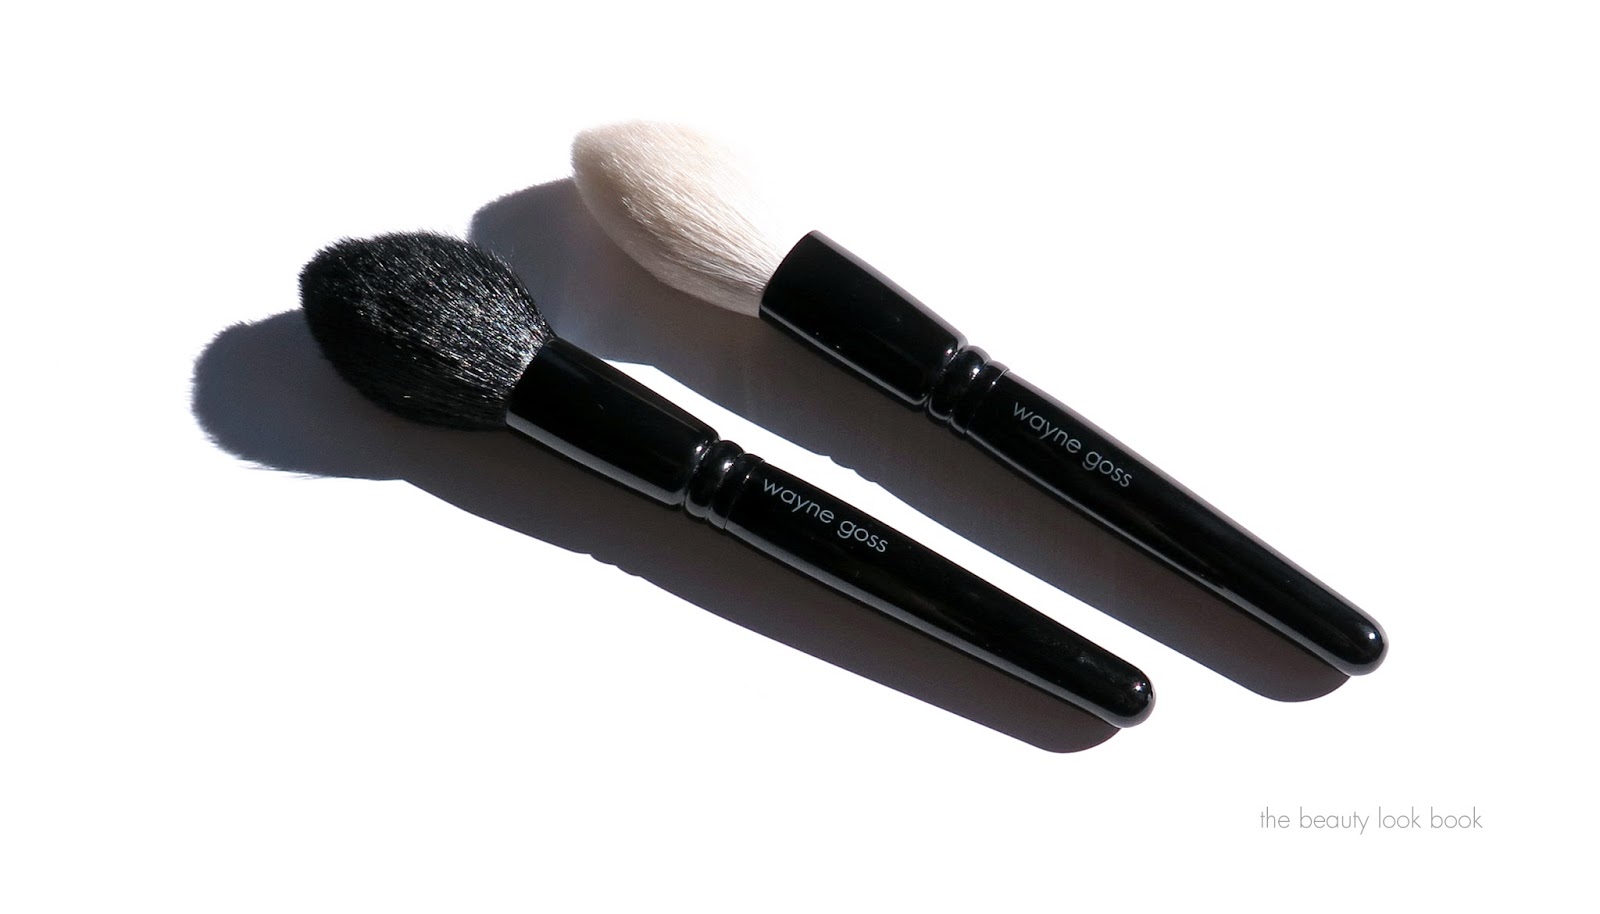
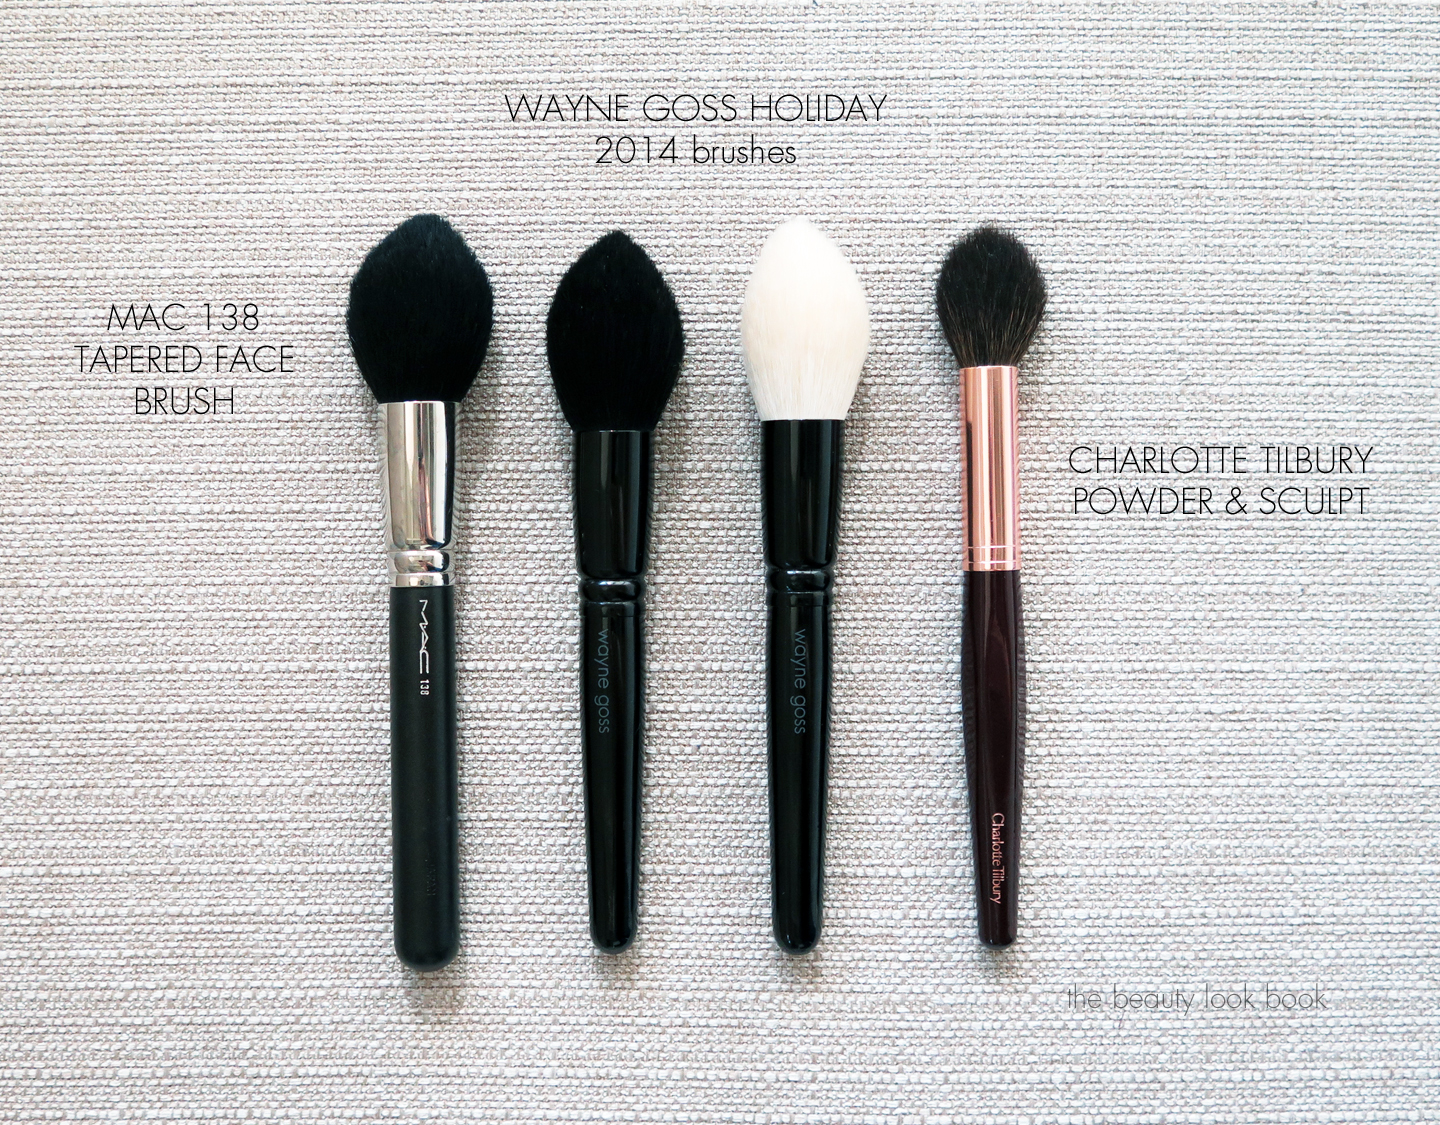
I’m late to the game with the Wayne Goss Holiday Brushes in White and Black ($85 each, limited-edition) but I am really happy I was able to get both as they were produced in limited quantities for last holiday (the white one is already sold out). These are exclusive to Beautylish and although I almost always purchase brushes I can see and touch in person, I made an exception and ordered them sight unseen after seeing it featured on @raeview’s Instagram (also featured on her December Hits/Misses video). I’m so glad that I did.
This year he released a Black and White version:
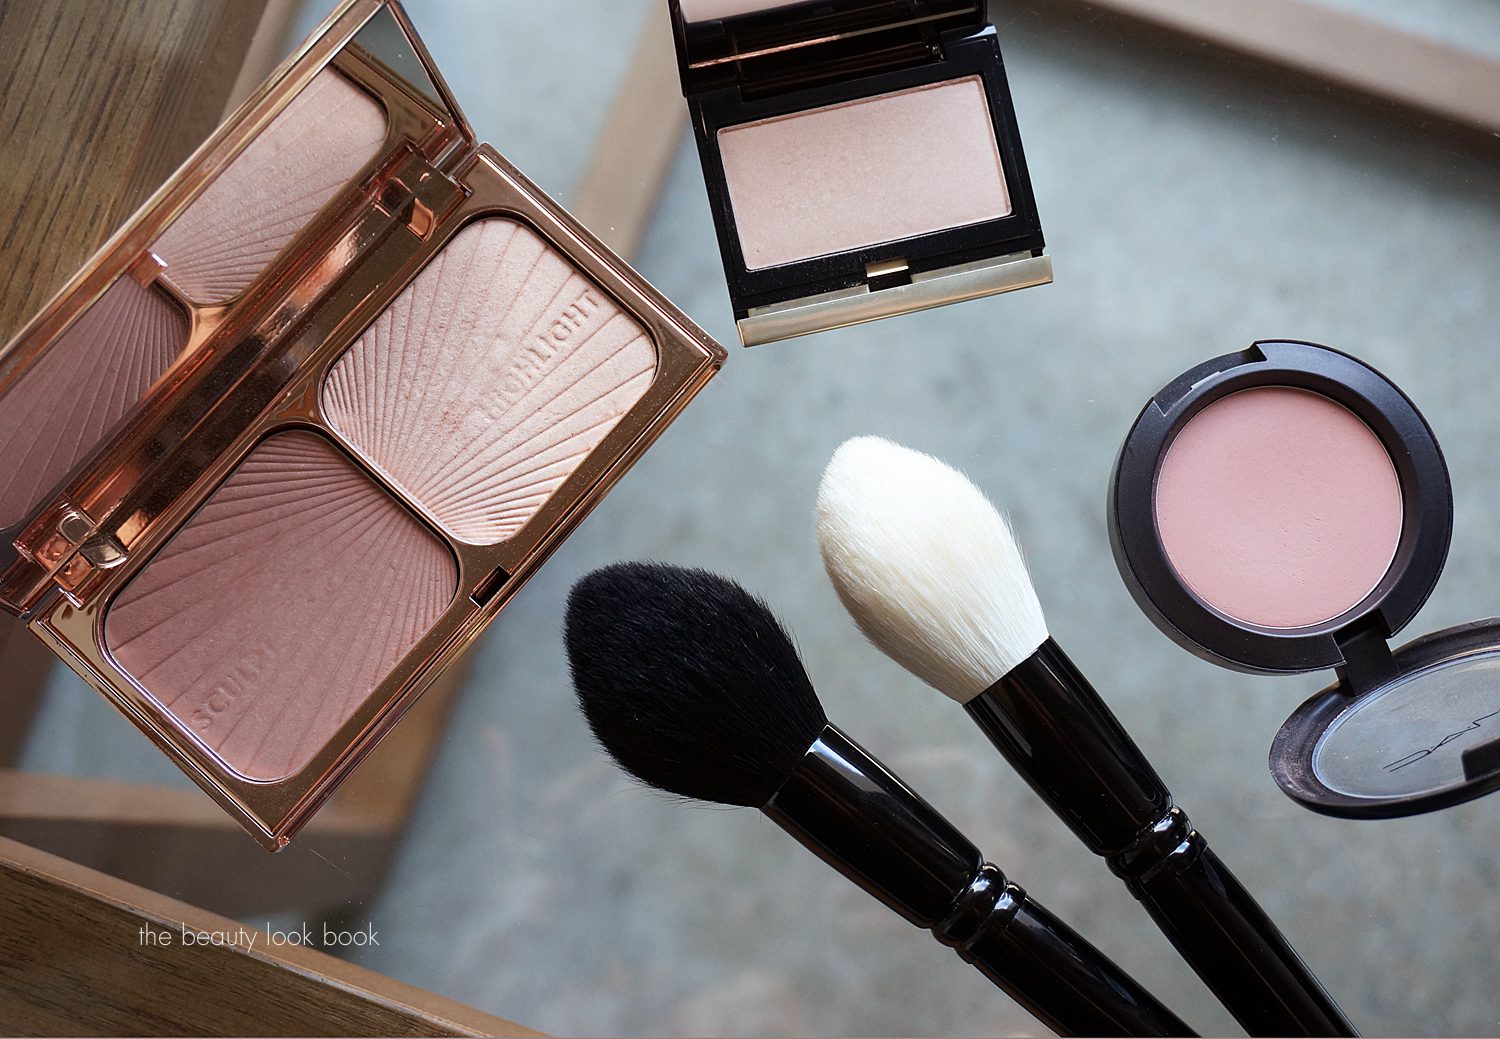
The Wayne Goss Holiday Brush is a large tapered powder brush. It’s dense, fluffy and ultra soft. All of his brushes are all hand made (cruelty free) and none of the hairs are cut – the two holiday brushes are the first that I’ve tried from his line for face brushes and I am really impressed. They both pick up just the right amount of product with just one or two swipes. I’ve tested it on pressed setting powder, bronzer, highlighter and blushes. The tapered shape makes it extremely versatile for all sort of powder face makeup. I really like these for blush and bronzer.
For me, it’s been challenging to find a brush with this particular shape and size – most tapered brushes I’ve seen are quite a bit smaller. The MAC 138 is similar in size and density but the ones designed by Wayne Goss by comparison are much softer in texture and feel like silk on the skin. In my entire brush collection, my Tom Ford brushes are the softest that I own. These holiday brushes from Wayne Goss are just as soft.
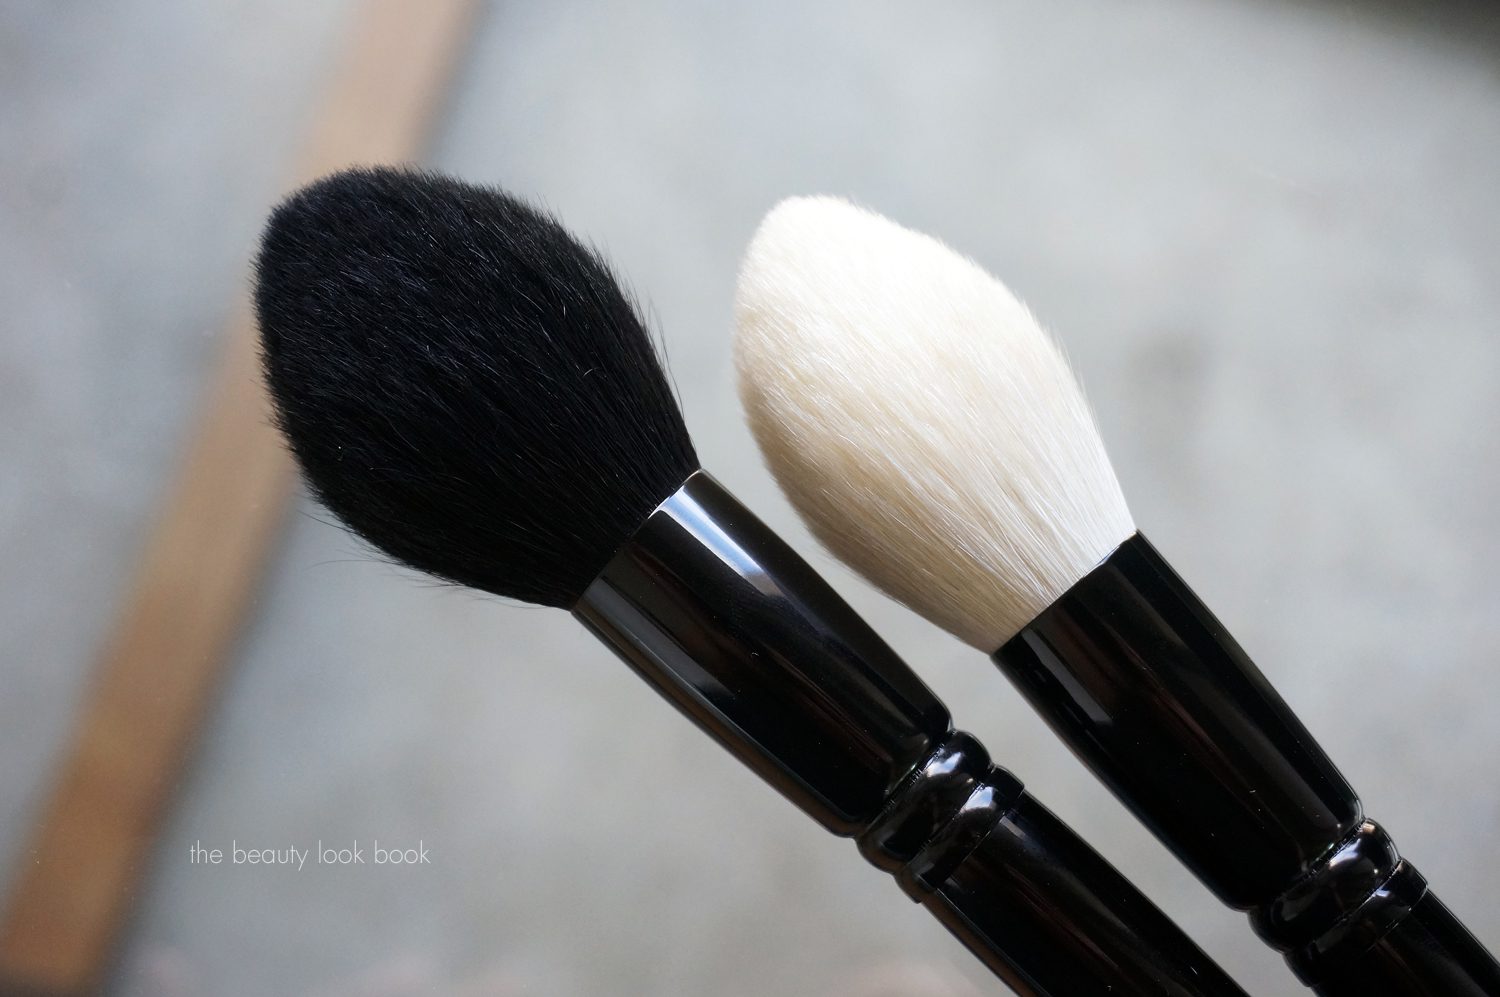
For my testing, the Black Holiday brush has gone through two washings already. It does fluff up a little bit after the first wash but it still retains its shape. I photographed it next to an unwashed/unused white one before I tried it. For me there was no shedding or color bleeding with the first or second wash.
If you’re crying over the fact that the White Holiday brush is sold out, I found both the White and Black versions to be identical in texture, density, softness and performance. I would still be crying if I didn’t get the white version since I have a soft spot for white fluffy brushes, but they are both identical and I probably didn’t need both. That being said I am really happy I have both, I’ve found them both to be very gentle on the skin and effective at pickup up product and giving you a super smooth and even makeup application with powders, bronzers and blushes. For me they are both worth every penny even though the price is on the steep side. They are well made and very good quality.
If you haven’t checked out the Wayne Goss Holiday Brush, I highly recommend you do soon. It’s limited-edition and exclusive to Beautylish. Have you tried any of the brushes from Wayne Goss? What are your favorites?
I’m officially one week into my 28-day long take-down challenge / workout bootcamp and I’m going through major cookie, cupcake and candy withdrawals but overall feeling good by eating healthier. It’s really difficult to resist the unhealthy foods – all I can think about is Sprinkles Cupcakes. I’ve been successful in sticking to the meal plans so far but if you have any diet tips I’d love to hear them. This weekend I went through a substantial stack of magazines but only found a few really inspiring. Glamour always has interesting articles and topics I feel like I can relate to. Do you still read print magazines? Which ones are your favorites?
What are you loving right now? P.S, I’m behind on responding to a lot of e-mails from readers but here’s a quick thank you for some of your kind notes over the last week. I was really touched by some of the e-mails I received, I hope to get caught up with responses very soon, hoping today!
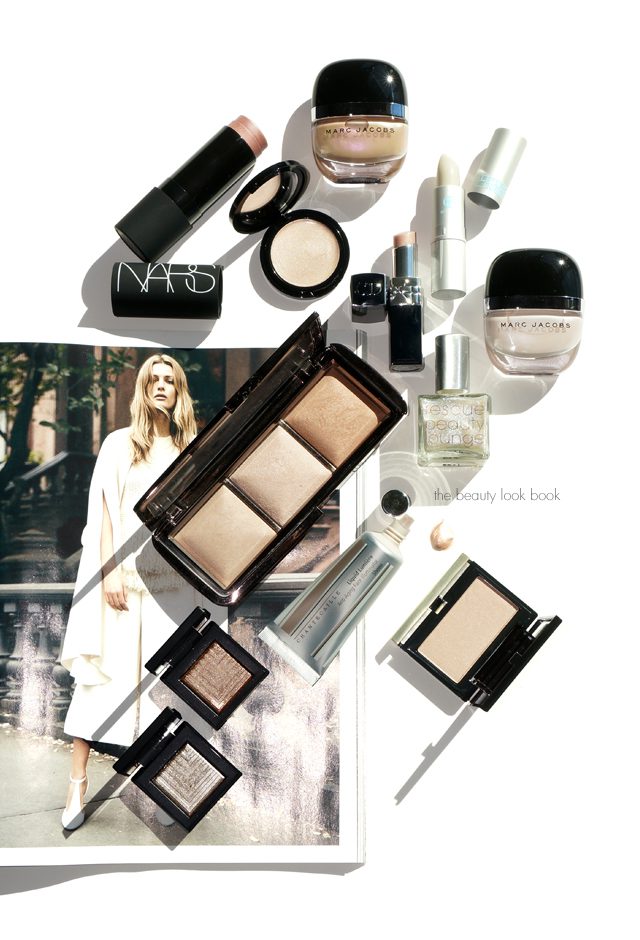
This time of year my skin feels like it lacks natural luster so I rely on illuminators and soft nude shimmers to fake that glow-from-within. Today I’m sharing my favorite go-to’s along with thoughts on a few new items I’ve been testing to get that soft glow. Picks include items for nails, lips, cheeks and eyes. When it comes to shimmers I like to mix them in for one to two areas of the face with color rather than wear champagne shimmers all over the face, otherwise it’s just too much. I like using these as a cheekbone or very soft brow bone highlight too in order to add dimension.
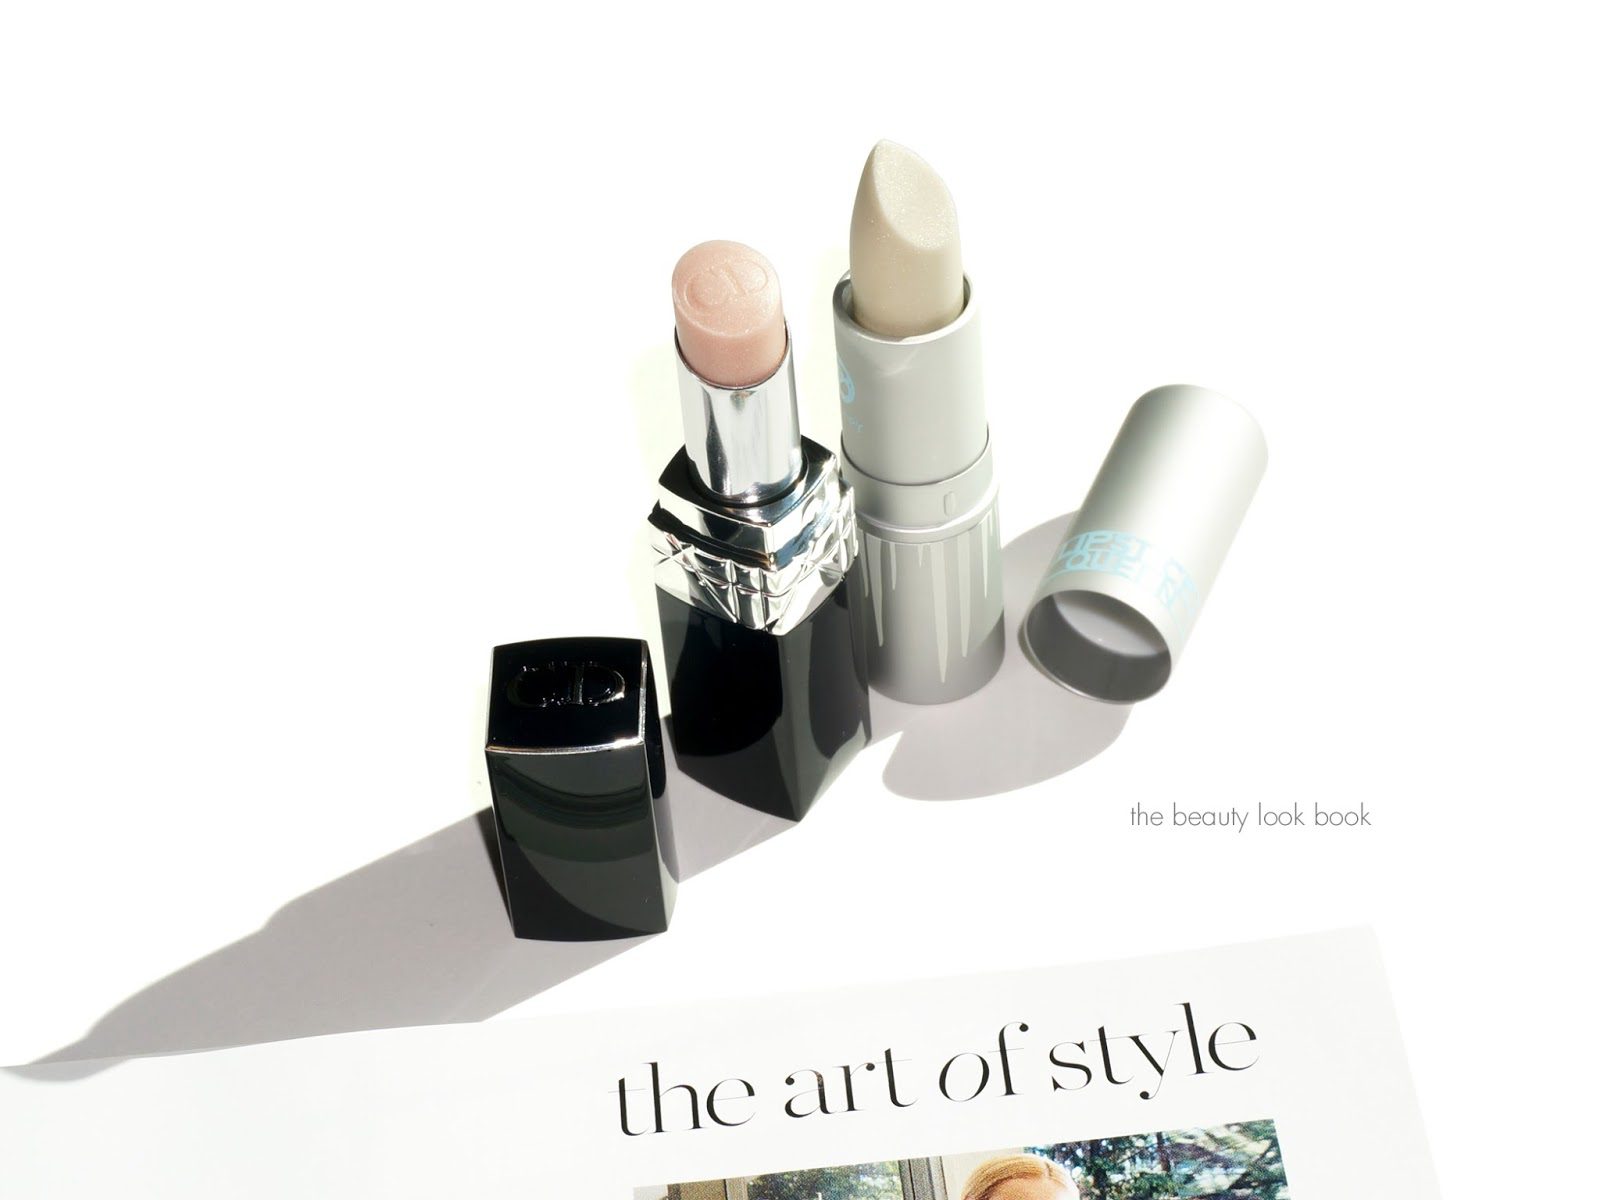
First up are pale shimmers for the lips. I am always a huge fan of those soft pale shimmers for the lips but can’t always pull them off easily. I have medium pigmented lips with olive skin so often times pale shimmers make me feel like I have white lips. Two I’ve discovered that work for my lips include Rouge Dior Baume in Star and Lipstick Queen Ice Queen. Both have that lovely translucent quality with multidimensional shimmer to prevent these from looking too frosted.
Both look similar in photographs on my lips but I think they are different enough to justify both. The Rouge Dior Baume in Star has a cooler-toned quality and is sheerer. Lipstick Queen Ice Queen looks lighter in the photos but it has a higher level of frost which reflects more. It has a mix of silver and gold particles which makes it a good layering lipstick. I have a slight preference for the Lipstick Queen because the shimmering quality is really pretty. If you are anti-shimmer for lips, you may find it too frosty.
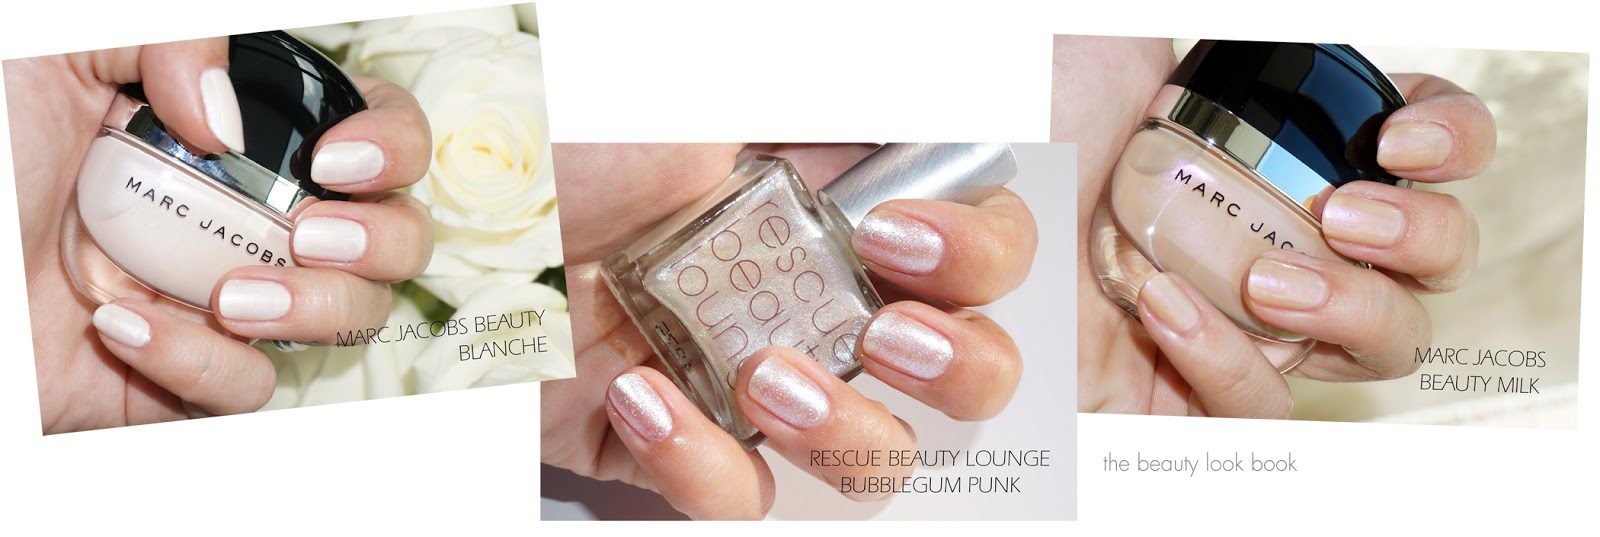
For the nails, I’ve been obsessed with Rescue Beauty Lounge Bubblegum Punk for a fun multi-colored shimmer frost. It has an ultra smooth finish even though it’s on the sparkly side. I can never resist pale shimmers for nails, but some are hard to work with if they are frosts. Marc Jacobs Beauty has released two new Hi-Shine Enamored Nail Polishes. Blanche was released last fall. It’s a metallic soft white which I found took some extra effort to make work. Being a metallic I found brush strokes visible with two coats, but they disappeared a bit with the third coat. I have yet to find a good white shimmer that is streak-free. This one is pretty good if you are patient. Milk is a new addition to their Runway Shades. This is an iridescent beige that flashes pink and opal. I adore these kinds of colors but I know some women find the colors like this difficult to work with on their skin tone (something about the beige makes the skin look sallow). Milk flashes enough iridescent shimmer to prevent the beige base from dominating. I find it very wearable.
For highlighting, there are a number of multi-tasking products for eyes and cheeks. I love a good shimmer that gives a glow without looking frosty. I know everyone has different preferences for what degree of shimmer they are comfortable wearing so I’ll give a summary ranking of what I think is the most subtle to the most frosted.
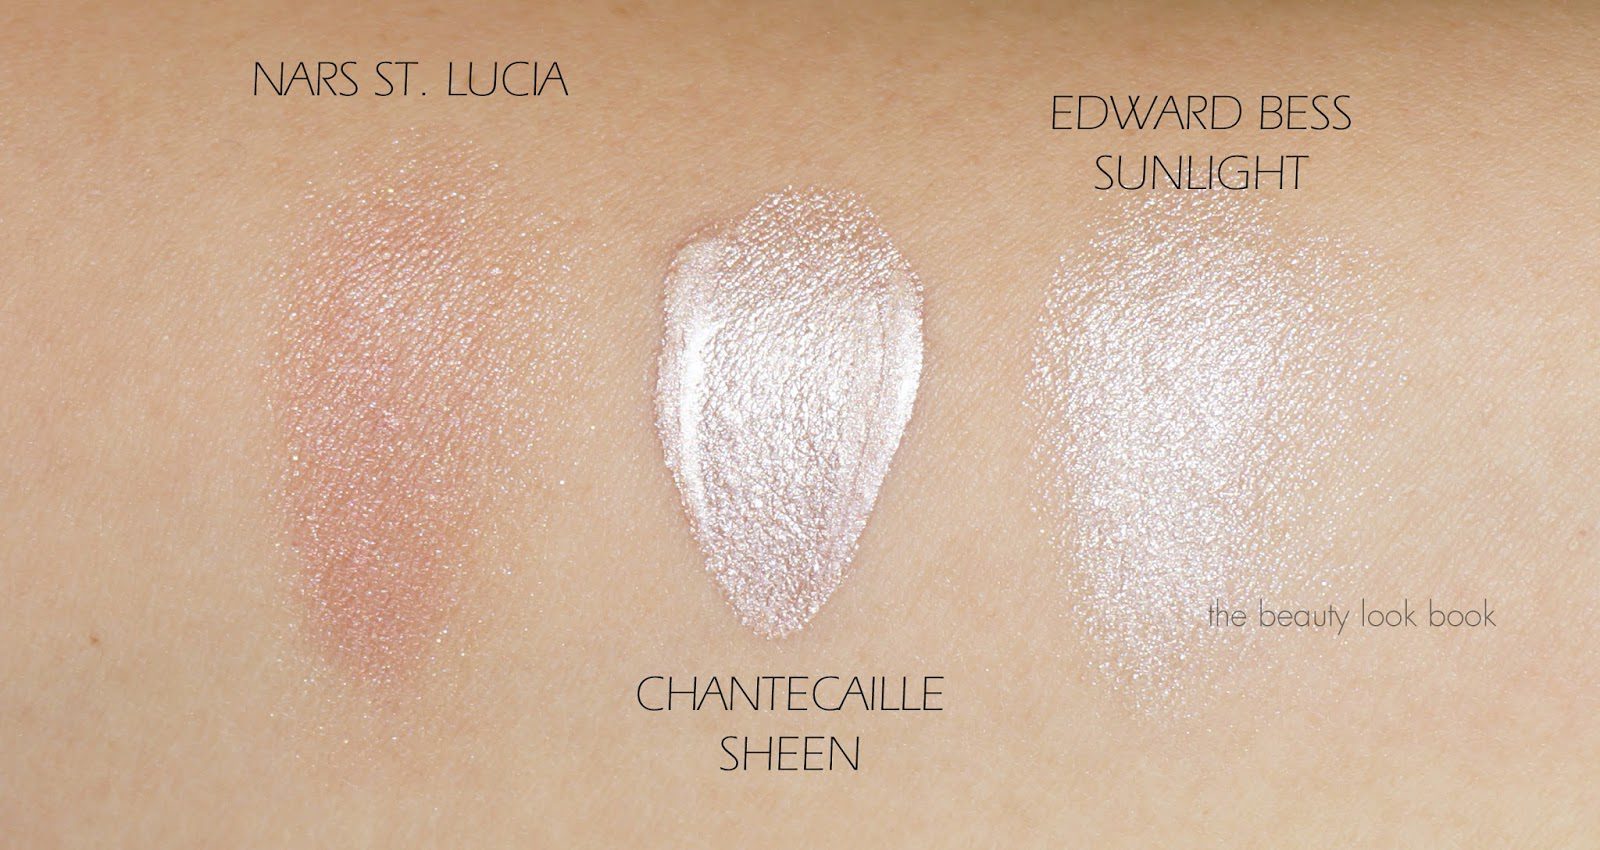
First up are creamy ones. NARS St. Lucia Multiple is the latest from NARS (currently a Nordstrom exclusive, available at all NARS counters in March, review here). It’s a multi-purpose creamy twist up stick. On me it gives a natural glowy soft pink highlight to the cheeks and eyes. On fairer skins this will probably give you more color and look more blush-like.
My holy grail cream highlighter is Edward Bess All Over Seduction. He has two shades, Sunlight is the paler one (shown below) and Afterglow is a bronzey version. Both are incredibly natural and glowy. The texture blends in beautifully with the skin and the shimmer is finely milled. If you’re afraid of shimmer I highly recommend you check these out because it’s impossible to overdo and looks amazing on everyone I’ve seen it applied on.
One of the newest illuminators I’ve been testing is the Chantecaille Liquid Lumiere Anti-Aging Face Illuminator in Sheen (I received this as part of the Net-A-Porter holiday beauty box but it’s available separately). At first swipe I found the shimmer in this one to be on the high side but after playing with this I found it blended out to a soft smooth veil of shimmer. It does have more shimmer than Armani Fluid Sheers or the Edward Bess Sunlight but it is still very wearable. The pigment and shimmer is intense but it’s concentrated so you only need a tiny amount. A little goes a long way. If you’re one of those beauty lovers who is in search of a liquid highlighter that won’t disappear on the skin once you blend it this is a good one to look into. I’ve dabbed it on top of the cheekbones or eyes (after foundation/powder) and it doesn’t disrupt your makeup base. Check out the review on Best Things in Beauty to see how the colors look once blended properly.
For additional highlighters, my go-to powder highlighter is from Hourglass. The Ambient Lighting Palette (review here) goes with me on all trips. I use the full size versions at home and take this palette with me for on-the-go or on vacations. The palette came out after the individual ones were released, so I have some duplicate colors. If you’re new to these powders, I hands down say go for the palette. There is a good amount of product so it will last you a long time and it’s super convenient to use and carry with you.
I used to use the Kevyn Aucoin Celetial Powder in Candlelight a long time ago when it had the larger compact packaging. I liked it but didn’t love it. Several have recommended I check it out again claiming it reached holy grail status for them. I like the new compact packaging and the powder is lovely but I don’t love it. I find it a bit too pale for my medium-olive skin. That being said if you thought the Hourglass Luminous Light was too shimmery or glowy I recommend the Kevyn Aucoin Candlelight because it is a notch down in the shimmer intensity. If you prefer neutral to cool-toned highlighters then you will really like Candlelight. I have friends who are on the fair side (Chanel Beige 10 or MAC NC20) and they swear by this one.
Last but not least, I think the NARS Dual Intensity Eyeshadows in Himalia and Dione are the best shimmers on the market. It has a really good blendable cream texture. The shimmer/frost is high on this so your mileage may vary. Full review here. If you don’t have a lot of the colors you may want to check out the NARSissist Dual Intensity Eyeshadow Palette. I already own 5 of the 8 shades so I’m having a hard time justifying a purchase since it will result in a lot of dupes for me.
What do you like to use to get a nice glow in the winter time?
The Lipstick Queen Ice Queen, Hourglass Ambient Lighting Palette, Rescue Beauty Lounge Bubblegum Punk Nail Polish and Chantecaille Illuminator were provided as press samples for review consideration. All other items purchased by me.
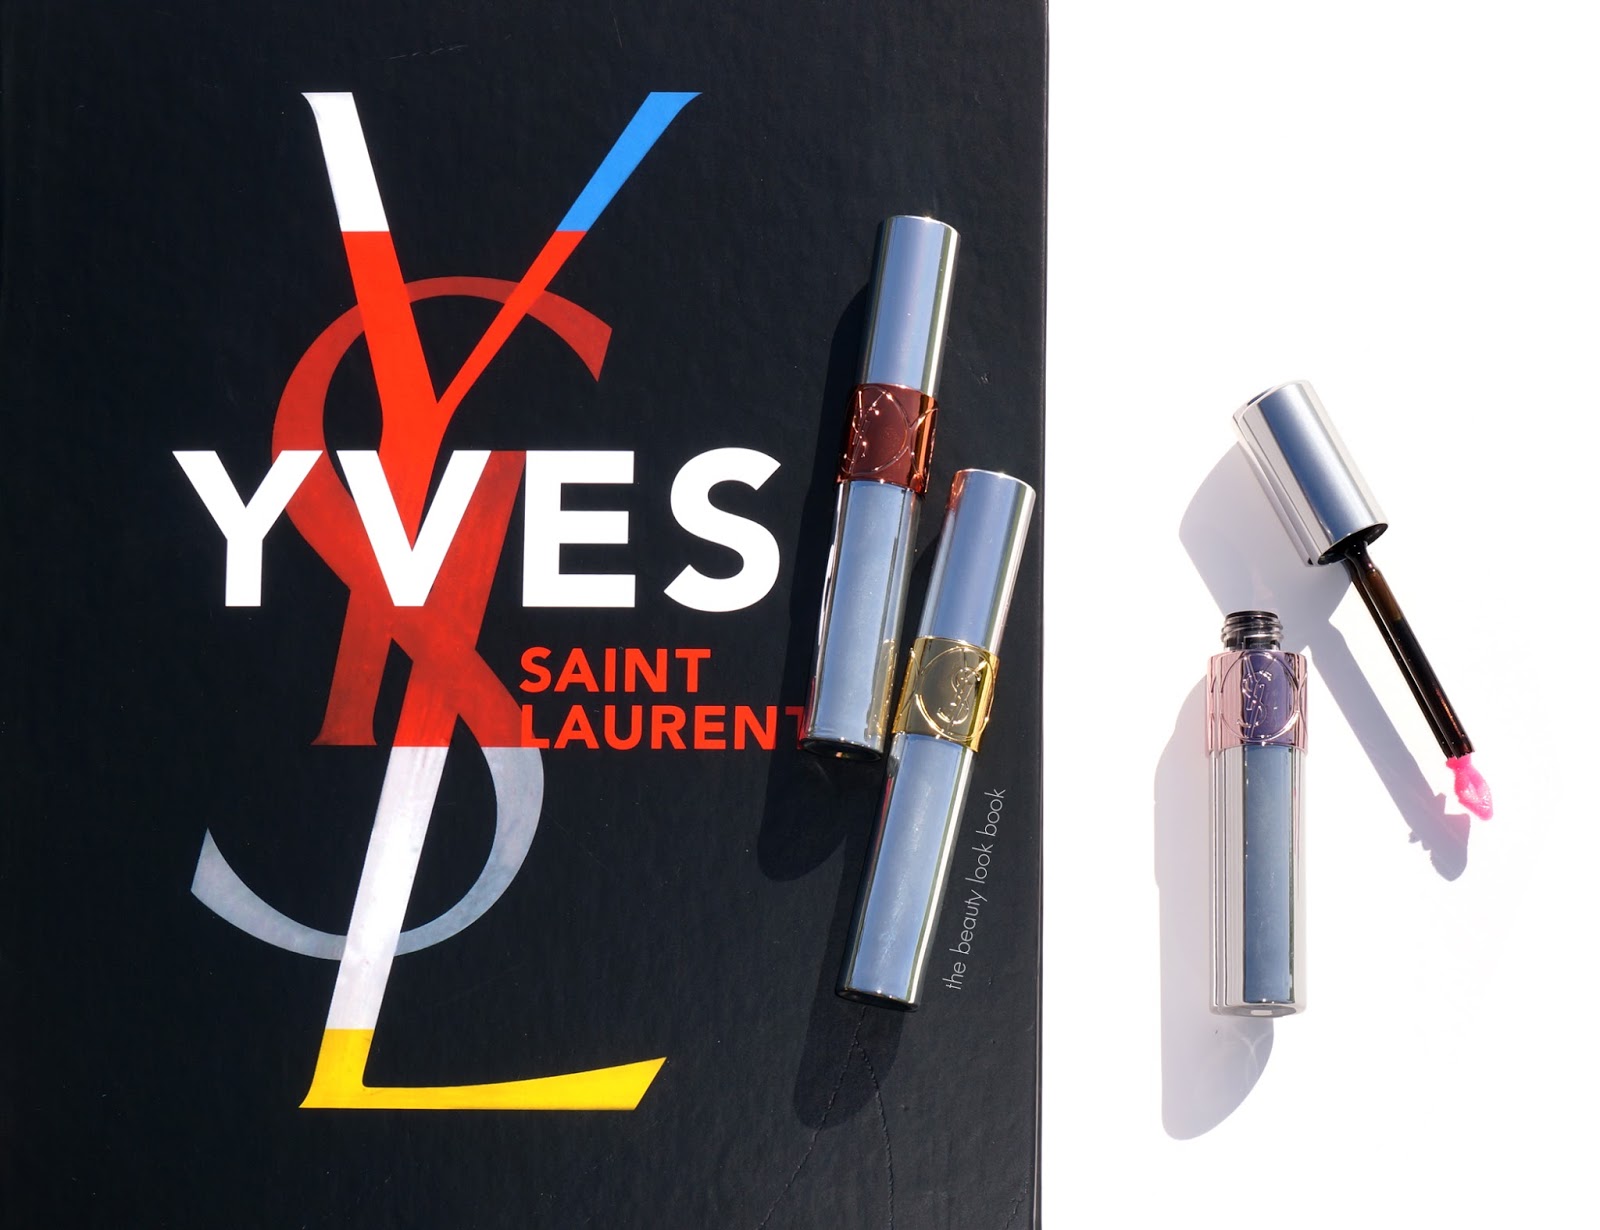
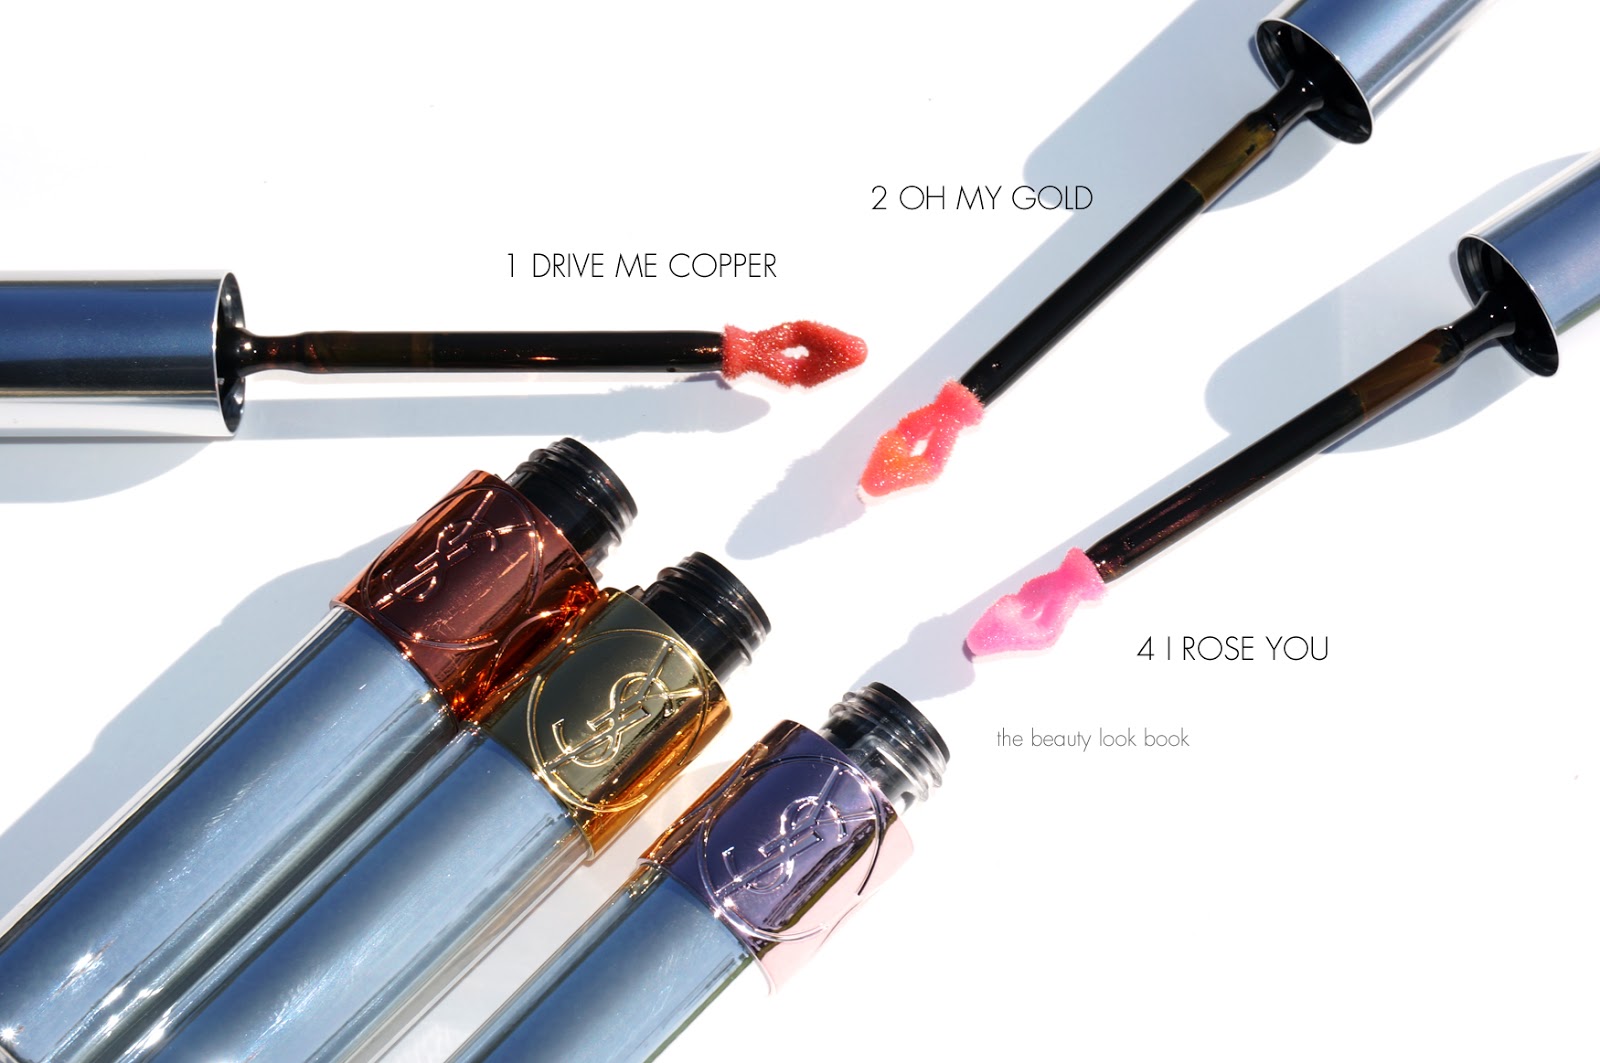
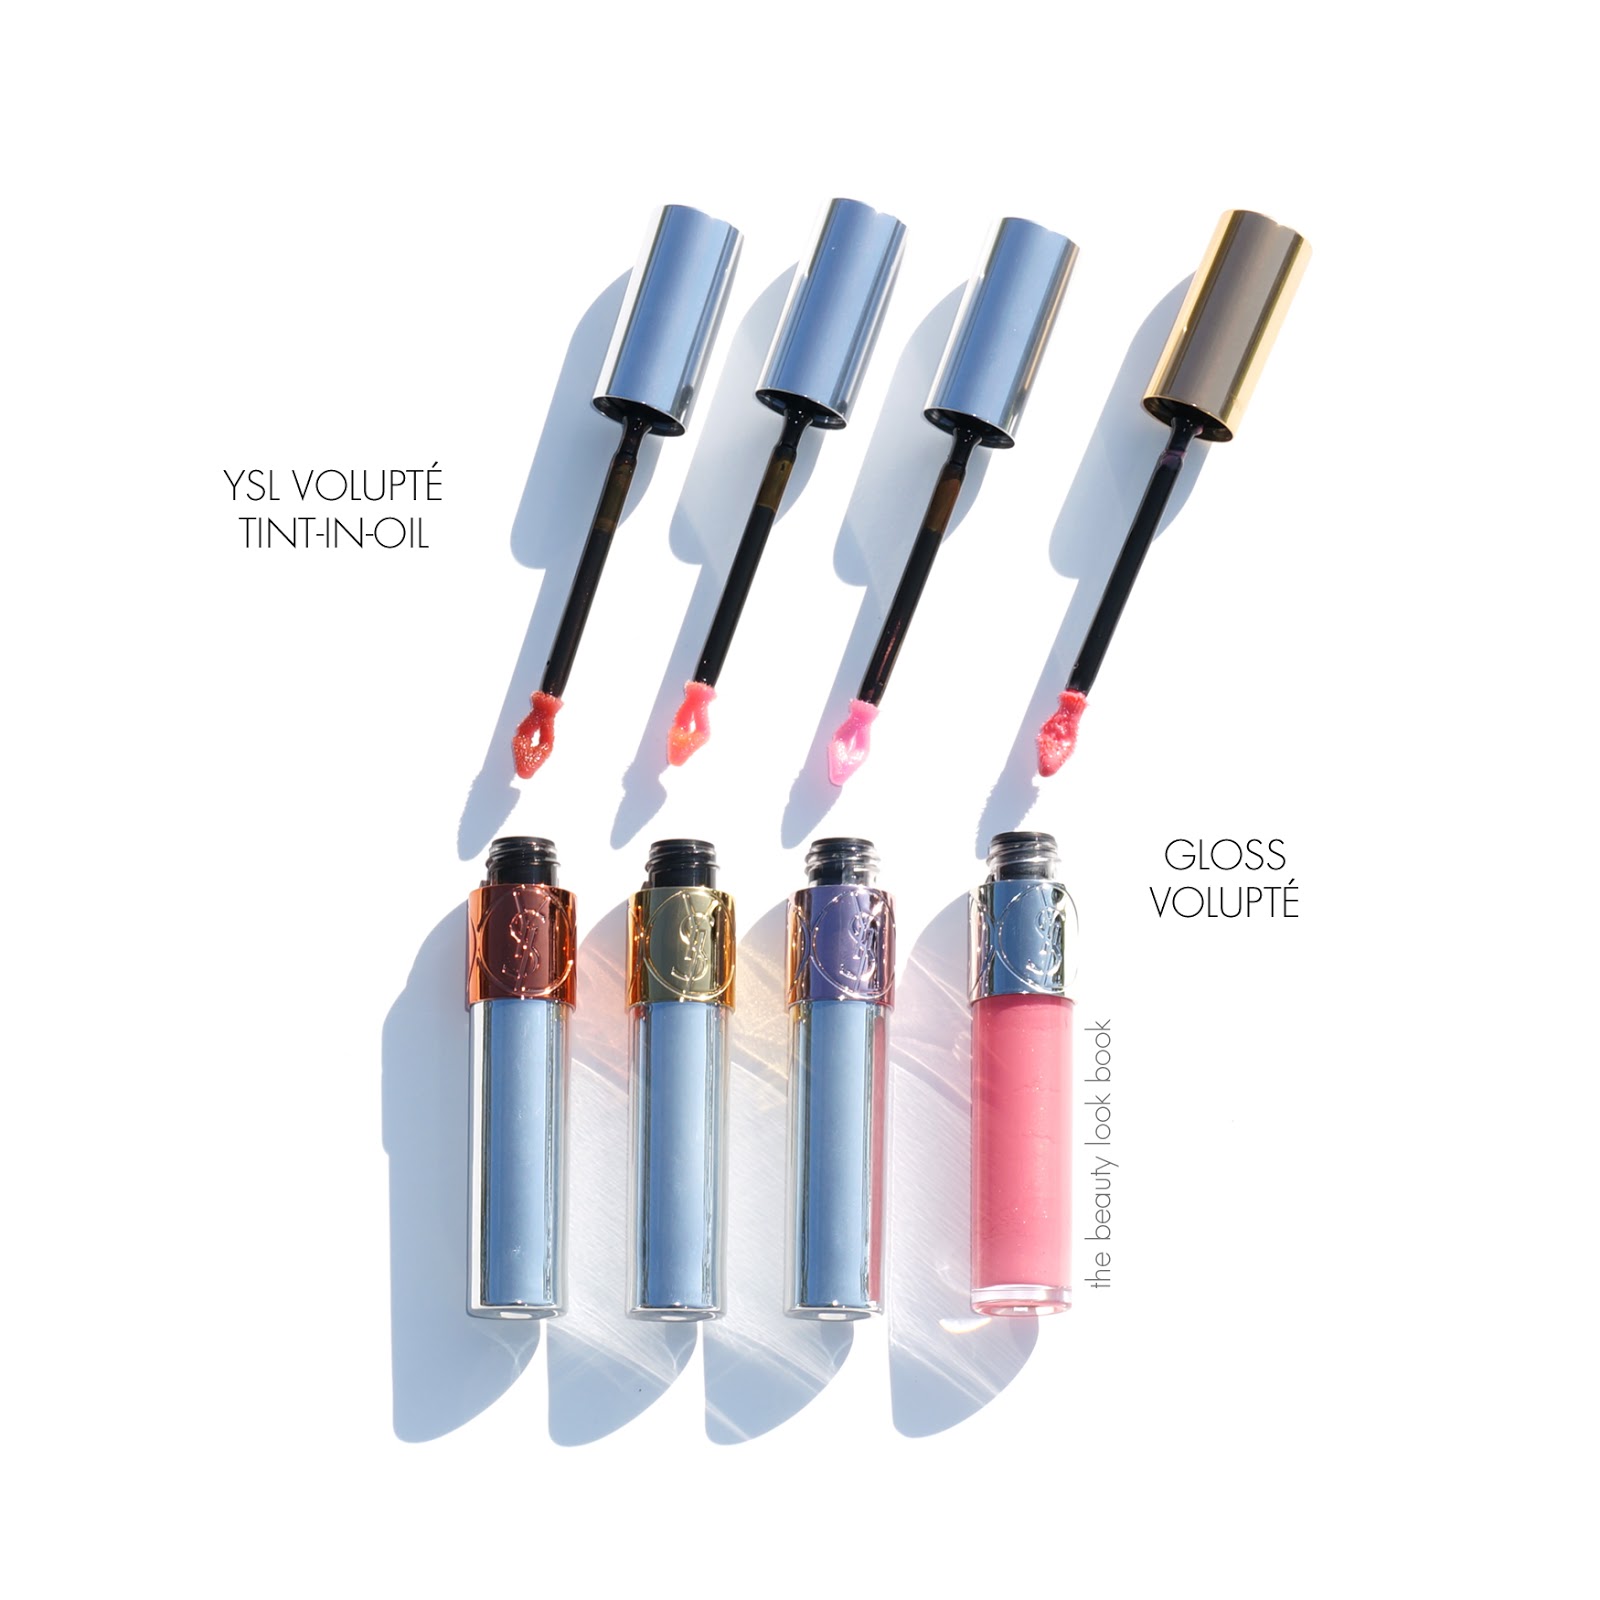
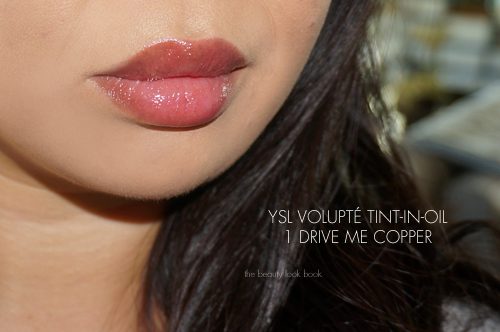
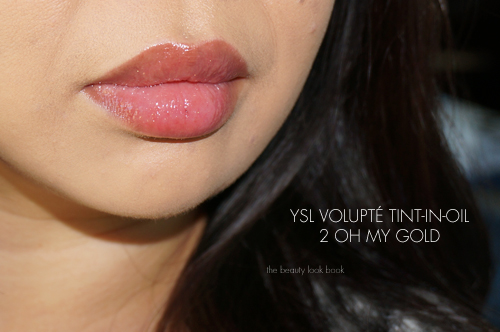
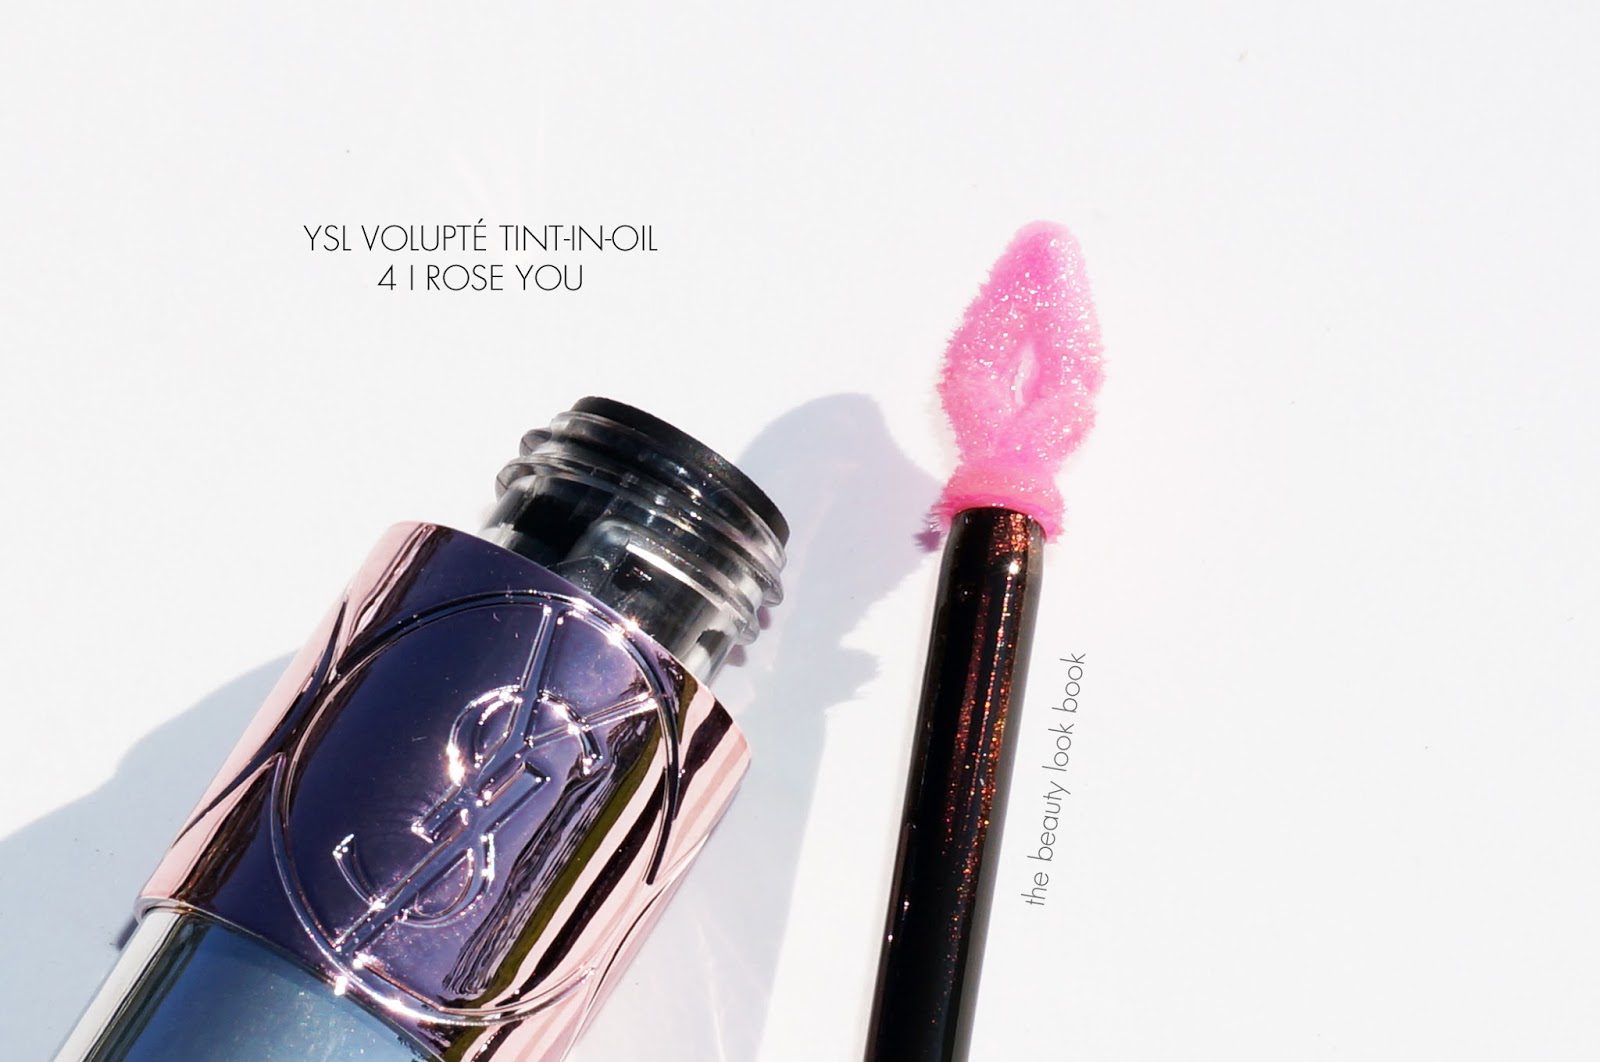
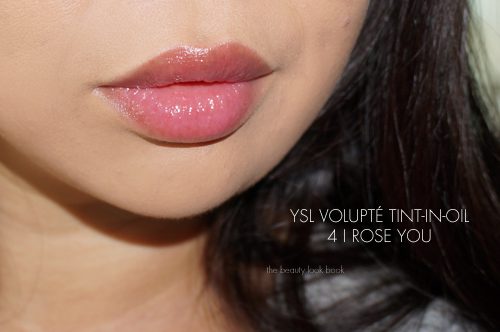
YSL’s latest in lips is the new Volupté Tint-In-Oil ($32 for 0.20 fl oz/6 ml) described as a “revolutionary lip color with a lip tint suspended in a deep conditioning oil.” I waited until I was able to see these in store to test them before buying any of these. I have pigmented lips and any kind of tint or stain for the lips tend to pull very bright or dark on my lips. The YSL Volupté Tint-In-Oils come in a range of light to bright colors. After swatching them on the hand I saw sheer veils of tint and shimmer suspended in oil/gloss. At first swipe they look clear but if you let them set on the hands you’ll see some color appear as they tint the skin. The brighter colors looked very wearable but I’m not a fan of putting store testers on my lips for sanitary reasons so I opted for three lighter shades to see how they would wear on my lips.
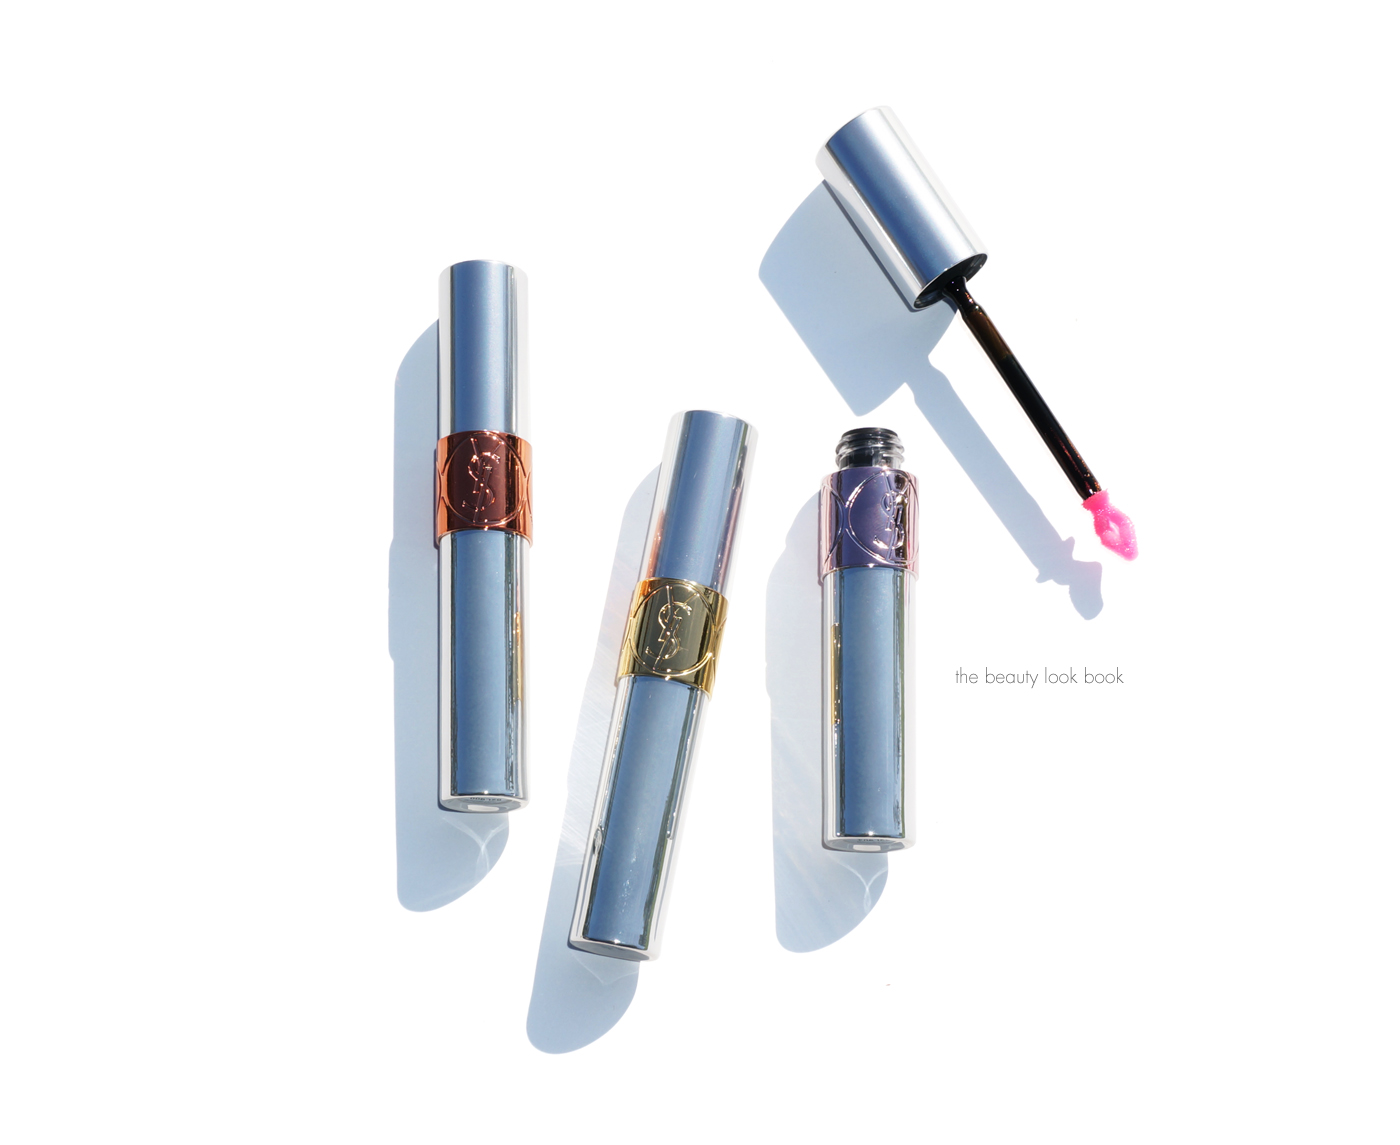
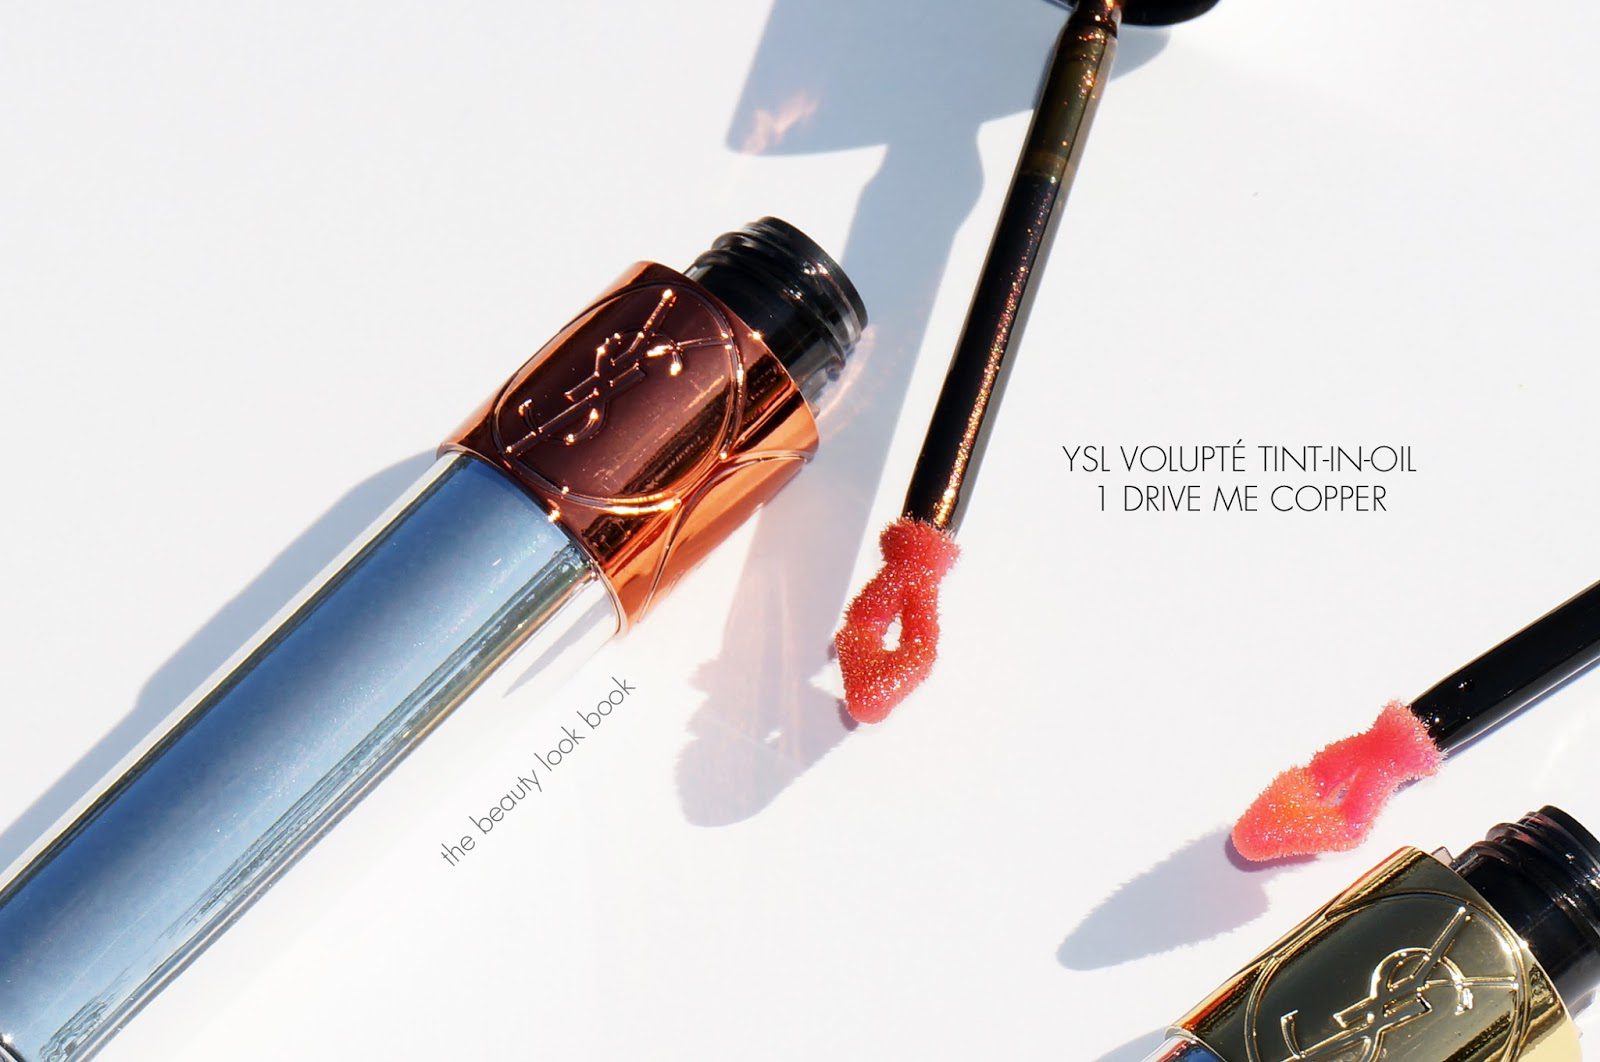
Drive Me Copper 1 is a sheer coppery gold shimmer suspended in gloss
Oh My Gold 2 is a lighter gold shimmer suspended in golden tinted gloss
I Rose You 4 is a soft light rose pink shimmer
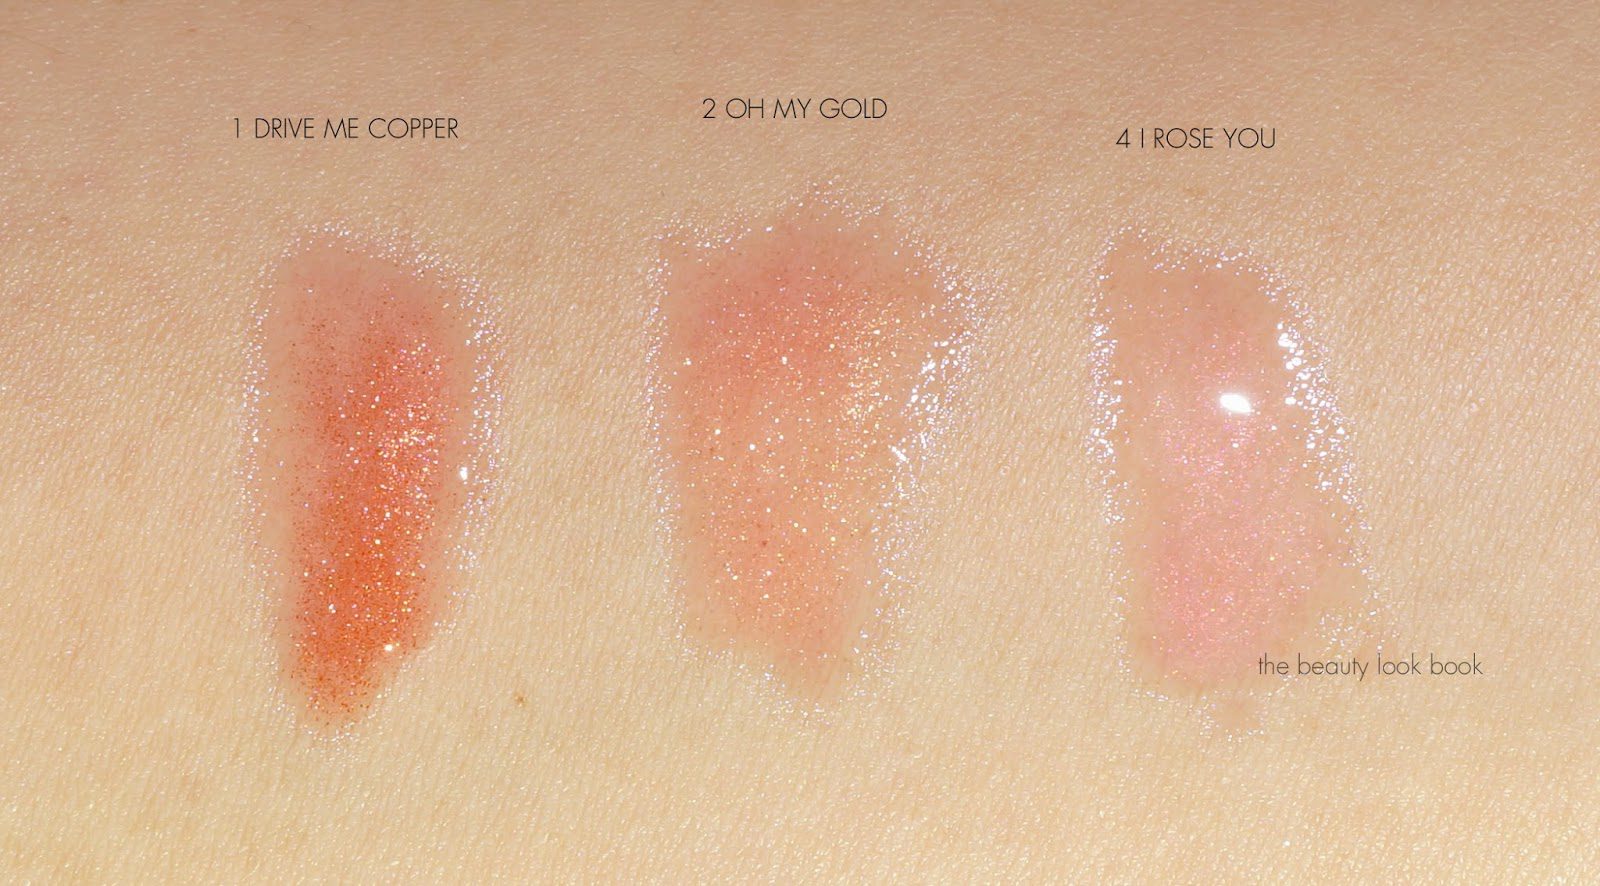
Swatched below you can see how these have a tiny micro sparkle shimmers suspended in the oil formula which is glossy. They have a very smooth non-gritty texture:
I let the lip oil sit on my arm for about 15-20 minutes and then removed the gloss to show you the stain that remained. With a flash the colors looked washed out, so here are the stains photographed without any flash or sunlight. It was hard to capture the colors accurately, the stain reflects the actual colors of the glosses but without a flash.
My initial thoughts on these would be that these could possibly be a complete mess and that these would slide off my lips. The testers at the store were quite messy and gloss/oil was all over some of the tubes and others looked like they were leaking. Also the word “oil” in a lip product sounds less than appealing. I’ve had good experiences with YSL lip products and I know product testers in stores can go through a lot of rough testing so I decided to give these a try.
The texture is very fluid. I had an open tube tilted at a slight upside-down angle for a few minutes while I was trying to read the bottom label and a little bit of product dripped out. For the most part I don’t see many people holding it upside-down so leaking shouldn’t be an issue. The Volupté Oils are very emollient but they didn’t slide around on the lips like some sheer glosses do. At first swipe they look clear but after you let them sit on the lips the tint melds in with the lip and adds a slight glow with some color.
Lasting power is medium for me, the gloss effect lasts several hours and it will last through bottles of water, not so much coffee or tea, but since there is a slight stain and tint to the color remains on the lips for hours (all day for me). I should have opted for the darker more pigmented colors but after seeing them turn bright on my hands at the store, I was afraid they would turn fluorescent on my lips. After seeing how the three lighter shades I purchased performed, I do think I should have gone with the more pigmented shades.
There is the signature sweet grapefruit YSL scent in these. If you liked the YSL Gloss Voluptés (three reviewed here), I think you will like the Volupté Tint-In-Oil. If you want more pigment or color, skip the colors I got and try for one of the shades that look darker/brighter.
Here are the colors on my lips. Note as usual your mileage may vary depending on your natural lip color and pigment:
I like the formula. They feel smooth and moisturizing on the lips and even though there is visible tiny micro sparkles these are remarkably smooth and non-gritty feeling. I thought these would be an oil slick but for a lip oil they stay put where you apply the product and I found they didn’t slide around. On me these transform from a clear gloss to a healthy natural glow with a hint of color. I’m all for neutral and nude lips but on me the three colors I picked kinda look the same – unfortunately you can’t really tell how they will look on you until you try them. They way they swatch on the hand is different from how they look on the lips. Had I known how they would perform I would have skipped #2 Oh My Gold because it looks really similar to #1 Drive Me Copper and opted for a darker pink or purple shade (like #5, 6 or 8).
Have you checked out the YSL Volupté Tint-In-Oils yet? What did you think? There are 8 shades available for $32 each. All are available now at Sephora, Nordstrom, Neiman Marcus and Saks.


