Browsing Tag

Sephora

Sales

Sephora 15% Off Love Note Shopping Event – April 7 to 13, 2016

April 7, 2016

The Sephora 15% Off Love Note Shopping Event starts today for VIB Rouge members and runs through April 13th. By now you should have received either an e-mail or card in the mail for the event. You can shop the sale in stores with the e-mail you received or shop online with code ROUGENOTE at checkout. Start dates and discounts for beauty insider vary according to the tier you are in, dates are as follows:
  • VIB Rouge Members – April 7 to 13, 2016 receive 15% off with code ROUGENOTE
  • VIB Members – April 8 to 13, 2016 receive 15% off with code VIBNOTE
  • BI Members – April 9 to 12, 2016 receive 10% off with code BINOTE
I have a roundup of recommendations in case you’re wondering what I think is worth the splurge. Many brands rarely go on sale except for holiday sales or friends and family events so I like to use these times to stock up on skincare. I’m still working on editing down my own personal shopping list – if you have any recs let me know in the comments!

Shown above:
1  /  2  /  3  /  4  /  5  /  6  /  7  /  8  /  9  /  10  /
11  /  12  /  13  /  14  /  15  /  16  /  17  /  18  /  19

I have a mix of recommended items for skincare, makeup, haircare and tools. Highlighters and glowing blushes are extremely popular right now – I’ll be working on a few more reviews as fast as I can hopefully before the sale ends:
  • Maison Martin Margiela Replica perfumes are new discoveries for me and Lipstick On and Beach Walk are my favorites so far. If you’re new to the line there are a few travel sets that serve as a nice introduction to the line. The REPLICA Discovery Set for Her ($65) includes Beach Walk, Lazy Sunday Morning and Tea Escape.
  • NARS Velvet Matte Skin Tint ($44, reviewed here) is my favorite new base formula launched this year for medium-but-natural looking coverage.
  • Marc Jacobs Beauty The Bronze Bronzer Brush No. 12 ($78) is a splurge but it’s the best large fluffy bronzer brush I own. It’s soft and dense and feels extremely smooth. Applies just the right amount of bronzing powder to the face for a soft diffused look.
  • Marc Jacobs Beauty The Shape Contour and Blush Brush No. 15 ($38) is a contour brush but also doubles as a foundation brush for liquids or creams. It applies liquids to the face without any streaks and blends creams to a flawless finish.
  • beautyblender® nude ($20) is one of the newest beauty blender tools, in my initial review I rated the original pink on the best one, the nude version is just as good in providing streak-free smooth coverage. For color correcting, the micro.mini correct.four set ($30) is nice to have to use with different color creams so you don’t have to worry about mixing product colors (color correcting review in this post here).
  • T3 PROi Professional Hair Dryer ($350, review here) is hands down the best hair dryer I’ve ever tried. I discovered this thanks to my beauty friend RaeViewer – it worked wonders on her hair and it gives the hair a salon quality blow out.
  • Bite Beauty Amuse Bouche Lipstick ($26 each) is Bite Beauty’s newest lipstick launch. All 34 colors have been swatched and reviewed on the blog. Roundup review and links to all of the swatches here. My top three shade picks are Honeycomb, Sake and Pepper.
  • Viseart Eyeshadow Palette Sultry Muse ($80) is something I just discovered from The Makeup Show recently. I’ll have a review soon but will say right now it’s everything that everyone has raved about and more. You need this in your life.
  • Tom Ford Neroli Portofino Aqua ($150) is Tom Ford’s lightest perfume to date. Each new addition to the Neroli Portofino line gets better every year and the aqua one is the best one yet. It has a citrus feel but it’s light and the scent also has an aquatic vibe to it. Full review soon.
  • Tom Ford Soleil Blanc ($220, reviewed here) is summer in a bottle. Out of all the possible scents for summer I think this is probably going to be my favorite, although the Neroli Portofino Aqua is also very good.
  • Tom Ford Skin Illuminator in Fire Lust ($72, review here) is a staple in my makeup wardrobe, if you haven’t bought one from previous seasons I highly recommend it since the Tom Ford Beauty line is now available online at Sephora.
  • Sephora Collection Pro Full Coverage Airbrush #53 ($38, review here) hands down one of the best foundation brush discoveries I made last year. I liked it so much I bought a second one.
  • Urban Decay UD x Gwen Blush Palette ($45) I have yet to review this on the blog, but both of the UD x Gwen palettes are really phenomenal. If I had to pick one I would say the blush one wins – I hope to have swatches edited and the review posted soon, but this one is a must.
  • Make Up For Ever Ultra HD Concealer ($27, reviewed here and here) is a miracle worker for brightening the under eye. A little goes a long way so you only need a tiny dab – but once you apply it, under eye circles and darkness are gone. When I attended the Makeup Show – we were told that they were planning to expand the color range.
  • Make Up For Ever Ultra HD Foundation ($43, worn in tutorial here) review forthcoming, but this is the best foundation stick I’ve tried that is tied with the one from Tom Ford. The main difference is the one from MUFE isn’t quite as thick in texture so I can wear it all over the face. I prefer layering this on top of my regular liquid foundation in places I need extra coverage but it’s a winner.
  • Kate Somerville Eradikate To Go! ($22) I’ve already gone through 2 packs of these. They work wonders on pimples like nothing else I’ve tried. My husband likes them too. They are gentle enough to use on sensitive skin so I bought a set for my brother. The color is tinted pink so they are best used on days you don’t need to go outside in public or at night when you sleep.
  • Kate Somerville Exfolikate Cleanser ($38, review here) favorite cleanser of the moment. I already used up a tube and am on my second. I will probably be stocking up on this during the sale because it’s that good.
  • Laura Mercier Face Illuminator ($44) in Indiscretion has made a comeback and now there are three new colors in the same formula. I’ve been playing with all of them and will have a review soon but if you liked the super glowy radiant finish of the original one but wanted a different color I think you will be really happy there are more options now.
  • Too Faced Melted Chocolate Liquified Lipsticks ($21 each, reviewed here) are some of my favorite liquid lipsticks and they smell (and taste) delicious, Chocolate Honey and Metallic Frozen Hot Chocolate are my favorite colors
For the sale I plan on stocking up on some basics. I’ll report back with a haul once I’ve placed an order but in the meantime I hope you found this roundup of recommendations helpful! I think I could have gone on with a list 2-3 times long but I tried to narrow down my top picks for right now. In terms of highlighters I think the Anastasia Glow Kits that I just reviewed are my favorite so far. I’ll have a review of the Laura Mercier and Urban Decay up as soon as I can to compare.
To recap on dates and codes:
  • VIB Rouge Members – April 7 to 13, 2016 receive 15% off with code ROUGENOTE
  • VIB Members – April 8 to 13, 2016 receive 15% off with code VIBNOTE
  • BI Members – April 9 to 12, 2016 receive 10% off with code BINOTE
What’s on your shopping list? Are you going to order online or stop by your local store? Or both?
Press samples featured include the NARS Velvet Matte Skin Tint, Marc Jacobs Beauty Brushes, T3 PROi, Tom Ford Fire Lust, Bite Beauty Amuse Bouche, Make Up For Ever Ultra HD Concealer, Kate Somerville Exfolikate Cleanser.
Marc Jacobs Beauty Uncategorized

Marc Jacobs Beauty Enamored Hi-Shine Nail Lacquers in White Snow and Resurrection

March 27, 2016

There are a few new shades of the Marc Jacobs Beauty Enamored Hi-Shine Nail Lacquers ($18 each for 13 ml/0.43 oz) for spring and I picked up two from Sephora in White Snow and Resurrection. White Snow is a sheer milky cloud white and Resurrection is an opaque powdery pink cream. For those curious about the other new colors, there are 6 total in pastels and creams. The other four shades include Sundays Cool (lavender), Good Friday (mint), My Peeps (cool pink) and Confession (grey).

I find pastels can be hit or miss for my medium olive skintone. I love the look of white polish on other girls but on me it often looks like white out. Marc Jacobs White Snow has a sheer finish which requires 3 coats for me, but the sheerness helps make it more wearable on my hands compared to a pure white polish. Opaque pastel pink creams are often streaky or look too powdery on my hands. Marc Jacobs Resurrection is a high-maintenance pink in the sense that the first coat is a streaky mess, but it evens out to a smooth finish with the second or third coat. Each coat dries faster than most other polishes so I don’t mind the extra work and the color has just the right mix of white and pink so it’s not too contrasted with my skintone.

I just bought these and applied them so I didn’t give them a week-long test run to see how long they lasted. However in my experience with other Marc Jacobs Nail Lacquers – lasting power is very good and I can get up to 7 days of wear without any tip wear or chipping. I usually combine the Marc Jacobs Nail Lacquers with the Formula X Base Coat and the Nails Inc. 45 Second Top Coat. A closer look at both shades.

White Snow:

Above: Sweater by Rag & Bone, Bag by Celine, Jeans by J.Brand

Resurrection:

Both are fairly standard classic colors so I suspect they can be easily duped however I’m always on the hunt for a classic sheer white that isn’t too sheer and that also isn’t too opaque. White Snow is pretty darn good if you don’t mind layering more than 2 coats. Resurrection is nice but not a must – especially if you already own a lot of pale pink cream colors.

You can find Marc Jacobs Beauty Nail Lacquers online and in store at Sephora. Also online at Marc Jacobs Beauty. Have you tried any of their nail polishes before? If so what are your favorites? A few of mine include Daisy, Wine-Not and Petra.

Enjoy the rest of your weekend!
Base Makeup

Kat Von D Beauty Lock-It Foundation and KVD + beautyblender® Customizable Complexion Set

March 25, 2016

I’m a bit late to the game in trying out the Kat Von D Beauty Lock-It Foundation ($35 for 1 fl oz/30 ml) and I’ve been clearly missing out for quite some time. The line just launched a special limited-edition set called the KVD + beautyblender® Customizable Complexion Set ($46) which includes your choice of Lock-It Foundation, a full size beautyblender® pro and minis of the liquid blendercleanser® and Lock-It Featherweight Primer (set valued at $55). I received several shades to try out and was immediately impressed by the flawless full coverage velvety finish the Lock-It Foundation had. This is a high pigment full-coverage foundation that gives the skin an almost porcelain doll-like look. The formula is very concentrated, but if blended properly has a smooth streak-free, cake-free, perfect finish. Lasting power is excellent with or without a primer, however I did feel the primer sample made a difference in application. With the primer nothing settles into fine lines. Without a proper base if you have any dry patches the foundation is prone to settling into tiny crevices, but as long as your skin is properly moisturized you can probably skip the primer. That being said I’m so impressed with the primer I’ve added it to my shopping list for this weekend.

The packaging is well designed. It comes with a clear case so you can see the product inside. The top of the pump is flush with the top of the bottle which makes it convenient for travel. There’s a small black cap to place on the actual dispenser itself which acts as a lock so you don’t accidentally dispense product if you press on the top. For me a little goes a long way, I only need 2 pumps to cover the entire face. Foundation needs very little layering to get full coverage – you just need to apply and blend.

For application, I tried this with a few damp beautyblenders® in the Original (pink) and Pro (black) (both reviewed here) along with several foundation brushes including the Marc Jacobs Beauty The Face III Buffing Foundation Brush and Sephora Pro Full Coverage Airbrush #53 (both reviewed here). I still stand by my original review that the Original Pink beautyblender® is better than the beautyblender® Pro, but I found with this particular foundation both sponges worked equally well. I’m not sure if the Pro version has changed at all over the years but this round of testing had black sponges that seemed softer with more bounce than what I remember. Either way – a dampened sponge helps control the amount of product you apply. Since the Lock-It Foundation is a very concentrated and full coverage finish foundation, you want to make sure you don’t apply too much up front (it will just end up looking cakey). Dab, blend and build and the finish will be perfect.
Color selection was a bit tricky for me. I did find some colors swatched to a perfect match on the skin but they oxidize immediately (within 5-10 minutes) to a half shade darker. Medium 54 was a perfect match when I applied it but it darkened so my face did not match my neck – it’s close and I doubt anyone but me would notice but I’m picky when it comes to matching my face shade to my neck. I tried two additional shades lighter. Medium 53 has amazing golden undertones (I wish more foundation lines had undertones like this one) but it also darkens on my skin right now. Medium 52 looks too pale when I first apply it but darkens to the perfect match. After the initial oxidizing which I found happens very quickly it stays the same shade once it sets and dries and doesn’t darken further. My best match right now is Medium 52.

A look at the ingredients:

Some comparison swatches to other formulas and brands for shade reference. right now my perfect match is Becca Aqua Luminous Foundation in Beige – but do note the formula is not as opaque as the Kat Von D Beauty Lock-It Foundation and has some sheerness to it which makes it more forgiving.

NARS Pure Radiant Tinted Moisturizer in Groenland
Becca Aqua Luminous Perfecting Foundation in Beige (review here)
Tom Ford Traceless Perfecting Foundation in Bisque and Natural (review here)
NARS Pure Radiant Tinted Moisturizer in St. Moritz

If you do try this in store or get a sample, I highly recommend testing out a few shades and see how it sets. I normally would have given up on finding a match if I tested one and found it oxidized, but the formula of the Kat Von D Lock-It is so good taking the time to test different shades is well worth the effort. I’ve been playing with this formula for a few weeks now – no break outs and no irritation which is a huge plus for my sensitive skin. I have normal combination skin and it holds up very well without budging or getting shiny all day long. I wouldn’t say it’s 100% transfer resistant (if you rub your sleeve or anything on your face it will come off) but it does stay put very well. I always set foundation with a powder and found this performed best when set as well (my favorites rounded up in this post here).

If you’re debating whether to buy the individual or spend a little bit more to get the set, I would say try out the set. Even though the beautyblender® pro isn’t my favorite out of all the beautyblender® options (I think the Original Pink and Nude are the best), I still think it’s a good tool the set is a nice way to the minis of the primer and liquid sponge cleanser. The liquid cleanser is a one-time use (it was for me) but the primer sample can last 3-4 uses (it lasted 4 days for me).

Bottom line, definitely worth checking out. You can find the KVD + beautyblender® Customizable Complexion Set for $46 at Sephora and Kat Von D Beauty. Do note it’s limited-edition, but you can always buy the full-sized items included in the separately.

Have you tried this foundation before? What did you think?

KVD + beautyblender® Customizable Complexion Sets provided courtesy of Kat Von D Beauty for review consideration.

Base Makeup Sephora

Color Correcting for Beginners

March 17, 2016

Last week I stopped by Sephora at South Coast Plaza for a Correct and Conceal Mini Makeover to learn more about the color correcting trend happening right now. I was curious to see if there was anything that could cover dark spots and redness better than a full coverage concealer or foundation. I had a session with artist Dre who was one of the most knowledgeable artists I’ve ever worked with. She was very thorough in explaining color correcting, going through all the options and application techniques, gave me awesome skin prep recommendations and I could not have had a more fun experience. If you’re like me you and consider yourself a novice or beginner when it comes to color correction you might be intimidated by the whole concept. I’ll share my makeover experience, what was used, what I bought and some thoughts on the product testing process. I hope this will help give you some tips and ideas of what to try on yourself. If you have a Sephora near you I highly recommend you call them to schedule a mini-makeover. They can be as quick as 15 minutes and I think you will be impressed with how much you learn – I learned a lot. Scheduling one in advance is probably best to make sure they have someone on site to sit down with you although they can accommodate walk ins sometimes and they are free of charge!

First a quick run through of the mini-makeover I had at Sephora. She started by assessing my skin type and skin concerns. I mentioned I had super sensitive skin and told her about a few products I had allergic reactions to. Personal concerns for my skin were to improve texture, cover dark spots from scars that were healing, under-eye darkness and redness in general. I also mentioned that I liked a streamlined easy approach to applying base face makeup so she picked out her four favorite color correcting products for my skin type that would be easy to use and incorporate along with some skincare items for me to try for calming and radiance.

For a bit of background on 
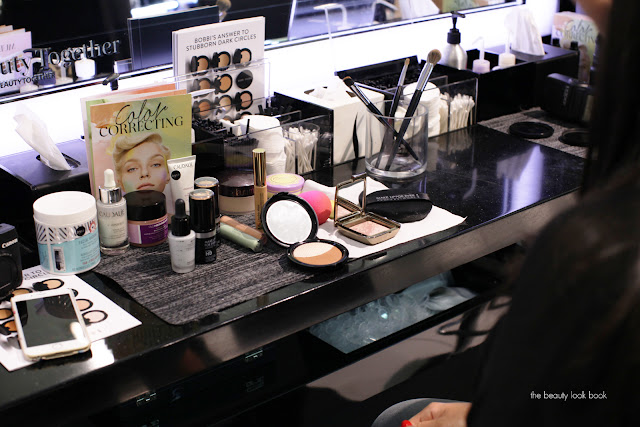
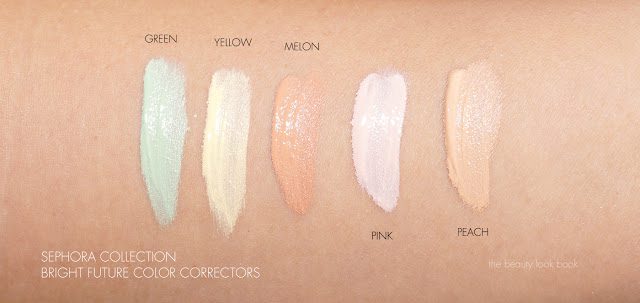
Color Correcting it’s not a new trend but it has been very popular right now. The concept of color correcting is that you can use certain colors to counter or diffuse others. Green will correct red, peach will help with dark spots and undereye circles, pink and purple will counter dullness and brighten the skintone. I initially thought using a full coverage concealer or foundation would be sufficient but I often find it leaves the face looking a bit flat and sometimes those dark spots still show through. This is where color correcting can help. Here’s a look at the Sephora Beauty Studio in store – it varies per store but most have a station with mirrors, makeup remover and tools for artists to apply product on your face.

A run through of all the products she used on me from start to finish:

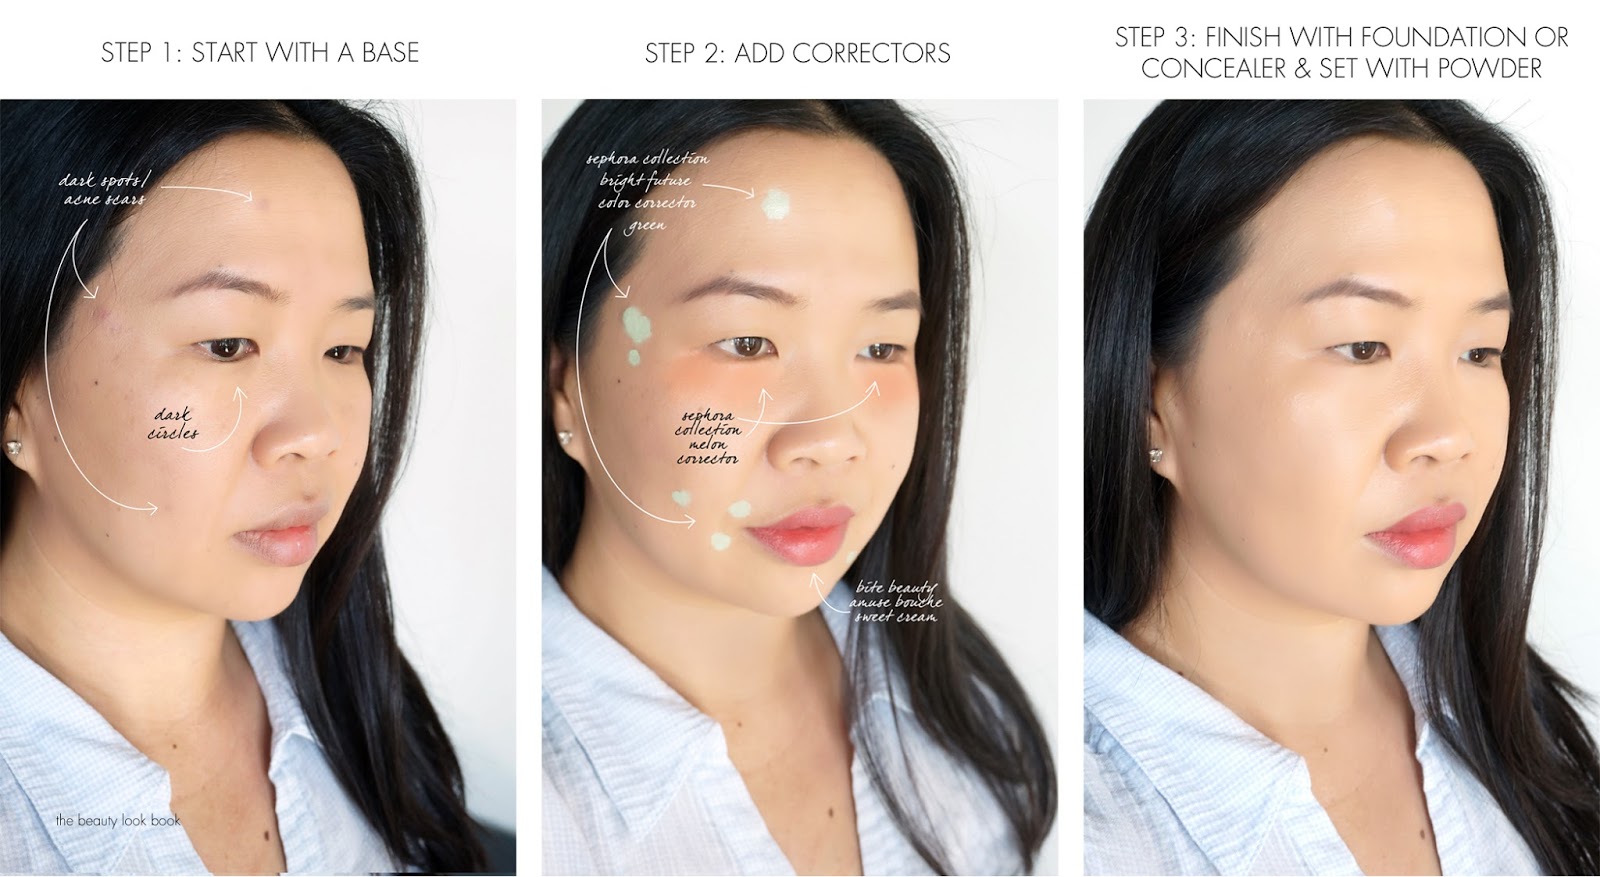
Step 1: Prep the skin

She started by having me remove my makeup with the Ole Henriksen The Clean Truth Cleansing Cloths which are super gentle and non-irritating for my sensitive skin. This one cleans, balances and hydrates in one step which is convenient for on-the-go makeup removal. Next she used the First Aid Beauty Radiance Pads to help with surface texture. She followed with the Caudalie Vinoperfect Radiance Serum and Ole Henriksen Nurture Me since I mentioned my face was prone to irritation and flare ups. Skin felt smooth, nicely hydrated and calmed down.

Step 2: Base

Dre’s theory of using color correcting was to use apply in steps and use it with your current foundation routine. She started by applying the Algenist Reveal Concentrated Color Correcting Drops in Blue to help brighten the overall skintone as a base which did indeed brighten the skin without looking scary blue. Blue helps to neutralize sallow skin. She followed with the Make Up For Ever Ultra HD Invisible Cover Stick in 128 mentioning one’s foundation will do a lot of the color correcting as a starting point to neutralize uneven skintone or dark spots.

Step 3: Color Correct

At this point even with a fuller coverage foundation on my skin you can still see dark circles under the eyes and dark spots from acne scars that are healing still show through. Rather than layer on the foundation color correcting helps add coverage without caking on product. I was skeptical but was really impressed with how literally all the dark spots disappeared with a green color corrector and undereye circles disappeared with a peach/melon corrector. She applied the Sephora Collection Bright Futures Color Correctors in Green and Melon. The key here was to apply and let set so that colors don’t get muddied when you blend them wet. For the green she dotted on spots and then blended with a detailed concealer brush in a cross hatch method to help blend and cover naturally. For the melon she applied directly under my eyes in a downward swiping motion and blended with the sponge tip applicator.

Step 4: Conceal, Set and Finish

Once the color correctors have properly set (takes maybe 3 minutes at most, as long as you don’t pile on the creams) finish by taking concealer or foundation and pat it on top. She used the Sephora Collection Pro Foundation Brush #47 which is a more affordable similar version of the Marc Jacobs Beauty Sculpting Foundation Brush to roll and dab on the foundation over the corrected spots gently and then blend everything out gently with a beautyblender. You don’t want to take a sponge or brush and press too hard on the face or else it will drag and mix colors to make it look muddy. The final step she used was to set with a loose powder. She showed me the difference between the Laura Mercier Translucent Loose Powder and also the Besame Brightening Face Powder in Violet (both applied with a puff). She said the Laura Mercier is her favorite (it’s one of mine too) but if I wanted to try something new she recommended the Violet to brighten the skin, for fairer skins she recommended the Pink (which I already own).

Step 5: Add color and makeup

She added a bit of blush and bronzer on my skin so my face wouldn’t look flat from all the base makeup, but I asked her to keep it minimal so I could see how the correctors and foundations performed through the afternoon. We skipped everything else and I was impressed that my makeup lasted well into the late evening without any touchups needed. Her skincare recommendations and application made it so nothing budged or creased or faded. Once I use up some of my moisturizers I will need to buy some of the items she used on me.

I have never been so impressed with a makeup session as I have been with my visit to Sephora. Dre taught me so many things – I really appreciated her taking the time to go through application tips and recommending products specific to my needs. My brother tagged along to help me take photos and afterwards I asked him if he thought my face looked ok. He said yes, it looked natural and he couldn’t tell that there were any weird colors. So it passed the brother test 🙂 In discussing the different color corrector options, I asked her why she recommended the Sephora Collection Color Correctors over the ones from 
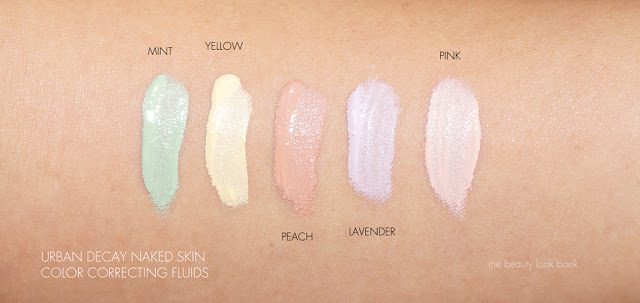
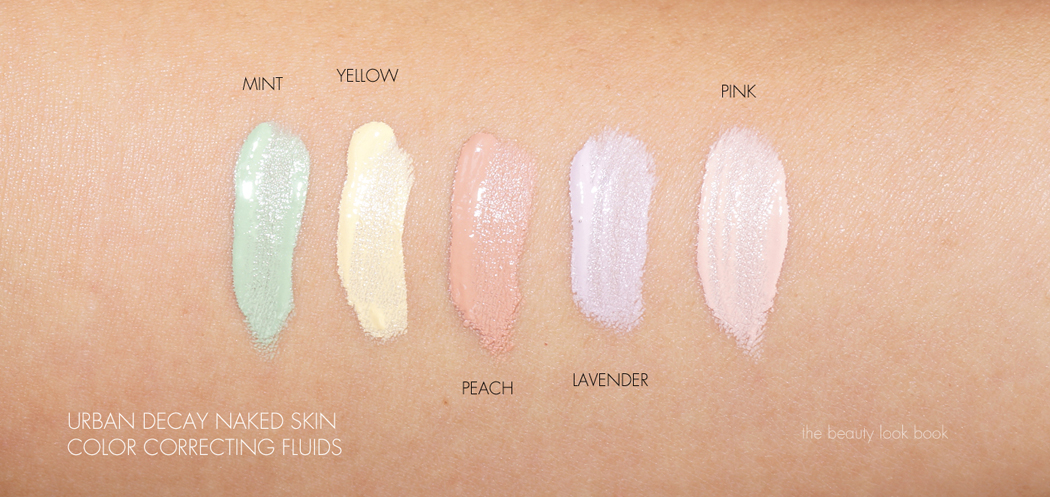
Urban Decay Correcting Fluids or 
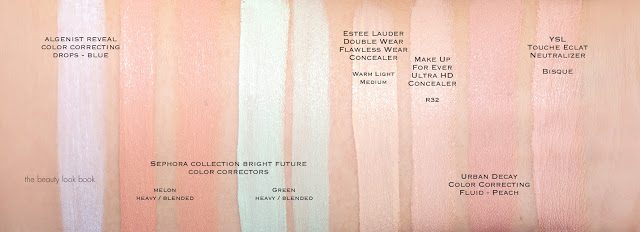
YSL Touche Eclat Neutralizers or even the ones that come in cream compacts. She said it was a matter of preference – the cream palettes can definitely multi-task with all the options for color correction and concealer, but to keep things simple she said the Sephora Collection correctors were her favorite for consistency, texture and coverage. (I bought one each of the Urban Decay and YSL to test against the Sephora Collection and I’ll say right now she was right.)

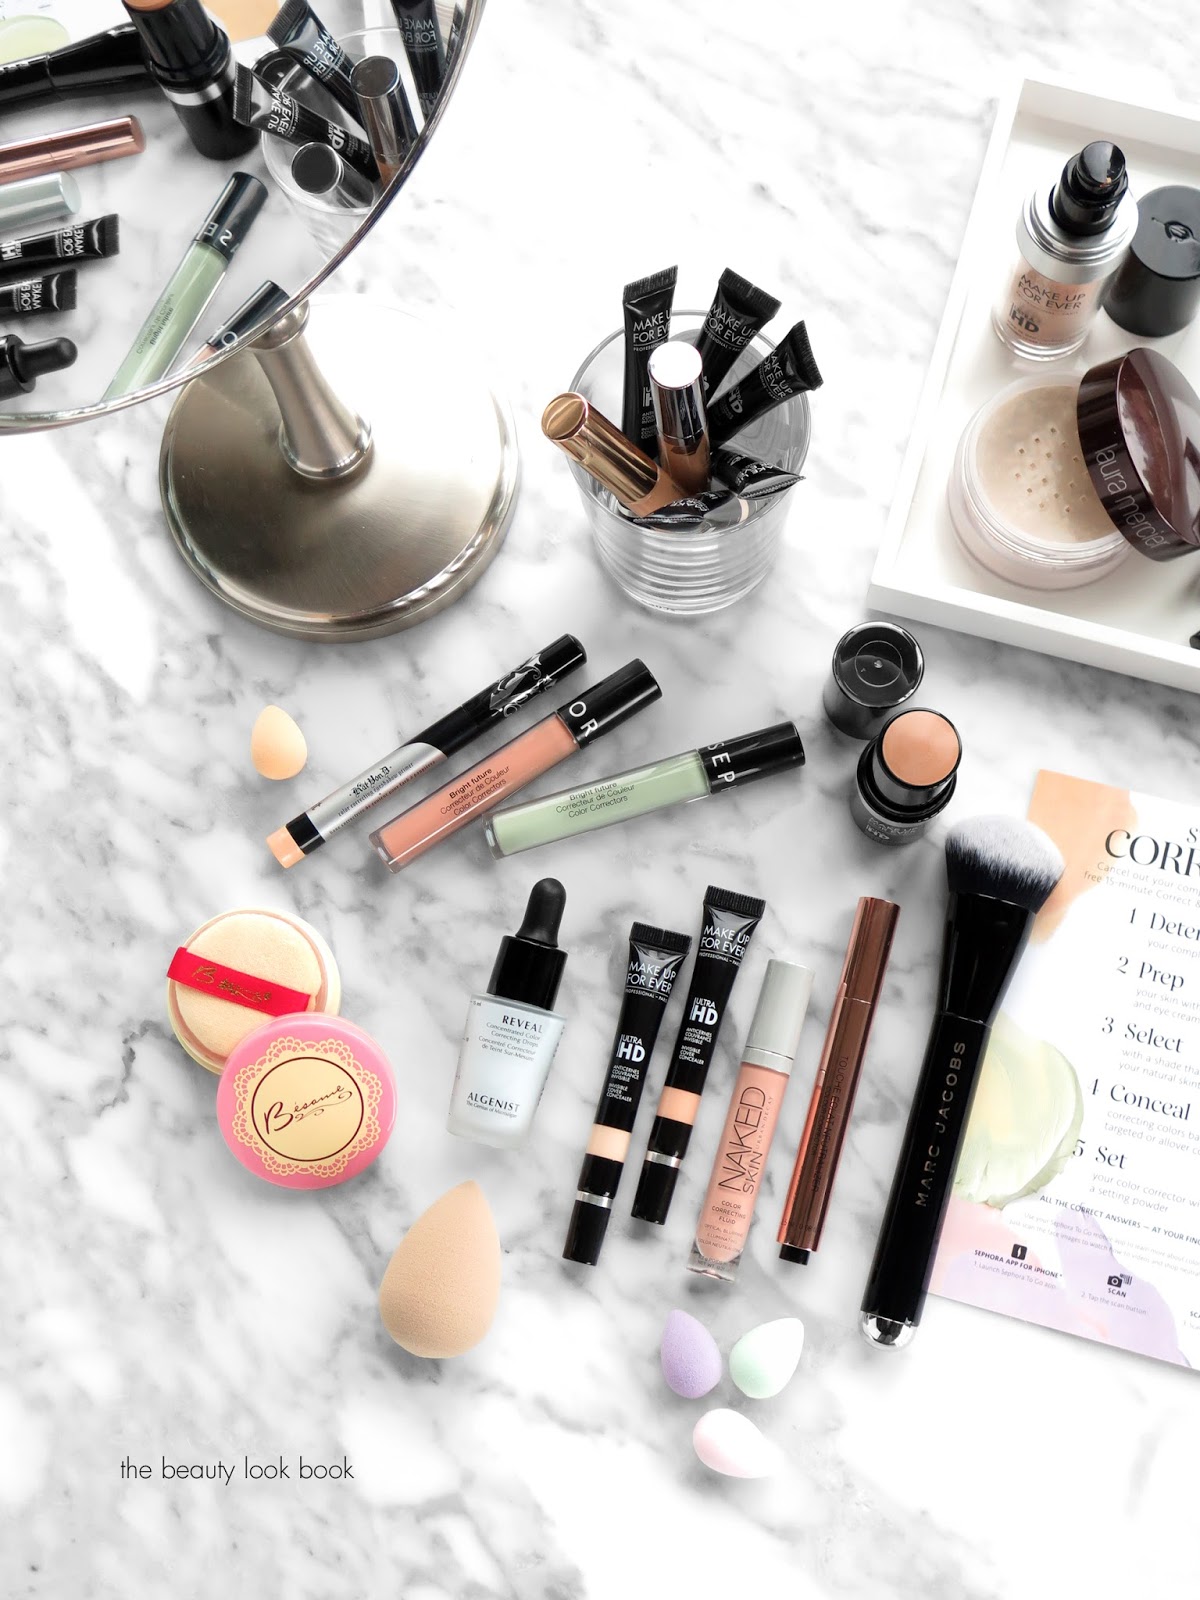
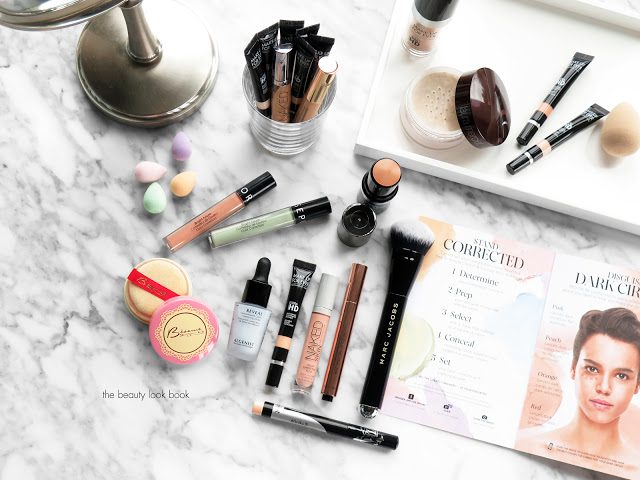
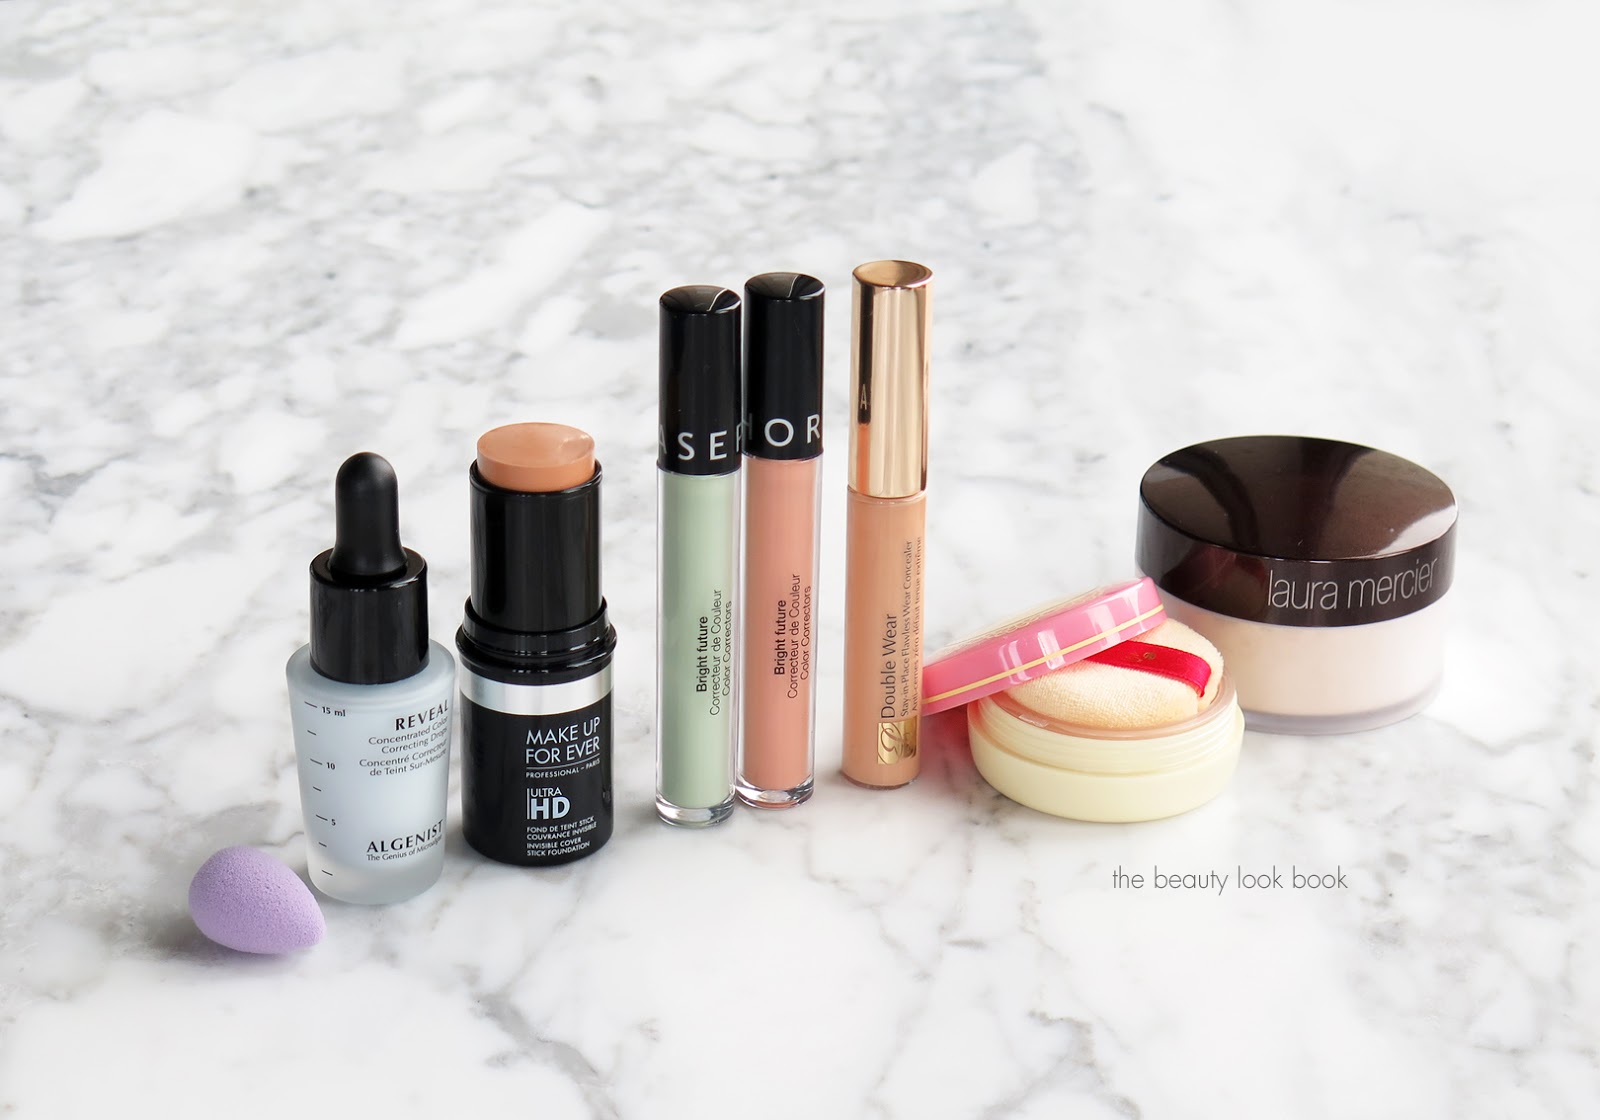
Next up is a run through review of everything I bought and tried along with a mini tutorial of how I’ve been recreating the color correcting look to diffuse dark spots and dark circles. Here are the items she used on me during the makeover. I bought all the items she tried with the exception of the Violet powder because I already own the Pink although I’m seriously considering going back to the store to pick it up this weekend.

Left to right are:

  • Micro Mini Correct Four by beautyblender – there are some new beautyblender options, for the color correcting trend they launched a set of four in different colors, I really like these for blending under the eyes or in the creases of the nose, it’s nice to have different colors on hand to match the correctors so you don’t have to worry about mixing colors together 
  • Algenist Reveal Concentrated Color Correcting Drops in Blue – you can use these alone or mixed in with foundation to help color correct the skin. I’ve been using this as a base, almost like a primer to help counter my sallow undertones with my olive yellow skin. It brightens the skin without looking too blue. You can even mix it in with moisturizer to blend all over to make it a bit more sheer. I really like the way this performs. 
  • Make Up For Ever Ultra HD Invisible Cover Stick Foundation in 128 (looks dark but blends out to a slightly lighter finish, that being said I am getting lighter right now so I will probably have to purchase a different shade soon to mix) is one of the most amazing foundation sticks I have ever tried (it rivals Tom Ford’s) – I’ll have a separate review in the upcoming weeks once I’ve given it a thorough test drive but it offers medium to full buildable coverage that looks amazing
  • Sephora Collection Bright Future Color Correctors in Green and Melon – After testing this compared to YSL and Urban Decay, I have to say that my favorites for texture and consistency on my face are the Sephora Collection ones, they don’t crease or emphasize fine lines and they have enough coverage and pigment to truly neutralize my face issues, the Urban Decay Naked Skin Color Correcting Fluid in Peach has a similar coverage to the Sephora ones and looks great on the skin but if I don’t have enough primer under my eyes it emphasizes all the fine lines that I don’t want to show up, the YSL by comparison is a lot more sheer in finish and I need more coverage
    • A quick side note, during my make over I mentioned my favorite under eye concealer of the moment was the Make Up For Ever Ultra HD Concealer and that I liked the ones with peachy tones (mainly R32) to warm up and brighten under eyes, Dre did mention that this was also one of her favorites to use, but she showed me the Sephora Collection in Melon for me to try something new
  • Estee Lauder Double Wear Stay In Place Flawless Wear Concealer in Warm Light Medium – she used this to highlight my face and I was so impressed with the coverage and texture I had to try it out – it offers smooth flawless coverage and really does stay in place without caking or creasing through out the day
  • Besame Brightening Face Powder in Vanilla Rose (she used Violet on me in store)
  • Laura Mercier Translucent Loose Powder – I already own this and have repurchased numerous times, it’s one of my favorite loose setting powders, if you haven’t tried it I will say you need to
A simple step by step mini tutorial showing before and after. I took the tips learned at my appointment to recreate a flawless base at home. I hoped to take an after show last week but the store lighting wasn’t ideal. In the first shot I did prep my skin with a thin layer of foundation, but as you can see dark spots and dark circles are still highly visible:

Below are the tools I recommend using, but you can shop your stash and find what works:

A look at packaging and different applicators for each kind of color corrector that I’ve been testing out ranging from droppers, sponge tips, squeeze tubes and click brush applicators:

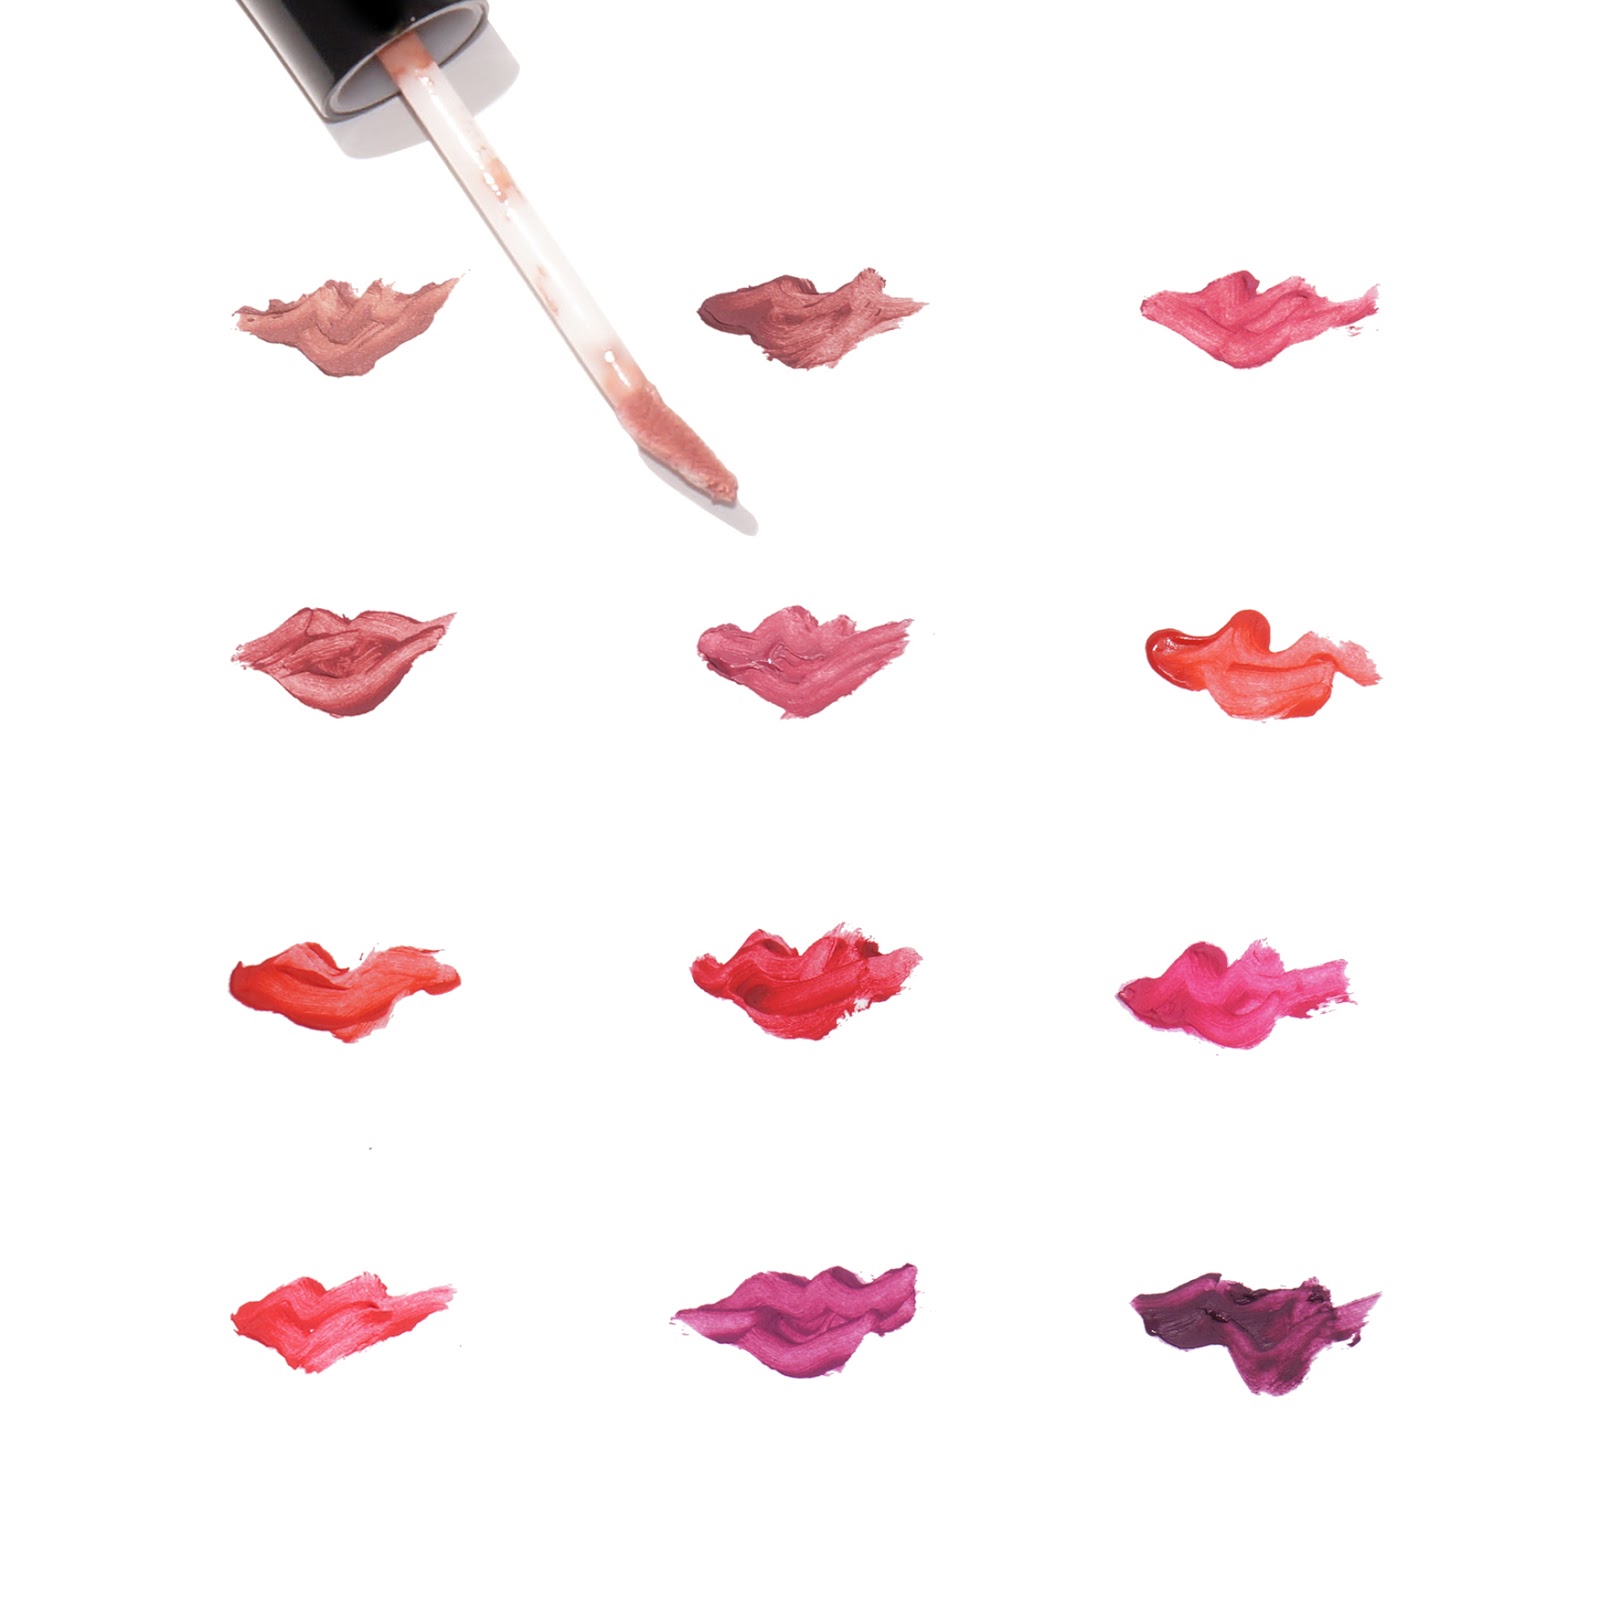
Side by side swatches of the color correctors and some concealers:

A look at the Sephora Collection Bright Future Color Correctors, note there is also Orange/Deep and Lavender available online but when I was in store they didn’t have those colors yet:

In case you missed the Make Up For Ever Ultra HD Concealer post, here are all the shades swatched:

I hope you enjoyed this overview on color correcting! If you’re a novice like me I hope the rundown of my makeover, all the options I tried and swatches help make the color correcting concept seem less confusing or intimidating. I went into my appointment thinking that there wasn’t going to be much that could be done for my dark spots but I went in with an open mind and learned so much. Sometimes makeovers can be a daunting process especially if you get a pushy artist or one who just doesn’t listen to your needs or who doesn’t care preferences. I really recommend trying to book an appointment at your local Sephora – I am already planning on going back for a second appointment hopefully in the next couple of months because my experience was that good. If you’re in the area of South Coast Plaza try to book one with Dre – she’s awesome. If you can’t make it into the store, there is an online survey on the Sephora Color Correcting Makeup page to guide you and help narrow down the picks according your specific concerns and skin type.

Have you tried color correcting recently or is it something you’ve always done for your base makeup routine? Please let me know what you’ve tried and your thoughts. I always learn new tips and tricks from you and would love to hear about what you have been testing or if you have any favorites.
This post was created in partnership with Sephora. As always all opinions my own. Most products picked out and purchased by me, press samples include the Besame Powder and Make Up For Ever Ultra HD Concealers.

Uncategorized

Anastasia Beverly Hills Lip Gloss – Undressed, Vintage and Metallic Rose

March 16, 2016

Anastasia Beverly Hills recently extended their product line at Sephora and I picked up three shades of Lip Gloss ($16 each) that had been on my radar for quite some time. I’ve long avoided buying the glosses because of their opacity – I thought they would most likely look flat or plastic-like on my lips but having seen so many amazing swatches on social I decided to give them a go. My first three shades include Undressed (pale milky nude beige), Vintage (medium rose pink) and Metallic Rose (shimmering cool mauve rose). The formula is indeed very opaque and gives the lips full coverage. The creams (non-shimmers) go on smoothly and I was really impressed that they don’t settle into lip lines like so many cream glosses do. The shimmers are non-gritty and also very smooth on the lips. These have a strong vanilla scent when you first apply them, but it disappears after 2-3 minutes. After it sets I really can’t smell anything from the gloss. Lasting power and pigment is incredible – they have almost a liquid lipstick kind of finish with the way they are so opaque but have that shiny lip gloss formula. Texture isn’t weightless but at the same time it’s not super heavy.

I put on Metallic Rose first and I was blown away by how incredibly smooth, richly pigmented and gorgeous the color was. It’s truly the prettiest most amazing rose shimmer I have ever tried. I really can’t get over how stunning it is. I tried Vintage next and it’s a perfect medium pink nude. Undressed is one of the shades I see featured the most on other blogs and on Instagram. I knew there was a good chance this would be a high-maintenance nude and as expected it is. For me, my perfect pale beigey nude in a lipstick is MAC Pure Zen or Japanese Maple. Others tend to look like concealer on me. I was able to get Anastasia Beverly Hills Undressed to work with a bit of tweaking – I applied MAC Subculture lipliner and filled in the lips then put the gloss on top and blended everything with a brush to make it work. I think if I use a darker liner like MAC Boldly Bare or Stripdown it will probably work better for me.

These come with a flat sponge tip applicator which are really easy to use. The way the tip is shaped makes it easy to apply around the edges of the lip precisely.

Swatches below:

Undressed is swatched over MAC Subculture Lip Liner, Vintage and Metallic Rose swatched over bare lips:

Some comparison swatches:

NARS Lip Gloss in Chelsea Girls 
NARS Lip Gloss in Dolce Vita
NARS Lip Gloss in Risky Business

I’m really impressed with these and don’t know what took me so long to try these. Now that more of the Anastasia Beverly Hills line is available at Sephora I will definitely be checking out more items. If you have any long-time favorites please let me know. I still have the review on the Glow Kits that I picked up from IMATS on my review to-do list. I hope to have swatches edited and final thoughts sometime next week so stay tuned.

In the meantime – let me know if you’ve tried the Lip Gloss formula and what your favorite shades are! You can find the Anastasia Beverly Hills Lip Gloss at Sephora, Macy’s and Anastasia Beverly Hills.
Uncategorized

Bite Beauty Amuse Bouche Lipstick Roundup and Thoughts

March 9, 2016

After playing with the new Amuse Bouche Lipsticks from Bite Beauty for several weeks now, I have a roundup post with some final thoughts and a list of my top picks. I’ve been a fan of the other lipstick formulas I’ve tried from Bite Beauty and I think the new lipstick formula definitely is the best product they’ve launched to date. Long-time readers know I like colors with shine and some transparency versus the rich pigment full coverage kind of colors since they often look flat, emphasize fine lines and are a nightmare for any dry patches. There have been some exceptions in the last year including the Louboutin Lipsticks, Charlotte Tilbury Matte Revolution, Marc Jacobs Beauty Le Marc Lip Cremes (to name a few) all of which have somehow managed to launch full coverage lipsticks that look luminous and have depth on the lips. In a world filled with thousands of lipstick options I’m always impressed when a brand manages to create a new and improved formula because at this point it seems like it’s all been done before (but somehow they manage to surprise us). I have been thoroughly impressed with the Bite Beauty Amuse Bouche lipstick formula. To sum it up in a few words, all I can say is that it is a really good one. At the time of this post there are already over 1,700 reviews on Sephora.com and they are overwhelmingly positive which I think is huge.

Thoughts on the formula: I have full semi-sensitive lips that usually are prone to dryness with lipsticks. Some of my favorite lipsticks suck out the moisture from my lips and leave them dry and peeling by the second day (ie MAC). When I swatch batches of lipsticks I often have to split up the swatching process because the swiping, wiping, cleaning and reapplying process usually kills my lips. With the Bite Beauty formula, I did swatches over the course of 4 days and my lips were fully intact without any peeling issues. I personally feel this is a good indication that the formula isn’t drying and is indeed hydrating like it’s described. If you have dry lips or any flakes the lipstick will emphasize lines due to the rich pigment and texture – I’d recommend prepping the lips with a primer or balm first. That being said in my experience, these are hydrating but still manage to feel weightless.

Thoughts on the lasting power: I wasn’t able to test all 34 shades for a full day of wear to see how long they lasted. I did test about 7 shades for the lasting power test. I found each color lasted extremely well. All of them lasted remarkably long through several cups of coffee, tea and snacks. The darker shades do seem to have a slightly longer lasting power – the colors give the lips a slight stain so the color lingers longer.
A few other thoughts and tips on how to wear these: I found all the colors to be one-swipe wonders with no pencil needed to tweak colors. However if you find you have lips that can’t really handle full coverage lipsticks well you might want to consider a primer or balm. The only issue with lip balms is they have a lot of slip. Sometimes the emollient texture is good to treat the lips, but when you add color on top it’s prone to sliding off or weakens the lasting power in general. Two products I like to use as primers include the MAC Prep + Prime Lips and Bite Beauty Agave Lip Mask. Both will smooth the lip surface and help lipstick apply on the lips more smoothly. I’ve repurchased both a few times now and have no intention of switching to anything else when it comes to lip primers (although if you have any recs I’m open to trying something new but will probably still call these two my all time favorites).

Thoughts on the colors: I think the color selection is really quite good. 34 shades makes for a lot of options to choose from and Bite covered a lot of categories with this launch. All the shades are creams, so there’s no shimmer in any of the options. I think it would be interesting if they did add some pearl finish colors in the future – I’d definitely check them out, but as far as I can remember, I don’t think I recall any of their lipsticks or pencils having any shimmer. All but two of the colors have extremely good application with a smooth streak-free finish. The only two I had slight issues with include Liquorice (it was prone to smudging around the edges for me) and Black Truffle (the sharp contrast made for a slightly patchy application with one swipe, but it was easy to fix but swiping 3-4 times).

Links to the swatches and other posts:

  • All colors arm swatched here
  • Sorbet feature here
  • Neutrals Souffle, Sugarcane, Honeycomb, Meringue, Sake, Pepper and Rhubarb here
  • Cool-Toned Pinks Gin Fizz, Cotton Candy, Dragonfruit, Kimchi, Radish and Sangria here
  • Peach and Browns Verbena, Sorbet, Fig, Chai, Molasses and Nori here
  • Warm Reds and Corals Pickled Ginger, Gazpacho, Persimmon, Cayenne, Gingersnap, Sweet Cream and Maple here
  • Cool-Toned Purples and Plums Spritzer, Eggplant, Jam, Beetroot, Liquorice, Tannin, Sour Cherry and Black Truffle here
There are so many good colors, but if I were pressed to pick my favorites Honeycomb, Meringue, Sake, Pepper, Fig, Sweet Cream are the winners for me. If you’ve picked up any of the colors let me know what you ended up with! If you’re passing on these what’s your favorite lipstick formula or color of the moment?

You can find all 34 shades of Amuse Bouche exclusively at Sephora. I have yet to spot all the colors in store yet – if you’ve seen them please share in the comments! These are permanent so there’s no rush to order colors before they sell out. You will have plenty of time to research reviews or find a store to test these.

The Amuse Bouche Lipsticks were provided courtesy of Bite Beauty for review consideration. Many thanks to the team for kindly sending them to me to play with, I don’t think I’ve had this much fun playing with lipstick in a long time.

Uncategorized

Bite Beauty Amuse Bouche Lipstick Swatches – Spritzer, Eggplant, Jam, Beetroot, Liquorice, Tannin, Sour Cherry and Black Truffle

March 9, 2016

I have the last batch of the Amuse Bouche Lipsticks ($26 each, Sephora) lip-swatched in the cool-toned purples, plums and blue-based reds. Above left to right includes Spritzer, Eggplant, Jam, Beetroot, Liquorice, Tannin, Sour Cherry and Black Truffle. Out of all the colors, the only shade I had issues with was Black Truffle – but that is probably due to the sharp contrast the color has to my natural lip color. It was the only shade I found slightly patchy in application with one swipe. A few swipes evens out the color though. Swatches and descriptions of the colors:

Shown above from left to right:

  • Spritzer is described as a plum rose, to me it’s a lilac color that has some depth
  • Eggplant is described as a smoky plum, I find it to be a cool-toned purple
  • Jam is described as a rich merlot, it’s a deep berry plum
  • Beetroot is described as a bold berry, this is one of the brighter colors in the cool-toned plum color family, on my lips it looks more pink but doesn’t turn fuchsia
  • Liquorice is described as an oxblood shade, it’s a deep wine color with brown tones, this one had a bit of migrating around the edges on my bare lips, it didn’t slide off, but I found it slightly more emollient than the others
  • Tannin is a described as a poppy red, this one is more of a neutral-warm red on me with slight brick undertones
  • Sour Cherry is described as a maraschino red, I found this to be my perfect deep blue-red and lasting power is phenomenally good with this one
  • Black Truffle is described as a black violet, I think that’s an accurate description, this one frightened my husband when he saw it on me but he did say, “I guess some people might really like a dramatic look” – so there you go, my husband calls this shade “dramatic”
Lip swatches:

All the colors in this particular post are bold cool-tones. All of these are clearly outside of my comfort zone although I found myself smitten with Sour Cherry as the perfect blue-toned cherry red. I’ll have a roundup with final thoughts on this formula in the next few hours. I hope you found these swatches helpful! I’ve done several lipstick swatch posts in the past where I’ve been fortunate enough to receive all the colors in a launch to swatch for you such as the Marc Jacobs Beauty Le Marc Lip Cremes and Buxom Bold Gel Lipsticks. In the past I swatched all the colors in a single post – I know some of you have mentioned it can be hard to see swatches with smaller images for the lip swatches. This time I split up the colors by category into a mini-series with larger lip swatch images. Let me know which format you find easier to follow or if you have a preference!

You can find the Bite Beauty Amuse Bouche Lipsticks at Sephora for $26 each.
Lipsticks provided courtesy of Bite Beauty for review consideration.