Browsing Tag

Sponge

Highlighters Hourglass Cosmetics

Hourglass Ambient Strobe Lighting Powders

January 21, 2016

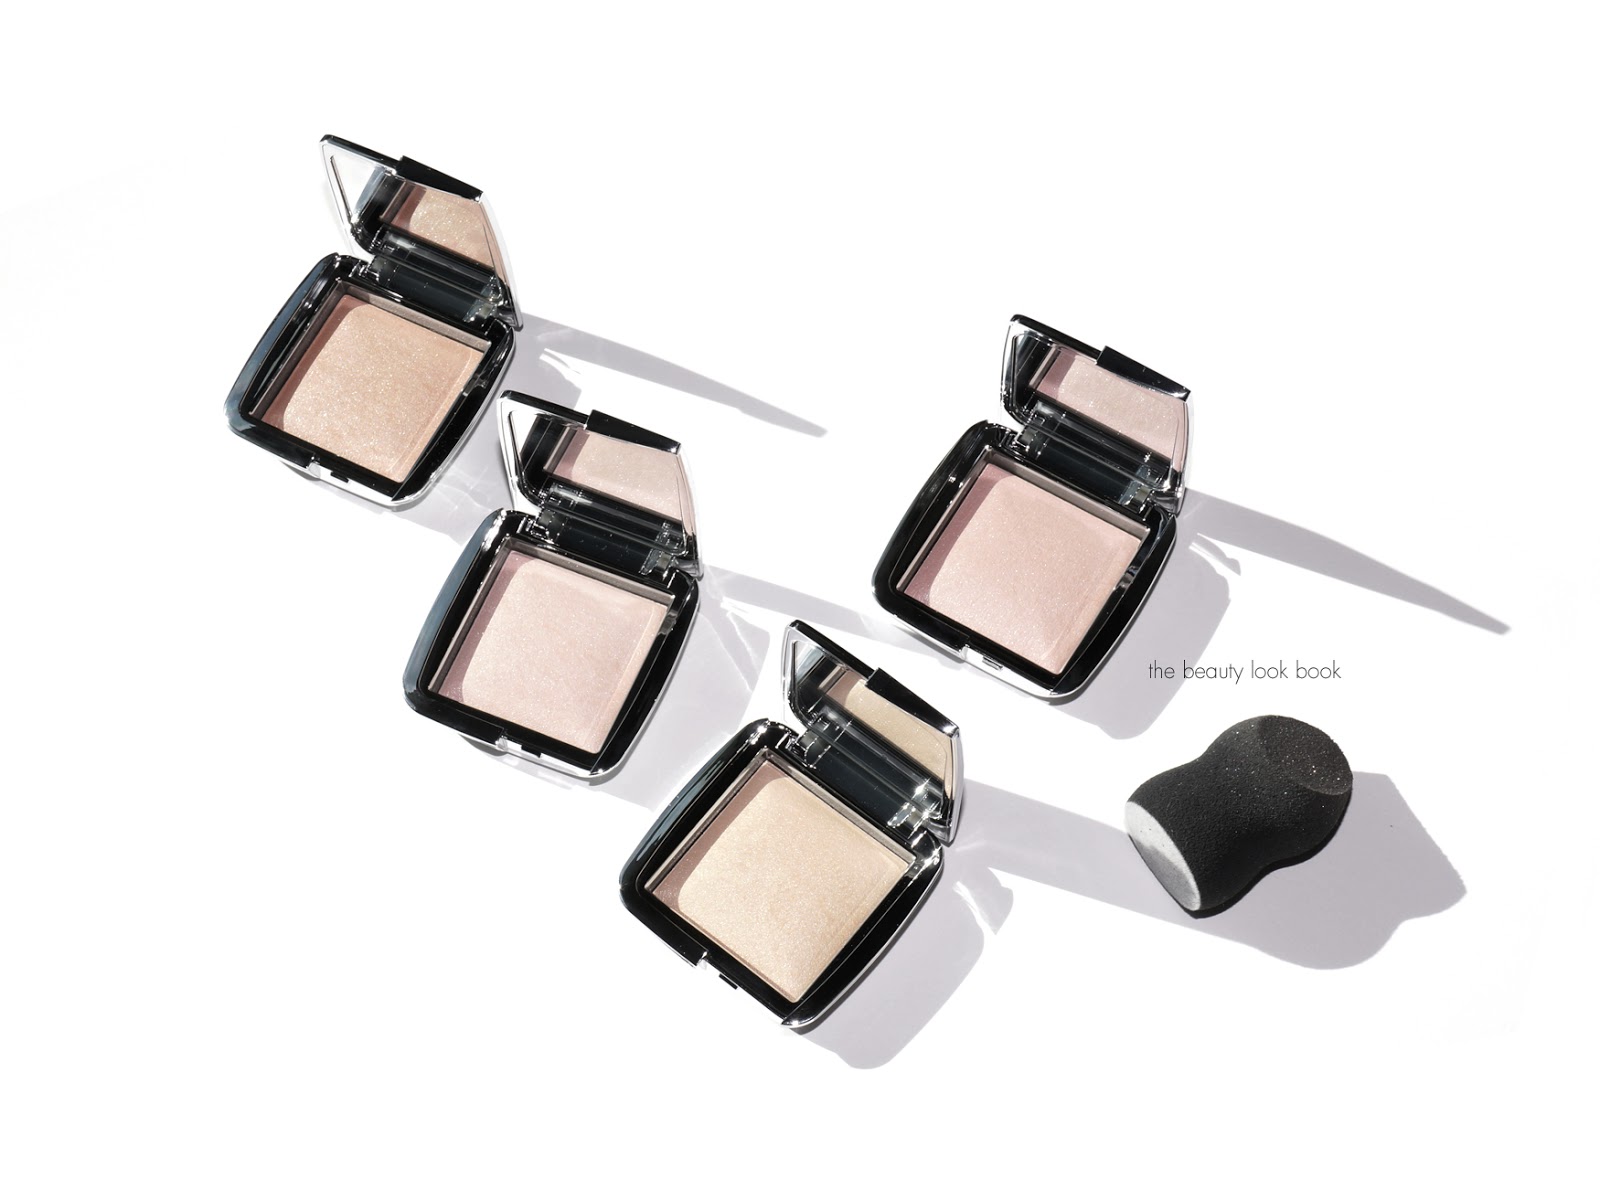
This spring Hourglass has launched some additions to the Ambient Lighting family with the Ambient Strobe Lighting Powders ($38 each for 0.16 oz/4.6 g) and the Ambient Strobe Light Sculptor ($22). I stopped by the Hourglass Store in Venice Beach last week to check these out and fell in love. One of the strobe powders Incandescent Strobe Light was introduced to us before in the Ambient Lighting Palette (Trio) as an exclusive. If you have this palette, you’re familiar with the beautiful natural glowy finish and smooth texture of the strobe powders. They look sheer on the hands/arms. On the face they add the perfect natural glow and highlight. The sparkle isn’t over the top and it makes the skin glow without being too frosty and they do not emphasize pores.

There are four shades of the Ambient Strobe Lighting Powders. If you ask me if you think all four are necessary to have, I would say no – but after seeing them at the store, I had to buy all four. The colors are:
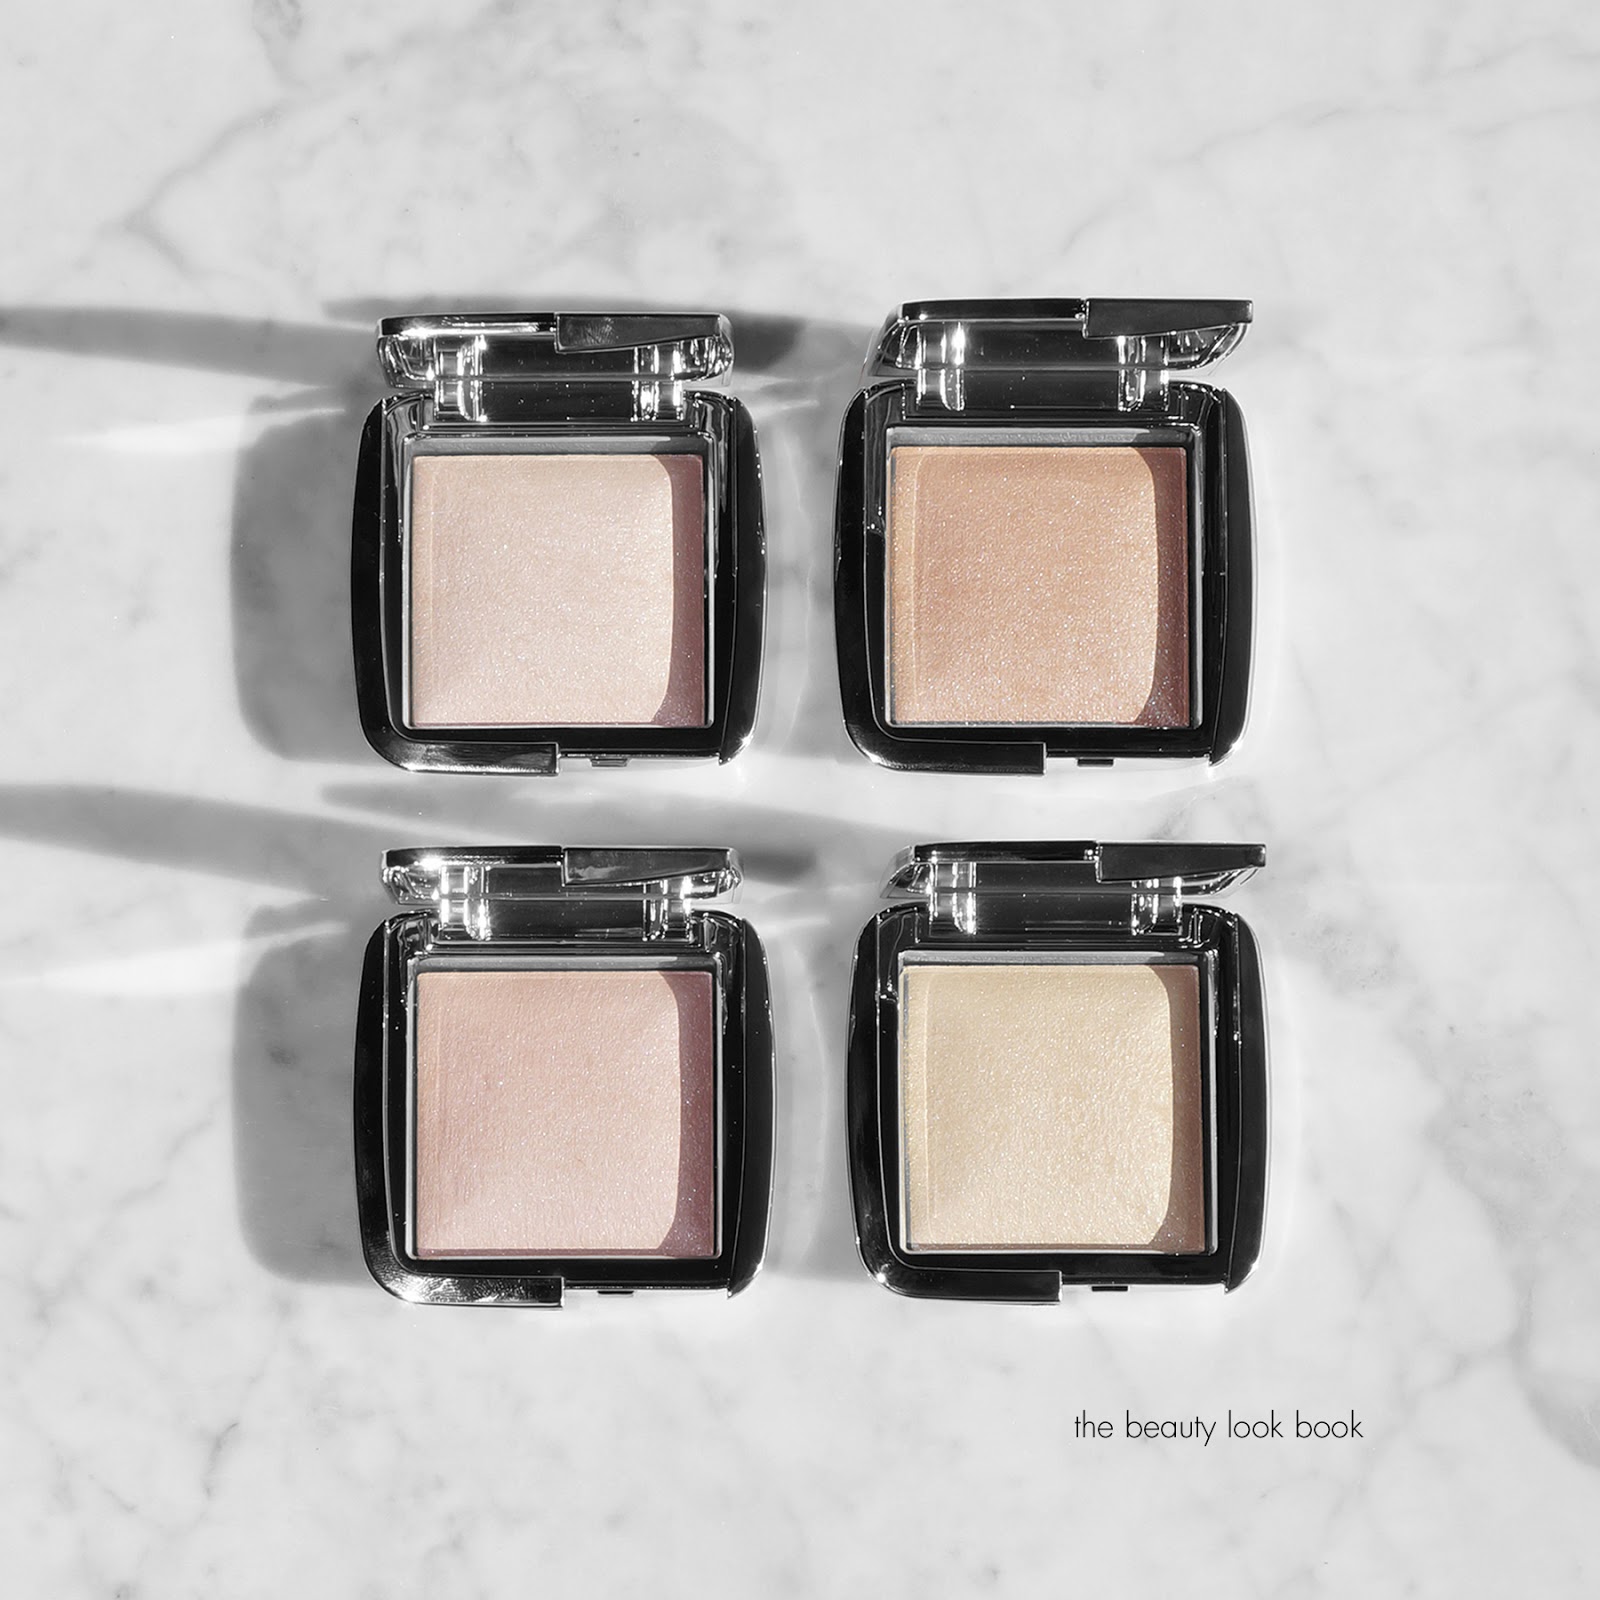
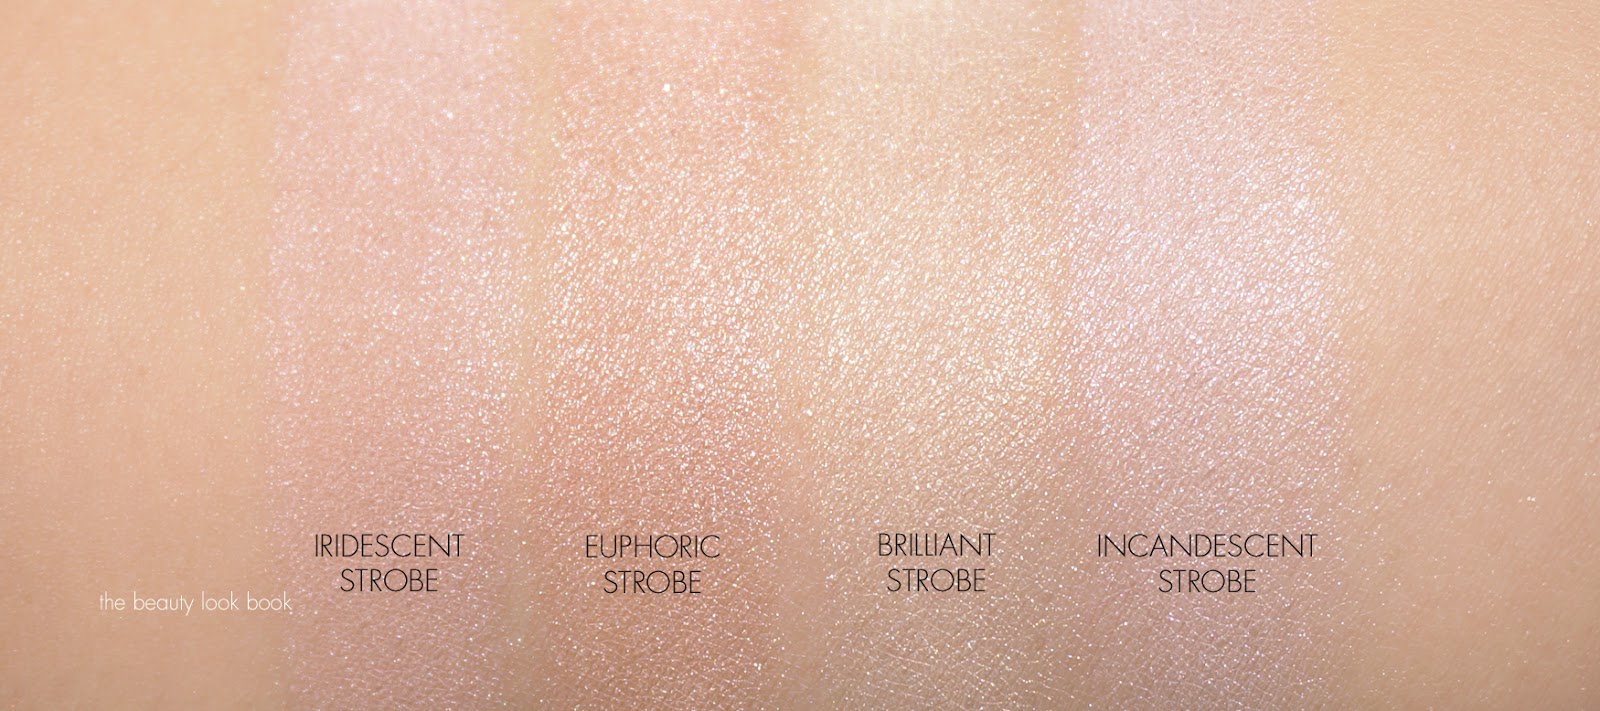
  • Euphoric Strobe Light – A pearlescent beige powder bestowing a natural highlight
  • Iridescent Strobe Light – An illuminating pink powder imparting a soft highlight
  • Brilliant Strobe Light – A shimmering gold powder imparting a lustrous highlight
  • Incandescent Strobe Light – An opalescent pearl powder bestowing a celestial highlight
Euphoric is the darkest option available. Iridescent and Incandescent are very similar, Iridescent is slightly deeper and more pink. Brilliant is a gorgeous yellow/gold option. I find the powders very finely milled and apply flawlessly with the Ambient Strobe Light Sculptor or a regular powder brush.

The packaging of the Strobe Powders is similar in size to the Ambient Lighting Blushes, except the color is silver.

A quick look at size comparisons:

Ambient Lighting Powders $45 for 0.35 oz/10 g (review)
Ambient Lighting Bronzers $50 for 0.39 oz / 11 g (review)
Ambient Strobe Lighting Powder $38 for 0.16 oz/4.6 g
Ambient Lighting Palette $58 for 0.35 oz/9.9 g (review)
Ambient Lighting Blush $35 for 0.15 oz/4.2 g (review)

Close ups of each powder in sunlight:

The product in the pans will look different depending on lighting situations. The shimmer particles are highly reflective. I have a couple shots to show the base color and the shimmers depending on light. Both sets are in the same order.

Top: Incandescent Strobe Light, Euphoric Strobe Light
Bottom: Iridescent Strobe Light, Brilliant Strobe Light

Swatches and three sets of comparison swatches, first in natural light:

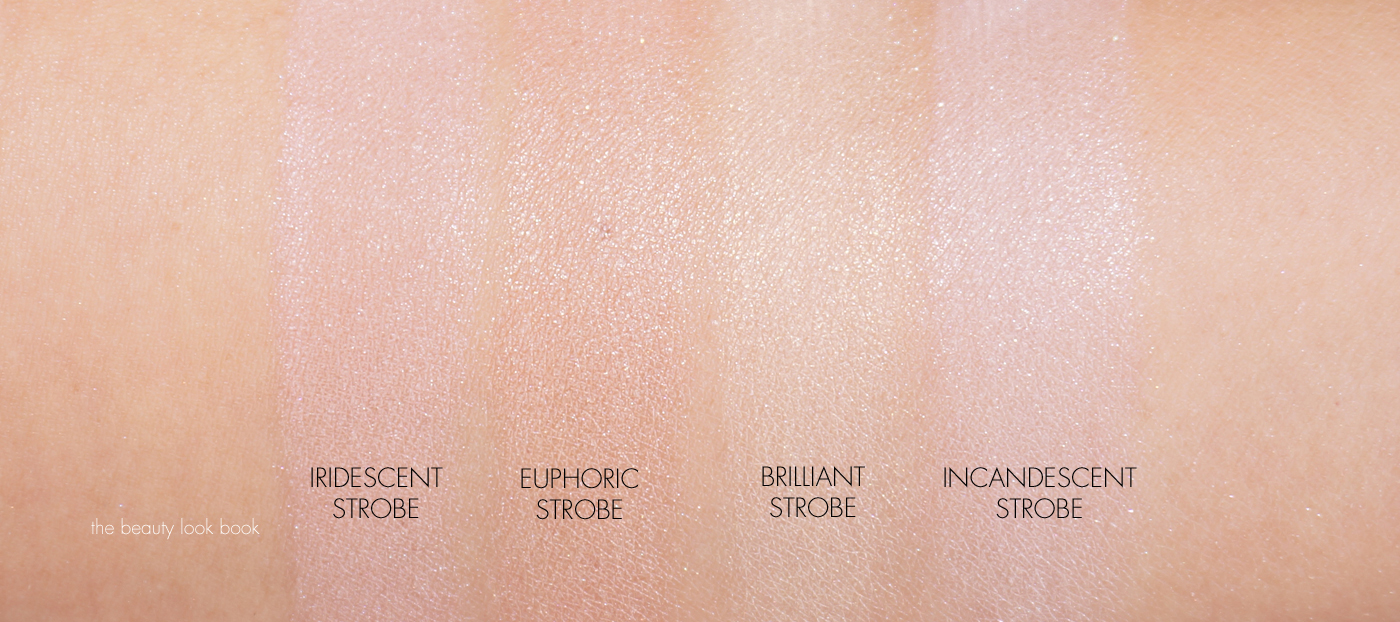
With sun + flash – they look frosty here, but I can assure you on the face they are more finely milled and naturally glowy:

A quick look at the Ambient Strobe Light Sculptor – it applies these perfectly to the cheek bones by tapping on the areas you want highlighted. A regular blush brush works just as good, although if you want to apply the powders damp for more color, I found the brush worked better.

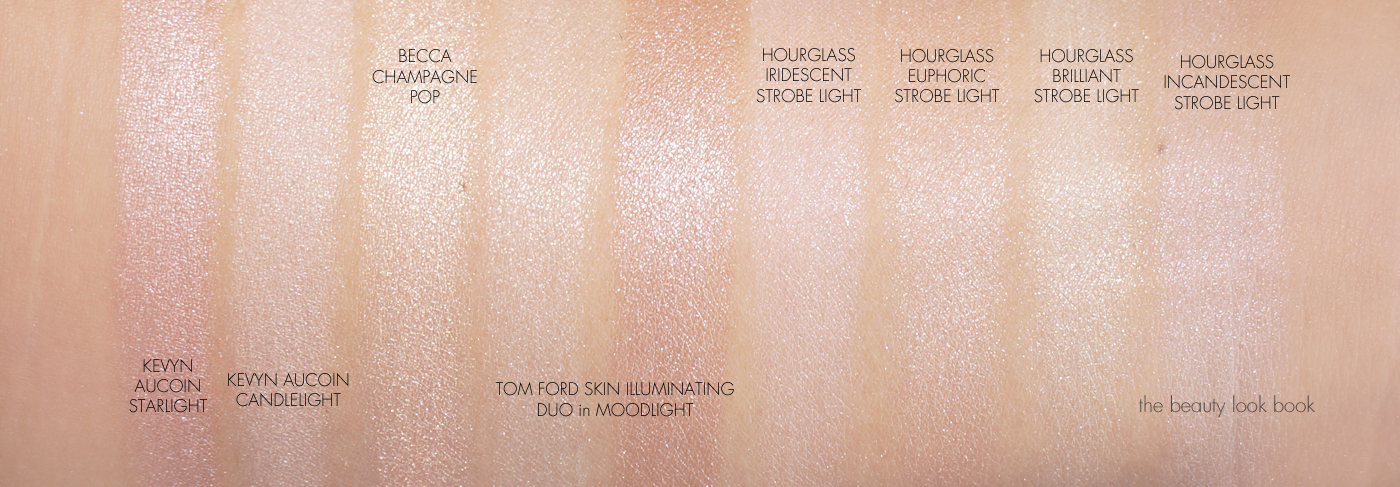
Comparison Set 1: Hourglass Ambient Lighting Powders in Luminous Light (reviewed here), Diffused Light and Dim Light. Luminous Light has a shimmery quality that acts as a highlighter while some other shades like Diffused and Dim Light are less shimmery and can be used as an all over setting powder for me without looking too glowy. Below the swatches are done with a heavy hand to show the color differences.

Comparison Set 2: Kevyn Aucoin Celestial Powders in Starlight and Candlelight (reviewed here) are a lot more shimmery. On me Candlelight looks too white for my olive/yellow skin although it looks good on many of my friends. I prefer the Hourglass Strobe Powders by far. Also shown is Becca Champagne Pop (swatched here) and the Tom Ford Skin Illuminating Duo in Moodlight (review). The Becca is one of the most shimmery highlighters I own (and adore). By comparison the Becca Champagne Pop almost feels sharp because the shimmer is so pigmented.

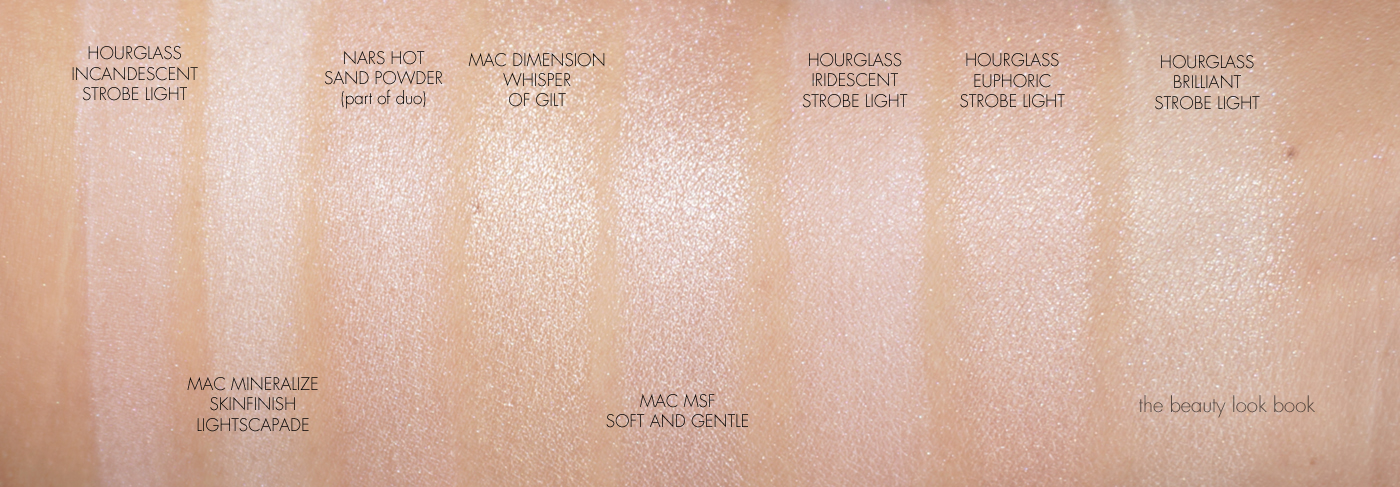
Comparison Set 3: MAC Mineralize Skinfinish in Lightscapade is one of the softest most finely milled highlighters from MAC that I own. It’s a lot paler than any of the Ambient Lighting Strobe Powders but has a similar effect. MAC Mineralize Skinfinish in Soft and Gentle by comparison has a lot more shimmer/frost. I added a swatch of the MAC Extra Dimension Highlighter in Whisper of Gilt (d/c, review here) to show texture comparison. The effect of the powders is similar to that of NARS Hot Sand Duos (review here). If you already own Hot Sand, you can probably skip Incandescent or Iridescent.

Quick look at the beautiful store on Abbot Kinney:

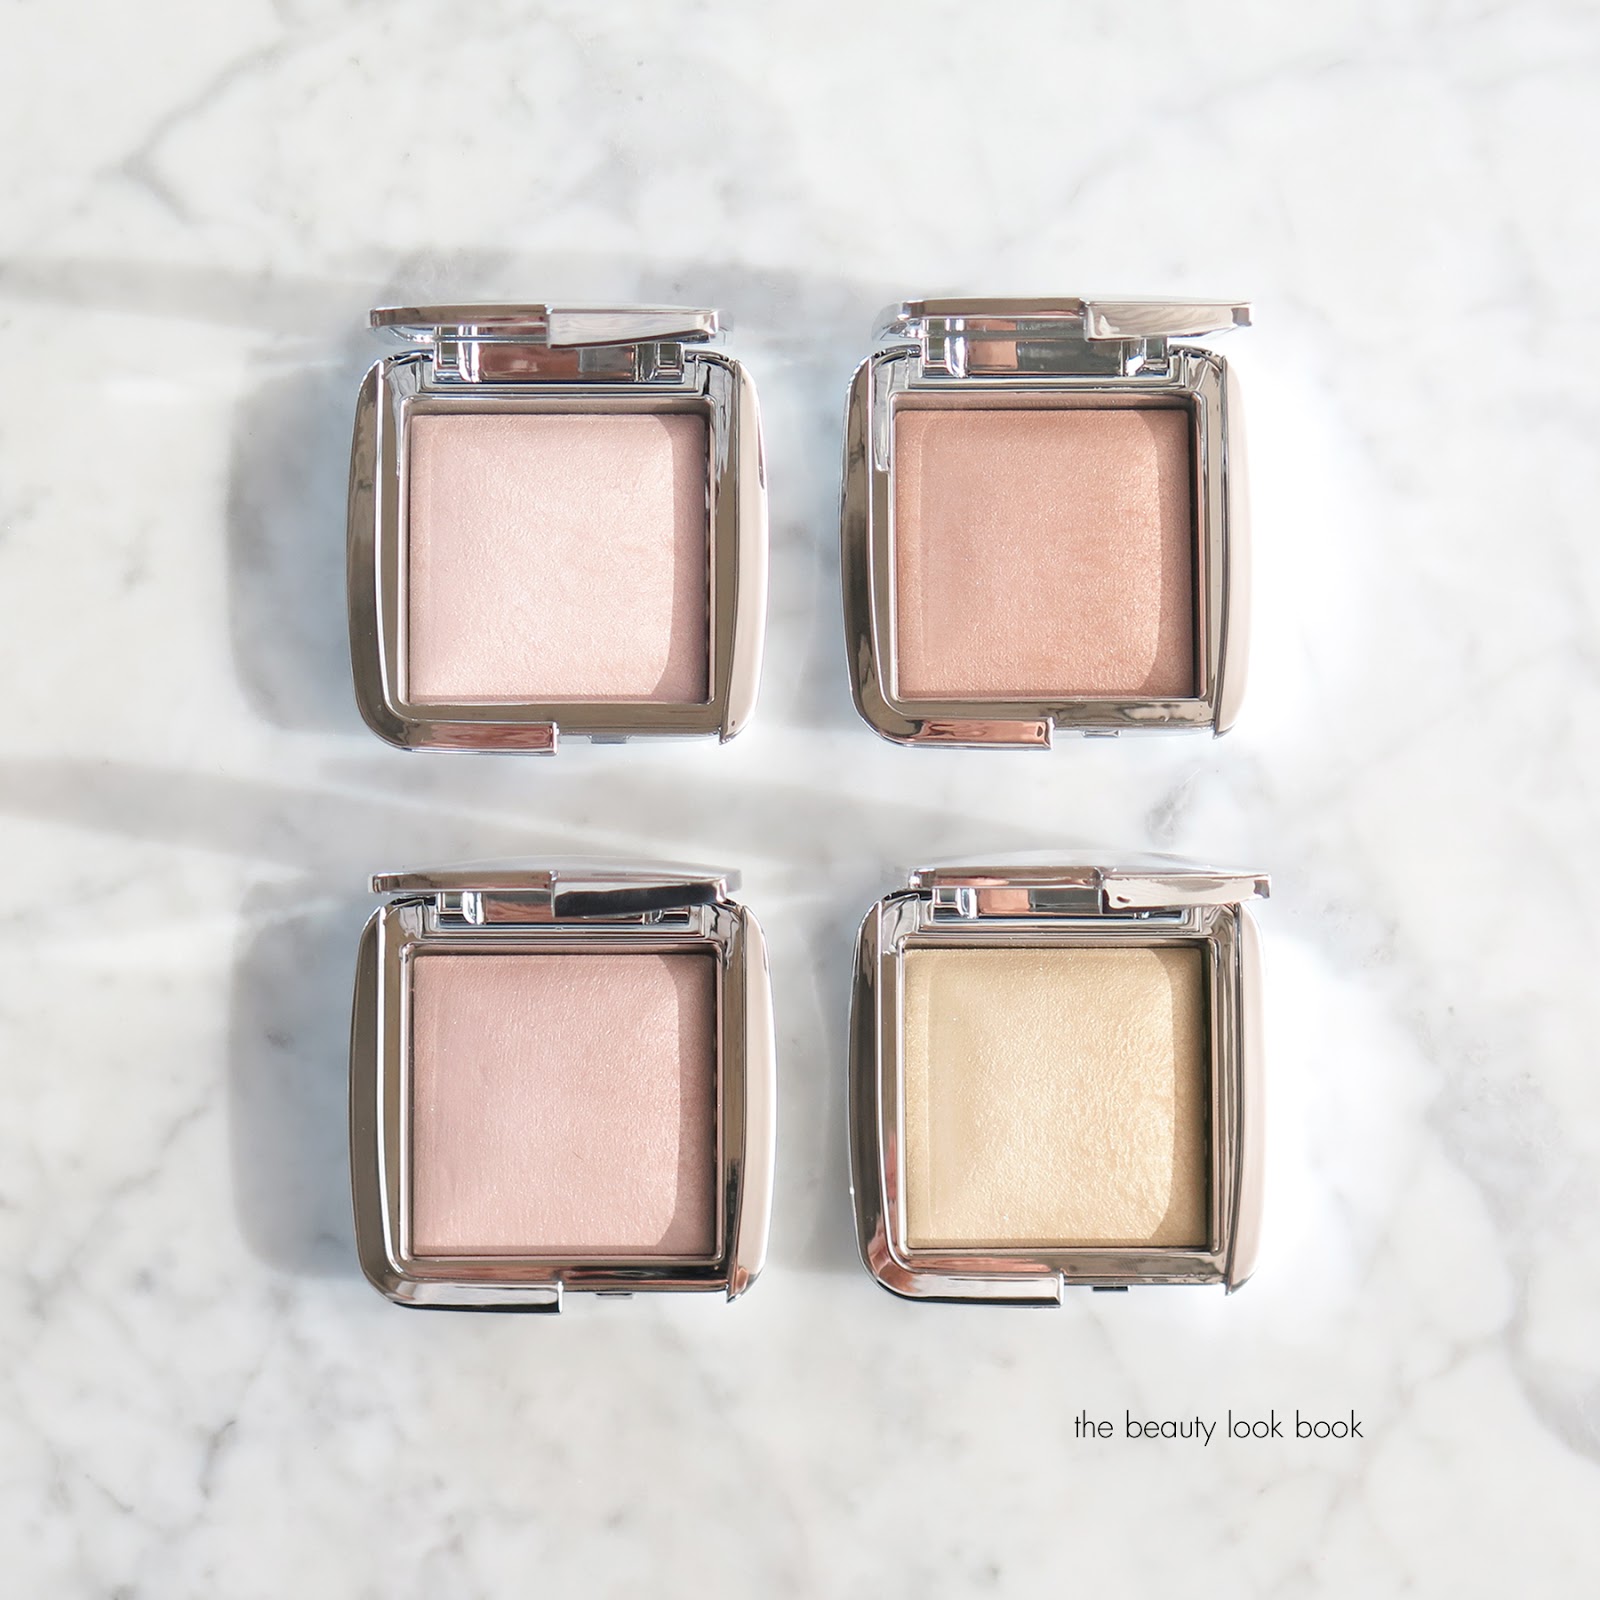
One last shot, clockwise from top left: Euphoric, Iridescent, Brilliant and Incandescent

Bottom line all winners. I tested these over the past week and am thoroughly impressed. They lasted all day on the cheek bones without getting too glowy or dewy looking by late afternoon. I’ve been testing them over a number of foundations from Tom Ford, NARS, Laura Mercier and Natasha Denona. They all held up remarkably well. I am already on highlighter/glow overload – I’m completely obsessed with glowy highlighters, but I thnk these are well worth a look. If I had to narrow down my picks, I would say Brilliant Strobe Light offers the best strobe highlight for my olive skintone. It brightens the complexion with a gorgeous candlelight glow. Euphoric is the most natural on me since it’s deeper, but it still shows up like skin but better. I would say there’s a tie between Iridescent and Incandescent – I think the pink tones in Iridescent make it more special, but you can’t go wrong with either. The sponge is nice to have, but not a must.

You can find the Hourglass Ambient Strobe Lighting Powders ($38) and Sculptor ($22) at Sephora and Hourglass Cosmetics right now. It is expected to launch at other retailers later this spring.

Have you checked these out yet? What’s your favorite highlighter right now?

Uncategorized

beautyblender micro.mini

March 24, 2015

After discovering beautyblenders last year I fell in love and have been using these sponges on a regular basis to blend my foundation and cream-based makeup products. The latest from beauty blender is a small duo called the micro.mini ($17.95 for a pack of 2). These are ultra cute baby-sized sponges designed for detail application like the inner eye corners, brow bones, sides of nose, and cheeks. According to beautyblender, the micro.mini is 1/4 the size of the original version and made of the exact same material. Online reviews are mixed on these, many state that it’s simply too small to even fit in the fingers, but I think the key to using these is to use them damp. When you get these wet they expand and double in size and become more bouncy. The expanded/damp application blends cream products flawlessly and smoothly versus a dry sponge.

micro.mini vs. original:

glass canister from Crate and Barrel

I’ve been testing the micro.mini for a few days now and I’m a fan. I really like these for applying makeup under the eye or blending products around the nose. I’m always twisting the full size version when I blend concealer under the eyes to get a more precise blend, the mini is the perfect solution for those tiny areas you want to blend where a sponge is too big but a brush is too detailed. I’m one who doesn’t like to use the same tool for foundation and concealer (I just don’t like mixing two products on one tool), so the micro mini is perfect for me. I know many like tools that are multi-purpose. If you don’t mind using the same sponge for concealer and foundation then this won’t be a necessary tool.

Above: NARS Radiant Creamy Concealers in Custard and Ginger, review + thoughts here

When the micro.mini is dry it’s ultra tiny making it difficult to hold even in small hands or fingers. The best way to use these is damp where they expand to double the size. Below shows the size difference dry vs damp. Even when they are damp they are still small. If you find it slips out of your fingers try squeezing the excess water out with a paper towel. The first couple times I used it I found I needed to dry it more.

The uses are endless with the beautyblender sponges. You can apply product on the face and then blend with the sponge. Or you can mix products on the back of your hand (or makeup palette) and dip the sponge in and then apply to the face. There’s no one method I use for applying concealer. Sometimes I like to dab straight on the face. Other times I’ll apply it to the back of my hand first.

I really like the micro.mini. For someone who like to keep separate tools for concealer and foundation this is perfect. I’ve been one who usually blends concealer with fingers, a clean end of a sponge or a small makeup brush. I find if there is excess foundation on a sponge, the dewiness or luminous texture of the foundation will sometimes dilute or mess up the pigment of concealer if it’s mixed with the same tools. It’s not always a bad thing but sometimes I really want concealer to cover up areas, so using a clean tool is a must for me. The small size of the micro.mini works really well for me for concealer, although I don’t suspect it will be a must-have for all. Some will probably prefer a brush, fingers or just use a regular sponge. They are ultra tiny so I suspect they might be difficult to hold for some (it’s just the right size for me but I have smaller-than-average fingers).

There are multiple uses listed for the mini version which includes contouring and highlighting, but for me I think it’s too small for either of those purposes. I prefer powder for contour and for cream or liquid highlighters I prefer brushes. If you’ve tried these I’d love to hear how you use them.

You can find the micro.mini beautyblenders in packs of two for $17.95 now at Sephora and Nordstrom. Have you tried these yet? What did you think?

The micro.minis were provided as press samples for review consideration.
As always, all opinions my own.

Beauty Tools

Favorite Makeup Tools for Face, Cheeks and Eyes

December 22, 2014

I’ve compiled several detailed brush guides this year but several of my readers have asked for a more consolidated list of recommendations. Like most of my beauty routine, when it comes to makeup tools, I rarely stick to just one brand. I think different lines have certain strengths in particular areas.  Some have a better shape while others are made of better materials. There is a lot to sort through in terms of brush shape, size, material and price point. For me, it’s really important that I am able to test a brush in person before purchasing it so I tend to stick to main stream brands. Today I’ve compiled a list of my most reached-for tools for face, cheeks and eyes.

My top picks for brush brands include MAC, Chanel and Tom Ford. In my experience, the overall best brand for quality and price is MAC. I own many MAC brushes that have lasted me over a decade. I like that the brushes have a simple and sleek design and the quality is consistent among all the tools regardless of material or type.

Chanel is also another great brand that I use a lot for brushes and tools. They recently redesigned all their brushes (I think in the last year or so) for a more modern look. The tools work really well with all brands of makeup. There are many similarities in shapes between MAC and Chanel although the material is very different in most of the tools. 

If price is no object, Tom Ford hands down makes the best brushes I’ve ever tested. All the brushes are super soft and plush and perform the best out of all the tools I’ve tried. The cream foundation brush is the only brush that gives me a streak-free application for foundation or tinted moisturizer. Tom Ford’s brushes are among the few brands I ordered sight unseen. I splurged on a brush set a few years ago and although it made a serious dent in my wallet but I have no regrets and it makes applying makeup a truly luxurious experience each day.

1 / Beautyblender ($19.95) is the best sponge I’ve used. I just discovered it this year and don’t know how I ever got along without it. There are multiple colors and types of beautyblenders but the pink one performs the best. Use it damp and it expands and applies foundation flawlessly.

2 / MAC Duo Fibre Face Brush #187 ($42) everyone needs a good skunk brush. These are fluffy brushes with two types of material mixed in. The uses for this are endless. I like to use mine to apply powder bronzer or highlighters to the face. You can also use these with cream products or to buff out powder foundation or to blend items. MAC also makes the Duo Fiber brushes in a number of other formats like the Short Handled #187 and a tapered Blush #159 version. I like the classic version the best.

3 / MAC Large Angled Contour #168 ($35) is super soft and fluffy angled contour brush. I use this for bronzer or blush (primarily powders). It’s also a good blending tool. The angled edge helps control application.

4 / Tom Ford Cream Foundation Brush #02 ($72) is the best foundation brush I’ve used. It’s one of the most expensive tools I own but worth every penny. When I use this to apply liquid or cream foundations, application is flawless and completely streak free. I normally prefer to use sponges for foundation but often times they soak up so much product. This is the closest thing I have to getting a sponge-finish look with foundation but in brush format.

5 / Chanel Foundation Brush #6 ($45) is my most reached-for foundation brush. It’s not quite as perfect as the Tom Ford, but for me it’s the next best thing. I like this for cream blushes too.

6 / Chanel Blush Brush #4 ($54) is my favorite blush brush because of the shape and material. It’s medium-sized and compact but has just the right amount of density to pick up color and dispense it perfectly on the cheeks. MAC makes a lot of good blush brushes too which are very good quality, but I find myself reaching for the Chanel the most.

7 / Chanel Powder Brush #1 ($65) is my favorite dense but soft powder brush. I use this for loose powder, pressed powder and powder foundation. It comes out of the box tapered but once you wash it it fluffs up quite a bit while still retaining a round shape. I like that it’s sturdy with a substantial handle but still easy to hold and maneuver.

1 / MAC Blending Brush #217 ($24) is the best white fluffy brush you can find for $24. This is key for me in terms of blending shadows for a subtle gradient. I also like to use this as a regular eyeshadow brush when I want an all over lid color.

2 / MAC Eye Shading Brush #239 ($25) is in my top 2 picks along with MAC Brush #217. This is my all time favorite eyeshadow brush. It picks up color really well and blends powders together nicely. I like that it’s dense but super soft.

3 / Tom Ford Eyeshadow Contour Brush #12 ($56) is another favorite. This is my do-it-all kind of brush. It applies shadow on the lids, it will contour or smoke out darker colors and the tip is dense for a smokey eye.

4 / MAC Shader Brush #242 ($25) is what I like for cream shadows (or concealer too). This one has lasted me the longest, I think it was one of the first MAC brushes I bought for myself. It has a really nice round tip making application easy and smooth on the eye (so it doesn’t poke the skin).

5 / Chanel Large Eyeshadow Brush #25 ($38) is a medium to large eyeshadow brush that isn’t too big or fluffy. I do like a good fluffy brush, but these days I find myself reaching for this one because it isn’t as thick or dense making it easier for me to control color and application. If you want something fluffy, soft and more dense, the Bobbi Brown Eye Sweep Brush is one of my favorites.

6 / Laura Mercier Smudge Brush ($24) is a good dense detail brush. It’s stiff but not too stiff so it’s easy on sensitive skin or eyes. I like this one to smudge eyeshadow or eyeliner. I use this instead of a regular liner brush because I like a more smudged softer line to define the eyes. It offers precise application but if you are looking for something super precise, I’d recommend the Bobbi Brown Eye Liner Brush or the Angled Eye Definer Brush.

7 / Trish McEvoy Laydown #40 ($42) is one of my favorite multi-purpose brushes. I like this for powder eyeshadow, cream eyeshadow and concealer. I owned this back when Trish McEvoy had gold handles for the brushes (they are now lucite). It’s the perfect shape, size and density for creams to get a good smooth and even application.

8 / Charlotte Tilbury Eyelash Curler ($20) is one of the newest eyelash curlers I’ve tried. When I first tried it I wasn’t super impressed because it’s called the “Life Changing Lashes” eyelash curler and well, it simply didn’t change my life. I found it just as good as my Trish McEvoy and Chanel eyelash curlers but not anything super special. I’ve since tried a few others from other brands like Shiseido and Shu Uemura and have really come to appreciate the design and shape of the Charlotte Tilbury. It has just the right amount of curve to fit my eye shape. Many others are too flat or not curved enough. The wrong shape will either pinch my eyes around the corners or miss lashes making the curl uneven. I give the Charlotte Tilbury a huge thumbs up for the way it performs. 

9 / Trish McEvoy Eyelash Curler ($20) is a classic go-to for me. I have several of these right now and  it’s been my most-replaced tool (some recommend you change or the pads these every 90 days, I tend to use these longer replacing once every 6 months). It just works the way an eyelash curler is supposed to. It grabs all the lashes and curls them evenly and in a round flared up shape. 

I have some additional thoughts on brushes focusing on double duty or recycling. Based on the above guides, you might be wondering what I recommend for eyeliner, concealer, crease, bronzer, brows or lips.

I think a lot of tools can be used multiple ways which means you can stretch out the uses. Having multiple brushes can be extremely useful so you don’t have to worry about mixing colors or washing brushes frequently if you change from a light to a dark color for a certain tool. I do like brushes that will do multiple things though. For bronzer, I will sometimes use my blush or powder brushes. For the eye crease or contour I find the MAC #217 works just perfectly. For concealer I like blending with the fingers or a sponge.

For brow a lot of brow pencils come with a brush on the end to smooth out the color. I’ve bought a few brow combs before but find they don’t last me very long so I like to recycle my mascara wands after they are used up. Rinse the end with soap and warm water and you’ve got a lash comb and brow comb in one that you can toss whenever without worrying about throwing money away.

Lip pencils often come with a lip brush at one end so I don’t find the need to purchase a separate lip brush for gloss or lipstick. Chanel and Dolce & Gabbana have lip brushes which I find handy.

Last but not least, long time readers know I’m a fan of recycling candle jars. I use them to store brushes, pencils, lip gloss and office supplies. Diptyque and Jo Malone are my favorite to recycle. I just clean them out with warm-to-hot soapy water and a dish sponge. My candles don’t always have a clean burn so often times there are remnants of wax stuck on the sides. Some recommend freezing or using boiling water. I find that using anything too drastic with temperature changes can crack the glass or melt off the sticker (which I like to keep in tact).

If you’re just starting to build up your collection of makeup tools I hope you found this guide helpful. It can be overwhelming to sort through all the options so I have found the best way to start is to focus on one area at a time (i.e. start with eyeshadow brushes or blush brushes) and do your research. If you’re an in-store kind of shopper, I highly recommend bringing a small list of options you’ve found interesting or with high ratings. Having a list can be helpful in case you want to see different brands in one store. Some brushes go by number so writing the numbers down is handy unless you have a super good memory, I often have to look at the numbers on my MAC brushes when someone asks me “which brush is that?”

Building a good brush collection will take some time but it doesn’t have to be complicated. Brushes can be pricey especially when you add them up so I do recommend taking your time to research in advance to make sure you find ones that work best for your specific needs or wants.

I hope you found this guide on my favorites helpful to start!

This post was sponsored by Nordstrom. All opinions my own. All tools my own. For more information you can refer to my Disclosures.
Uncategorized

beautyblender sponges – my new favorite beauty tool

October 24, 2014

Beautyblenders are one of the most raved-about makeup tools I’ve read about. I’ve looked at them in Sephora stores numerous times but couldn’t bring myself to spend nearly $20 on a sponge that I would have to end up throwing away within a couple of months. I finally caved and decided to give beautyblenders a try during the Sephora VIB Summer Surge event back in August. I purchased the Original Beautyblender version ($19.95) and have been really impressed. If you’re late to the game with these (like me), Beautyblenders are an egg-shaped sponge with what they call “an open cell structure.” It’s a porous sponge that fills with small amounts of water and expands to about 1.5x in size when damp. The sponge provides amazingly flawless foundation application that I’ve found to be streak-free. You can use it with primers, foundations, powders, cream blushes, concealers and any other complexion product. I can’t believe it took me so long to try these.

The sponge comes in a small plastic case with easy to use instructions. It works best when slightly damp. I run it through water entirely and then squeeze out the excess. The texture of the sponge is very cushy with a bouncy feel. I usually pour foundation onto the back of my hand first and then tap the sponge into the product before applying onto the face. Just tap and bounce and it blends in foundation perfectly. It also works wonders to blend out concealer.

dry Beautyblender Pro vs. damp Beautyblender Original

After featuring some of the sponges on the blog, several of my readers have asked what I use to clean the sponges. I can usually get 2-3 uses before I need to clean by using different areas of the sponge. I read reviews online at numerous message boards and customer reviews on retailer websites and decided to try the Beautycleanser Solid and Beautycleanser Liquid. I expected to like the liquid version better but the Solid does a much better job at cleaning the sponge all the way through. I’ll use the liquid one up, it works ok, but won’t be repurchasing. The solid is something I’ll keep repurchasing though. It’s like a solid soap – just get the beauty blender wet and rub it into the soap to lather up the cleanser. Rinse and repeat.

There are a number of different beautyblender options. I also checked out the Pure and Pro versions. Bottom line is the Original one performs the best for me. A quick rundown of the differences and my thoughts:
  • Original beautyblender (pink) is the smallest in size when dry although they are all pretty similar in size once damp and expanded. This one gives the best even coverage with liquids and has the most cushiony bounce, the first time you wash it, you will see pink dye run through the water. I’ve never had pink transfer from the sponge onto my skin though and it doesn’t seem to stain white countertops.
  • Pure beautyblender (white) is designed for super sensitive skins. It’s dye-free and colorless so those who might have a reaction to the pink dye in the original might want to opt for this one. I didn’t have any reaction to the pink one and the white sponge performs almost as well, it has a very similar texture but not quite as much bounce, it blends foundation smoothly, but for some reason the original still does a blending job the best.
  • Pro beautyblender (black) is designed for darker products that might stain the pink or white sponges. I noticed a visible difference in texture and the first couple times I used it, tiny bits of sponge went all over my face and countertop. It’s more porous compared to the others and the while the material is still soft, it seems a bit rougher in texture. It made about 1/2 of the foundations I’ve tried with it go on streaky although it did work nicely for powder foundation. I probably won’t be repurchasing this one.

I’ve used the MAC Blending Sponge for years (even back when their older version was a pale beige color). I also really like smaller ones from my local Japanese supermarket. None of the ones I’ve tested compare to the beautyblenders in way they blend liquid foundations or concealers on the skin. Since August I’ve used up and thrown away 1 beautyblender. You do have to be somewhat delicate when washing them or else you might see parts of the sponge tear in areas.

I give these a huge thumbs up. I will definitely keep repurchasing the original version. It applies foundation really well without soaking up too much product. I love how it helps blend concealer too (especially on the under eye area). If you are new to beautyblenders or need to replace one, you might want to consider their sets like this Sponge + Solid Cleanser duo (you get a slight price break). 

I’ve purchased my beautyblenders at Sephora and Nordstrom. Have you tried these sponges? If so what did you think? Do you have any other favorite foundation/concealer tools?

Uncategorized

Day 3 of Beauty Tools & Essentials: Tools & Accessories

July 29, 2009

Tools for the face – Foundation, Powder & Cleansing/Touch Up:

* Sponges – My fool-proof technique for applying foundation is to use an egg-shaped sponge, which allows for even application and control of the amount of coverage. The edges also allow for clean-up of smudges or fall out of powder eyeshadows. Sponges are also great for applying powder foundations, but most compacts come with their own. Refills are available from a number of lines.

* Puffs – Larger puffs are nice for applying translucent powders to set foundation. (I clean mine in the washing machine.) Sometimes you can find the smaller versions in gift-with-purchase deals.

* Facial Cotton/Q-tips – Shiseido Facial Cotton (found at Macys, Nordstrom, Bloomingdales, Sephora and other Shiseido counters) is a standby for me for removing makeup or fixing mistakes. Q-tips are also essential for removing smudges and getting those fine detail areas.


Top Row: Laura Mercier Velour Puff, Chanel Mini Puff (GWP), MAC Foundation Sponge Liquid/Cream

Bottom Row: Laura Mercier Mini Velour Puff (GWP), Shiseido Facial Cotton/Q-Tips, MAC Studio Tech Sponge (Set of 2)

Tools for the eye area – Lashes & Brows:

* Eyelash Curlers – There are many different curlers out there, the type that will work for you will depend on your eye shape. I find that Shu Uemura and Trish McEvoy work the best for me.

* Tweezers – My favorites are Anastasia & Shu Uemura. Tweezerman is good too, but I find it dulls after a while. The mini purple tweezers are from Nordstrom for their Anniversary Sale Beauty Exclusives.

* Brow Comb


Left to right: Tweezerman Mini Slant Tweezers, Anastasia ‘Mini Berry’ Tweezers (Nordstrom Beauty Exclusive, Shu Uemura Slant Tweezers, MAC 204 Lash Brush

Trish McEvoy Lash Curler from the Trish McEvoy website, but also found at select Nordstroms, Saks, Bloomingdales, Neiman Marcus, Henri Bendel locations.