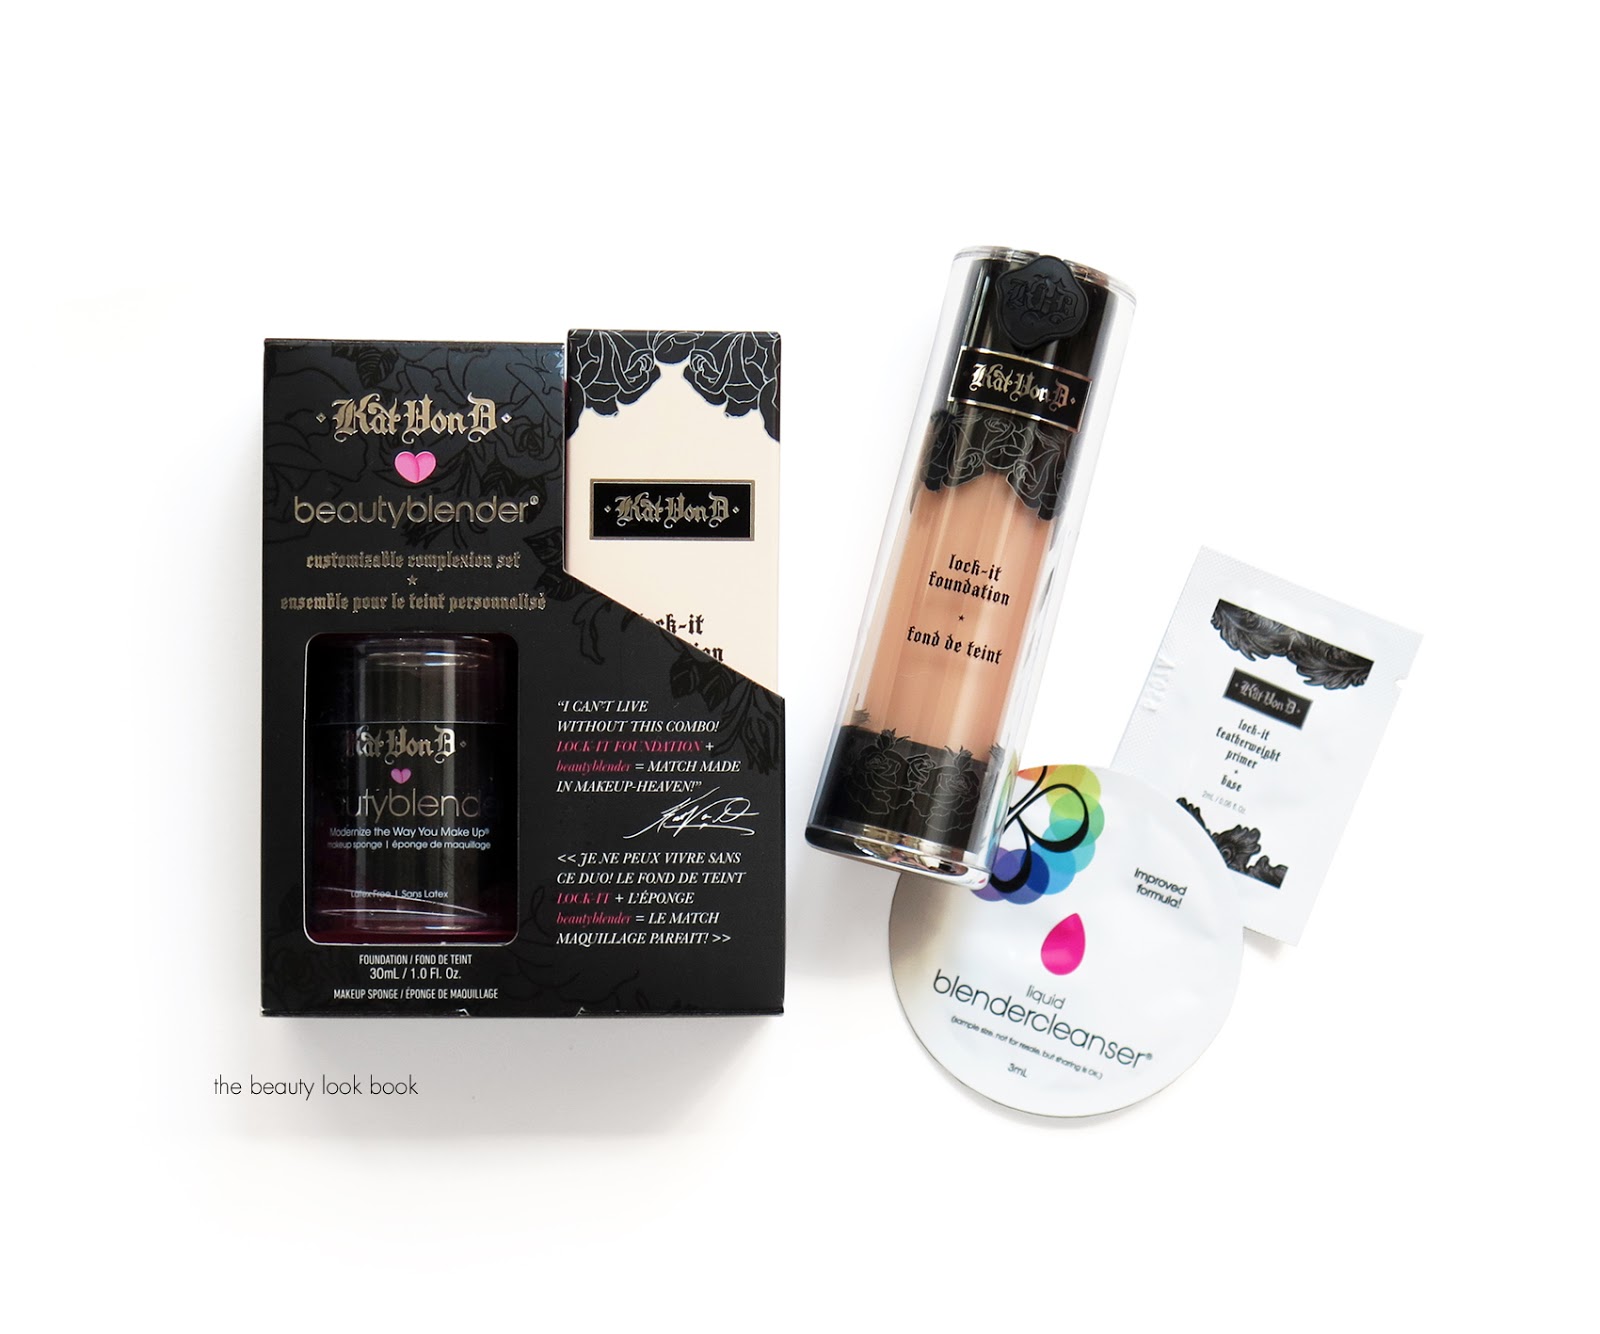
I’m a bit late to the game in trying out the Kat Von D Beauty Lock-It Foundation ($35 for 1 fl oz/30 ml) and I’ve been clearly missing out for quite some time. The line just launched a special limited-edition set called the KVD + beautyblender® Customizable Complexion Set ($46) which includes your choice of Lock-It Foundation, a full size beautyblender® pro and minis of the liquid blendercleanser® and Lock-It Featherweight Primer (set valued at $55). I received several shades to try out and was immediately impressed by the flawless full coverage velvety finish the Lock-It Foundation had. This is a high pigment full-coverage foundation that gives the skin an almost porcelain doll-like look. The formula is very concentrated, but if blended properly has a smooth streak-free, cake-free, perfect finish. Lasting power is excellent with or without a primer, however I did feel the primer sample made a difference in application. With the primer nothing settles into fine lines. Without a proper base if you have any dry patches the foundation is prone to settling into tiny crevices, but as long as your skin is properly moisturized you can probably skip the primer. That being said I’m so impressed with the primer I’ve added it to my shopping list for this weekend.
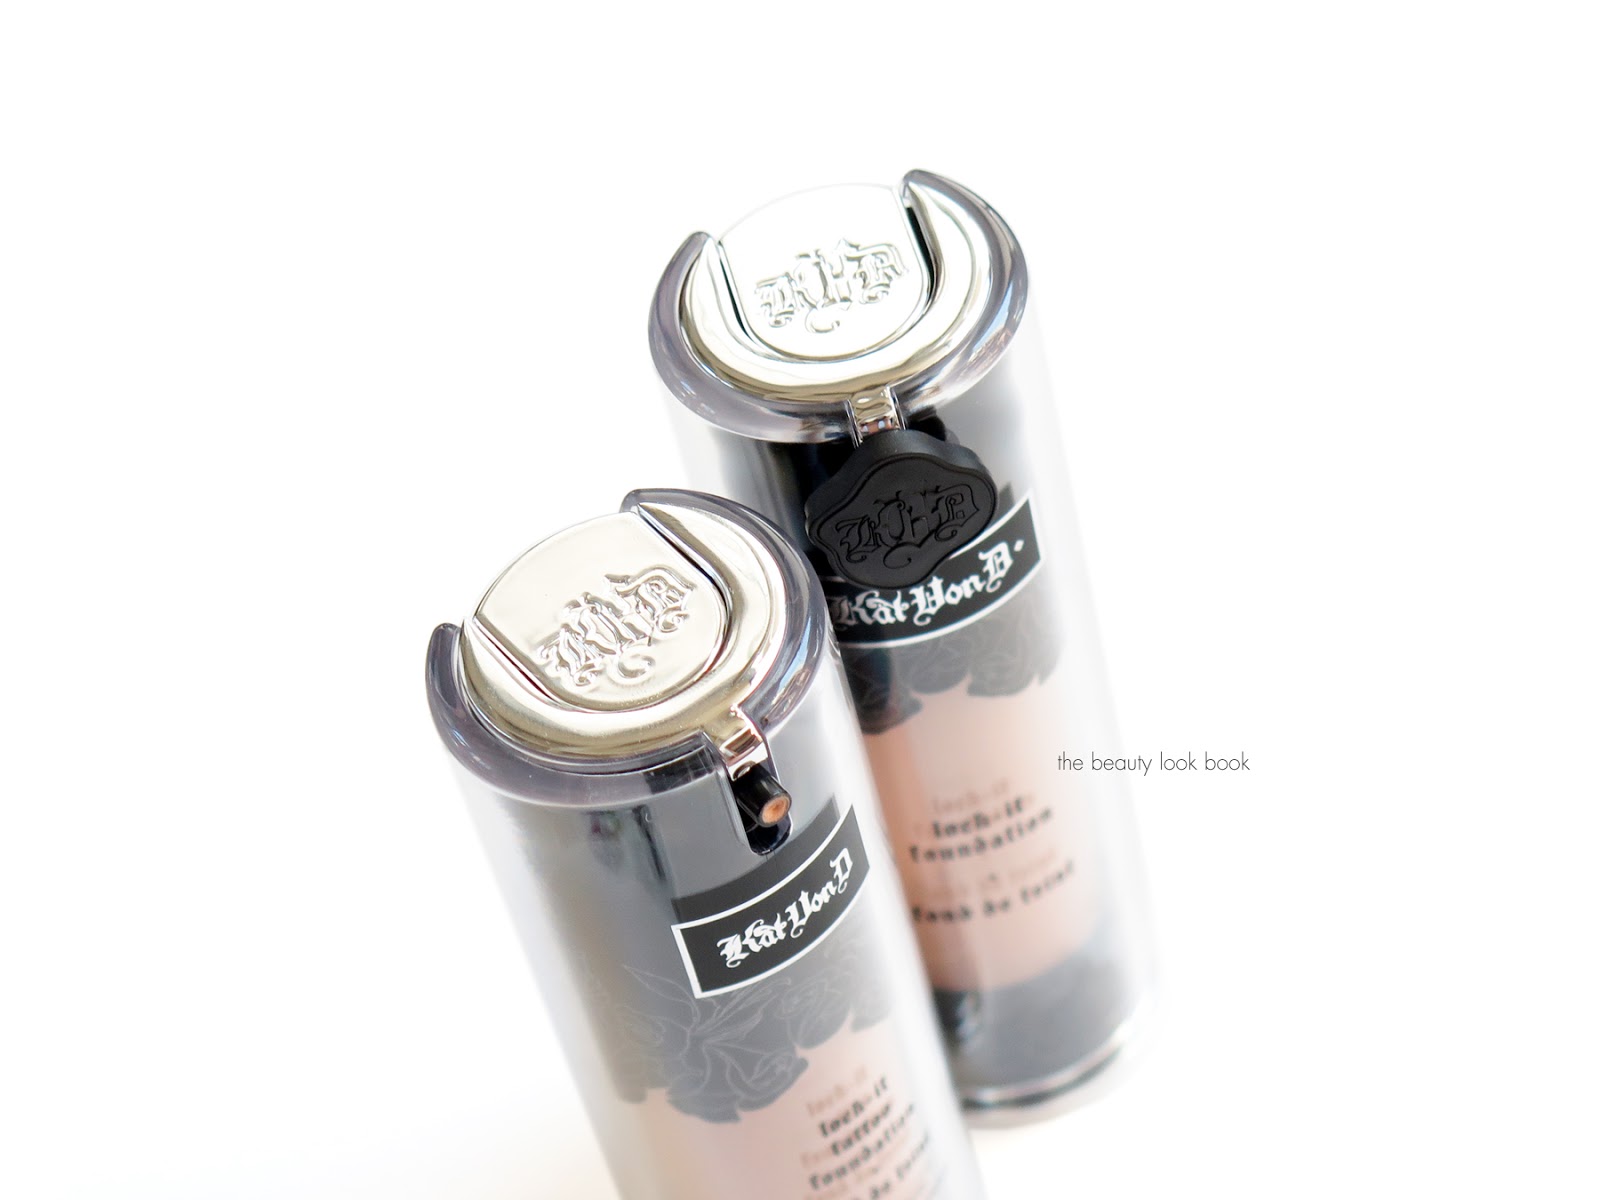
The packaging is well designed. It comes with a clear case so you can see the product inside. The top of the pump is flush with the top of the bottle which makes it convenient for travel. There’s a small black cap to place on the actual dispenser itself which acts as a lock so you don’t accidentally dispense product if you press on the top. For me a little goes a long way, I only need 2 pumps to cover the entire face. Foundation needs very little layering to get full coverage – you just need to apply and blend.
For application, I tried this with a few damp beautyblenders® in the Original (pink) and Pro (black) (both reviewed here) along with several foundation brushes including the Marc Jacobs Beauty The Face III Buffing Foundation Brush and Sephora Pro Full Coverage Airbrush #53 (both reviewed here). I still stand by my original review that the Original Pink beautyblender® is better than the beautyblender® Pro, but I found with this particular foundation both sponges worked equally well. I’m not sure if the Pro version has changed at all over the years but this round of testing had black sponges that seemed softer with more bounce than what I remember. Either way – a dampened sponge helps control the amount of product you apply. Since the Lock-It Foundation is a very concentrated and full coverage finish foundation, you want to make sure you don’t apply too much up front (it will just end up looking cakey). Dab, blend and build and the finish will be perfect.
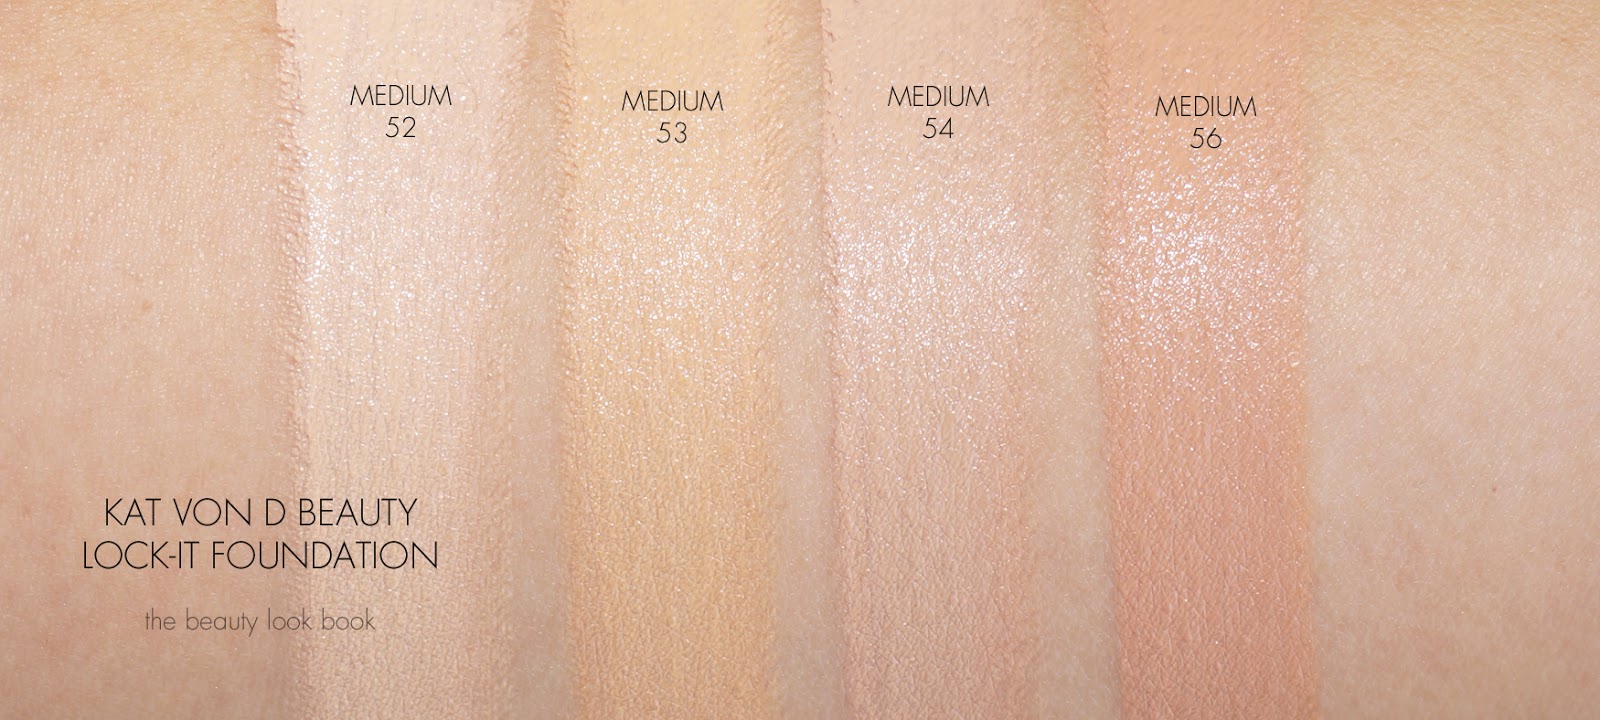
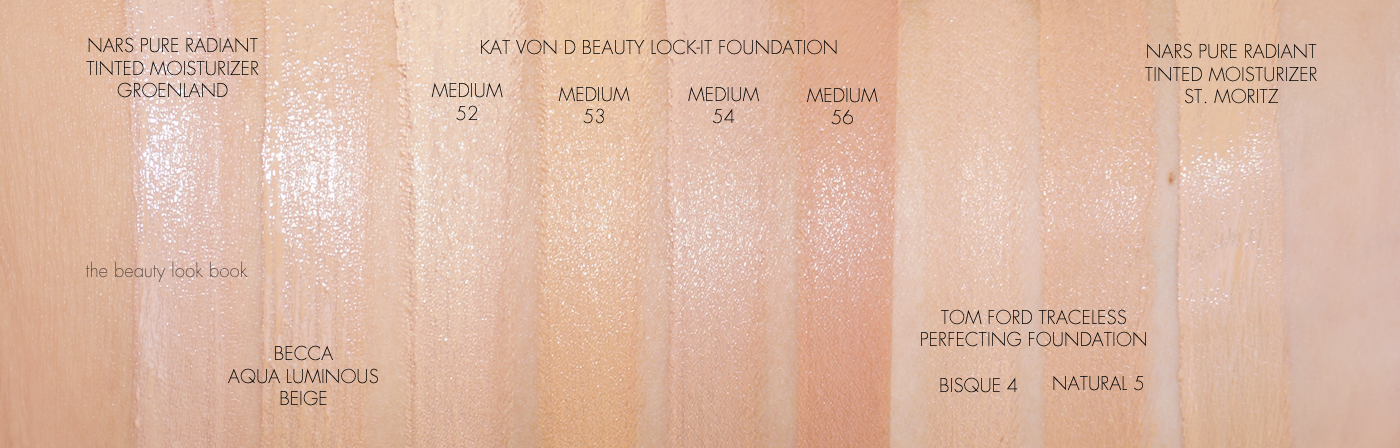
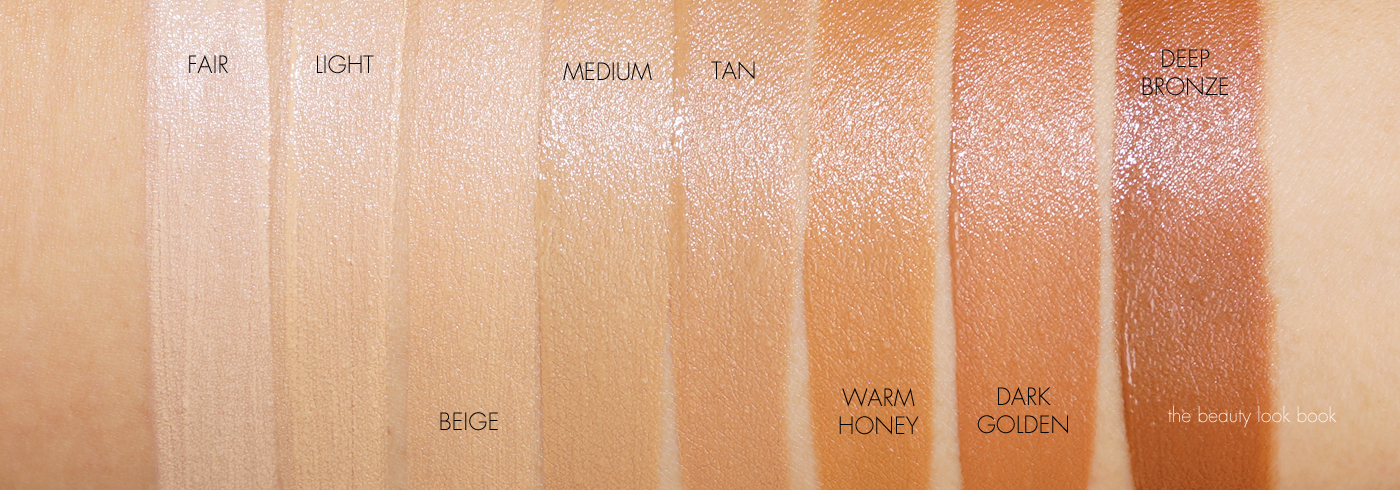
Color selection was a bit tricky for me. I did find some colors swatched to a perfect match on the skin but they oxidize immediately (within 5-10 minutes) to a half shade darker. Medium 54 was a perfect match when I applied it but it darkened so my face did not match my neck – it’s close and I doubt anyone but me would notice but I’m picky when it comes to matching my face shade to my neck. I tried two additional shades lighter. Medium 53 has amazing golden undertones (I wish more foundation lines had undertones like this one) but it also darkens on my skin right now. Medium 52 looks too pale when I first apply it but darkens to the perfect match. After the initial oxidizing which I found happens very quickly it stays the same shade once it sets and dries and doesn’t darken further. My best match right now is Medium 52.
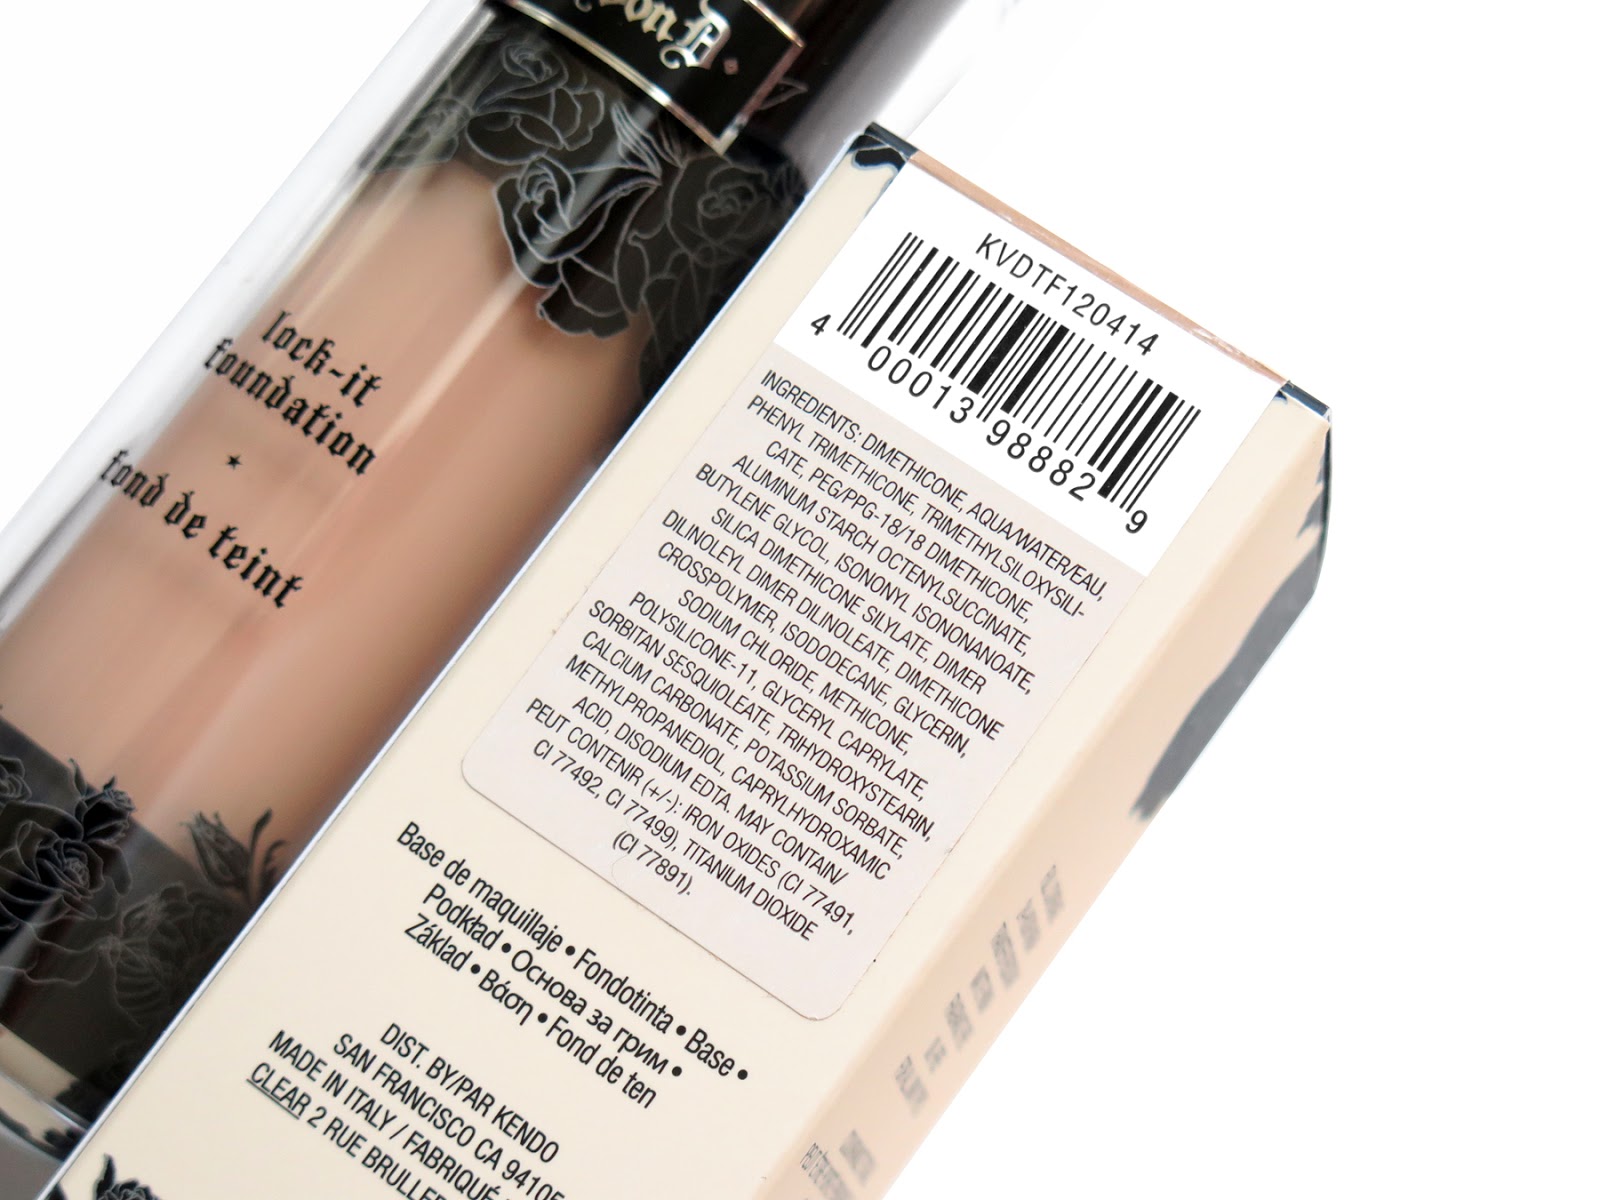
A look at the ingredients:
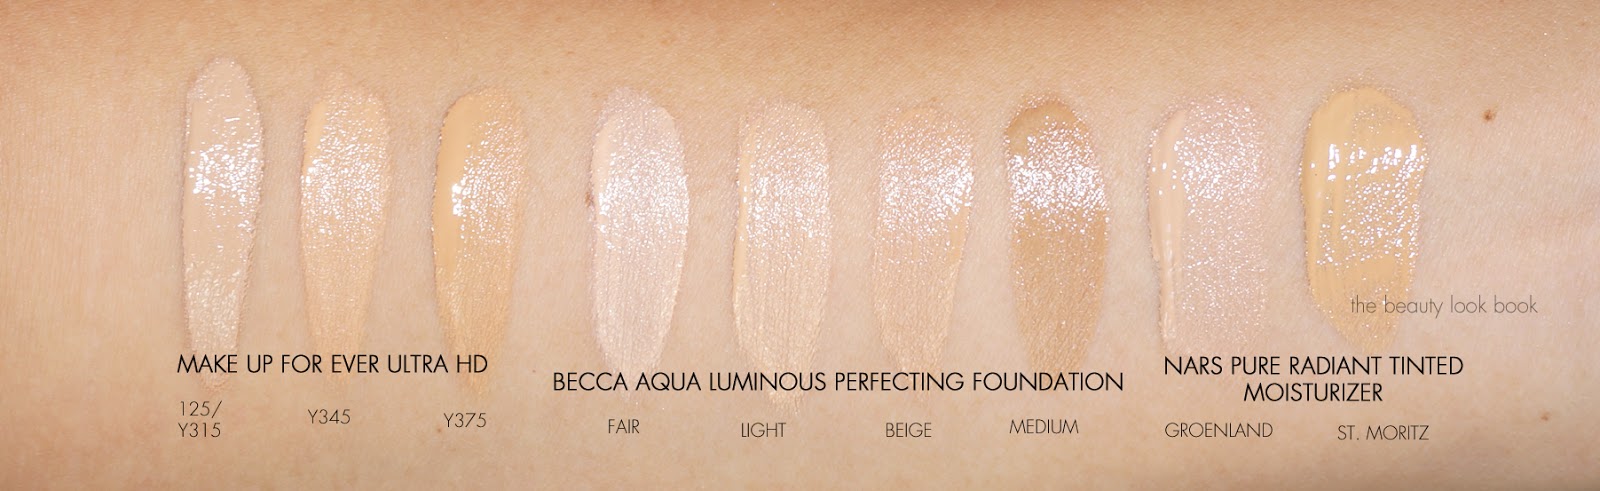
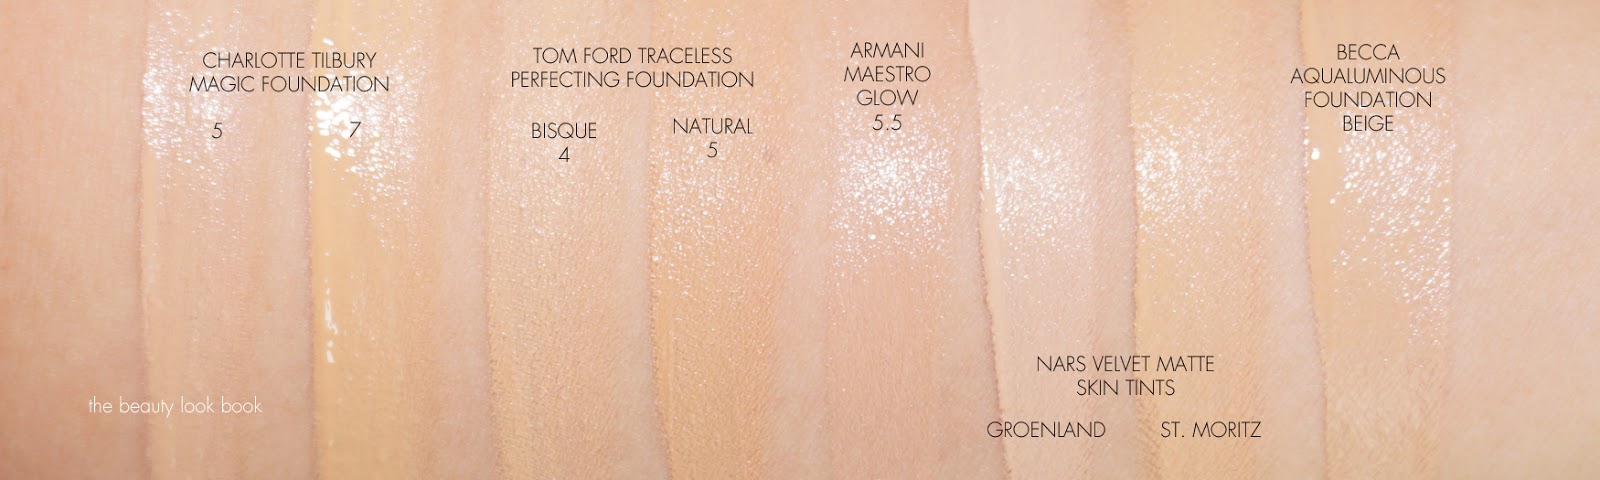
Some comparison swatches to other formulas and brands for shade reference. right now my perfect match is Becca Aqua Luminous Foundation in Beige – but do note the formula is not as opaque as the Kat Von D Beauty Lock-It Foundation and has some sheerness to it which makes it more forgiving.
NARS Pure Radiant Tinted Moisturizer in Groenland
Becca Aqua Luminous Perfecting Foundation in Beige (review here)
Tom Ford Traceless Perfecting Foundation in Bisque and Natural (review here)
NARS Pure Radiant Tinted Moisturizer in St. Moritz
If you do try this in store or get a sample, I highly recommend testing out a few shades and see how it sets. I normally would have given up on finding a match if I tested one and found it oxidized, but the formula of the Kat Von D Lock-It is so good taking the time to test different shades is well worth the effort. I’ve been playing with this formula for a few weeks now – no break outs and no irritation which is a huge plus for my sensitive skin. I have normal combination skin and it holds up very well without budging or getting shiny all day long. I wouldn’t say it’s 100% transfer resistant (if you rub your sleeve or anything on your face it will come off) but it does stay put very well. I always set foundation with a powder and found this performed best when set as well (my favorites rounded up in this post here).
If you’re debating whether to buy the individual or spend a little bit more to get the set, I would say try out the set. Even though the beautyblender® pro isn’t my favorite out of all the beautyblender® options (I think the Original Pink and Nude are the best), I still think it’s a good tool the set is a nice way to the minis of the primer and liquid sponge cleanser. The liquid cleanser is a one-time use (it was for me) but the primer sample can last 3-4 uses (it lasted 4 days for me).
Bottom line, definitely worth checking out. You can find the KVD + beautyblender® Customizable Complexion Set for $46 at Sephora and Kat Von D Beauty. Do note it’s limited-edition, but you can always buy the full-sized items included in the separately.
Have you tried this foundation before? What did you think?
KVD + beautyblender® Customizable Complexion Sets provided courtesy of Kat Von D Beauty for review consideration.
Last week I stopped by Sephora at South Coast Plaza for a Correct and Conceal Mini Makeover to learn more about the color correcting trend happening right now. I was curious to see if there was anything that could cover dark spots and redness better than a full coverage concealer or foundation. I had a session with artist Dre who was one of the most knowledgeable artists I’ve ever worked with. She was very thorough in explaining color correcting, going through all the options and application techniques, gave me awesome skin prep recommendations and I could not have had a more fun experience. If you’re like me you and consider yourself a novice or beginner when it comes to color correction you might be intimidated by the whole concept. I’ll share my makeover experience, what was used, what I bought and some thoughts on the product testing process. I hope this will help give you some tips and ideas of what to try on yourself. If you have a Sephora near you I highly recommend you call them to schedule a mini-makeover. They can be as quick as 15 minutes and I think you will be impressed with how much you learn – I learned a lot. Scheduling one in advance is probably best to make sure they have someone on site to sit down with you although they can accommodate walk ins sometimes and they are free of charge!
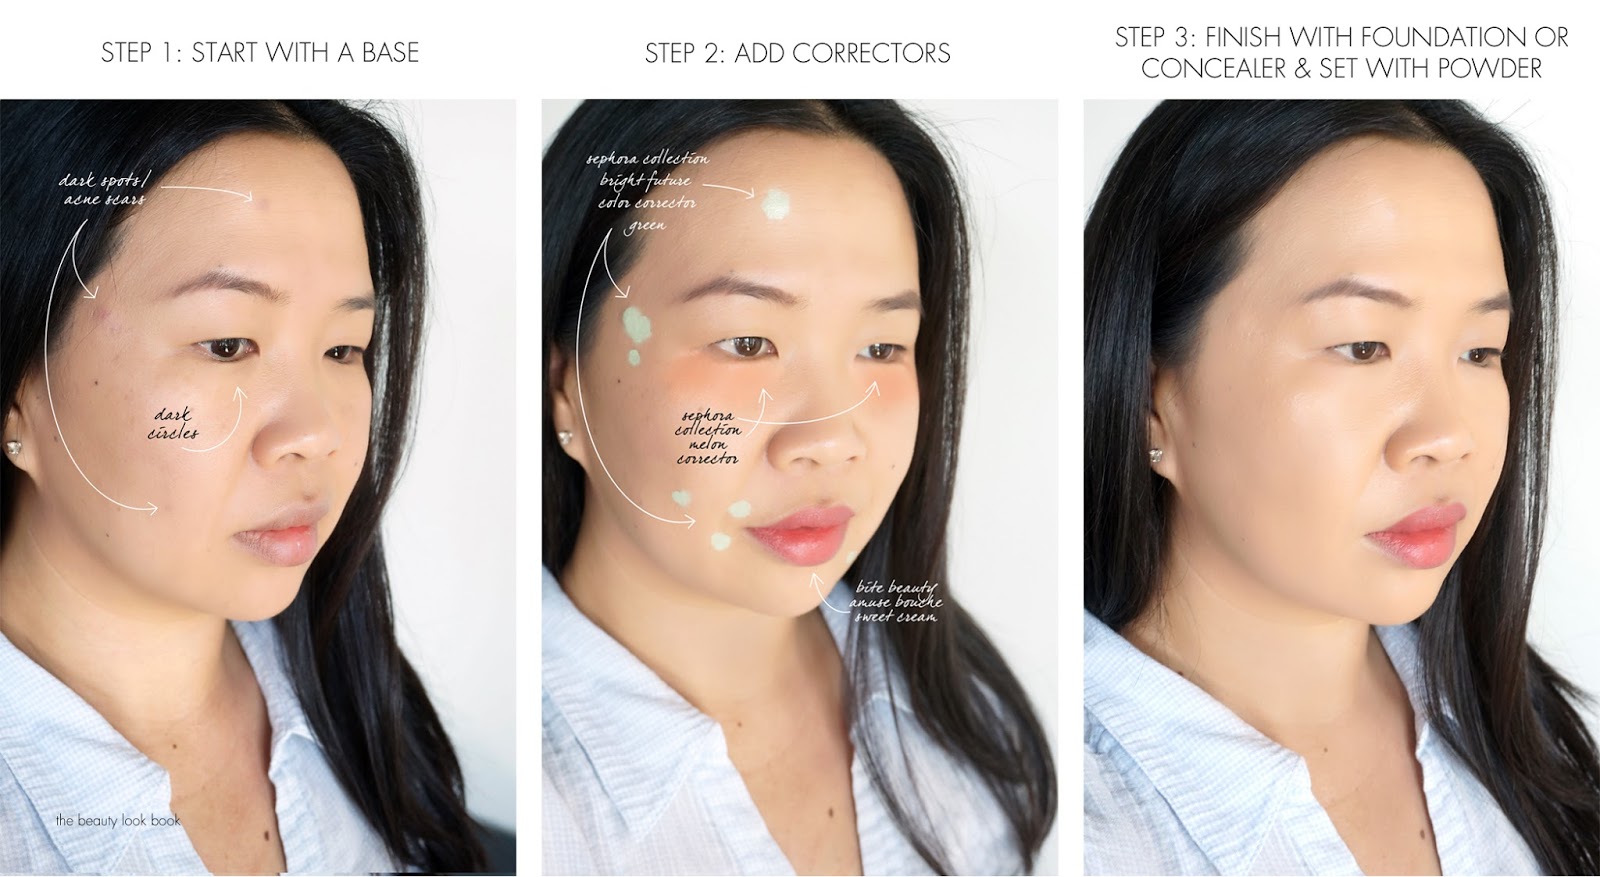
First a quick run through of the mini-makeover I had at Sephora. She started by assessing my skin type and skin concerns. I mentioned I had super sensitive skin and told her about a few products I had allergic reactions to. Personal concerns for my skin were to improve texture, cover dark spots from scars that were healing, under-eye darkness and redness in general. I also mentioned that I liked a streamlined easy approach to applying base face makeup so she picked out her four favorite color correcting products for my skin type that would be easy to use and incorporate along with some skincare items for me to try for calming and radiance.
For a bit of background on Color Correcting it’s not a new trend but it has been very popular right now. The concept of color correcting is that you can use certain colors to counter or diffuse others. Green will correct red, peach will help with dark spots and undereye circles, pink and purple will counter dullness and brighten the skintone. I initially thought using a full coverage concealer or foundation would be sufficient but I often find it leaves the face looking a bit flat and sometimes those dark spots still show through. This is where color correcting can help. Here’s a look at the Sephora Beauty Studio in store – it varies per store but most have a station with mirrors, makeup remover and tools for artists to apply product on your face.
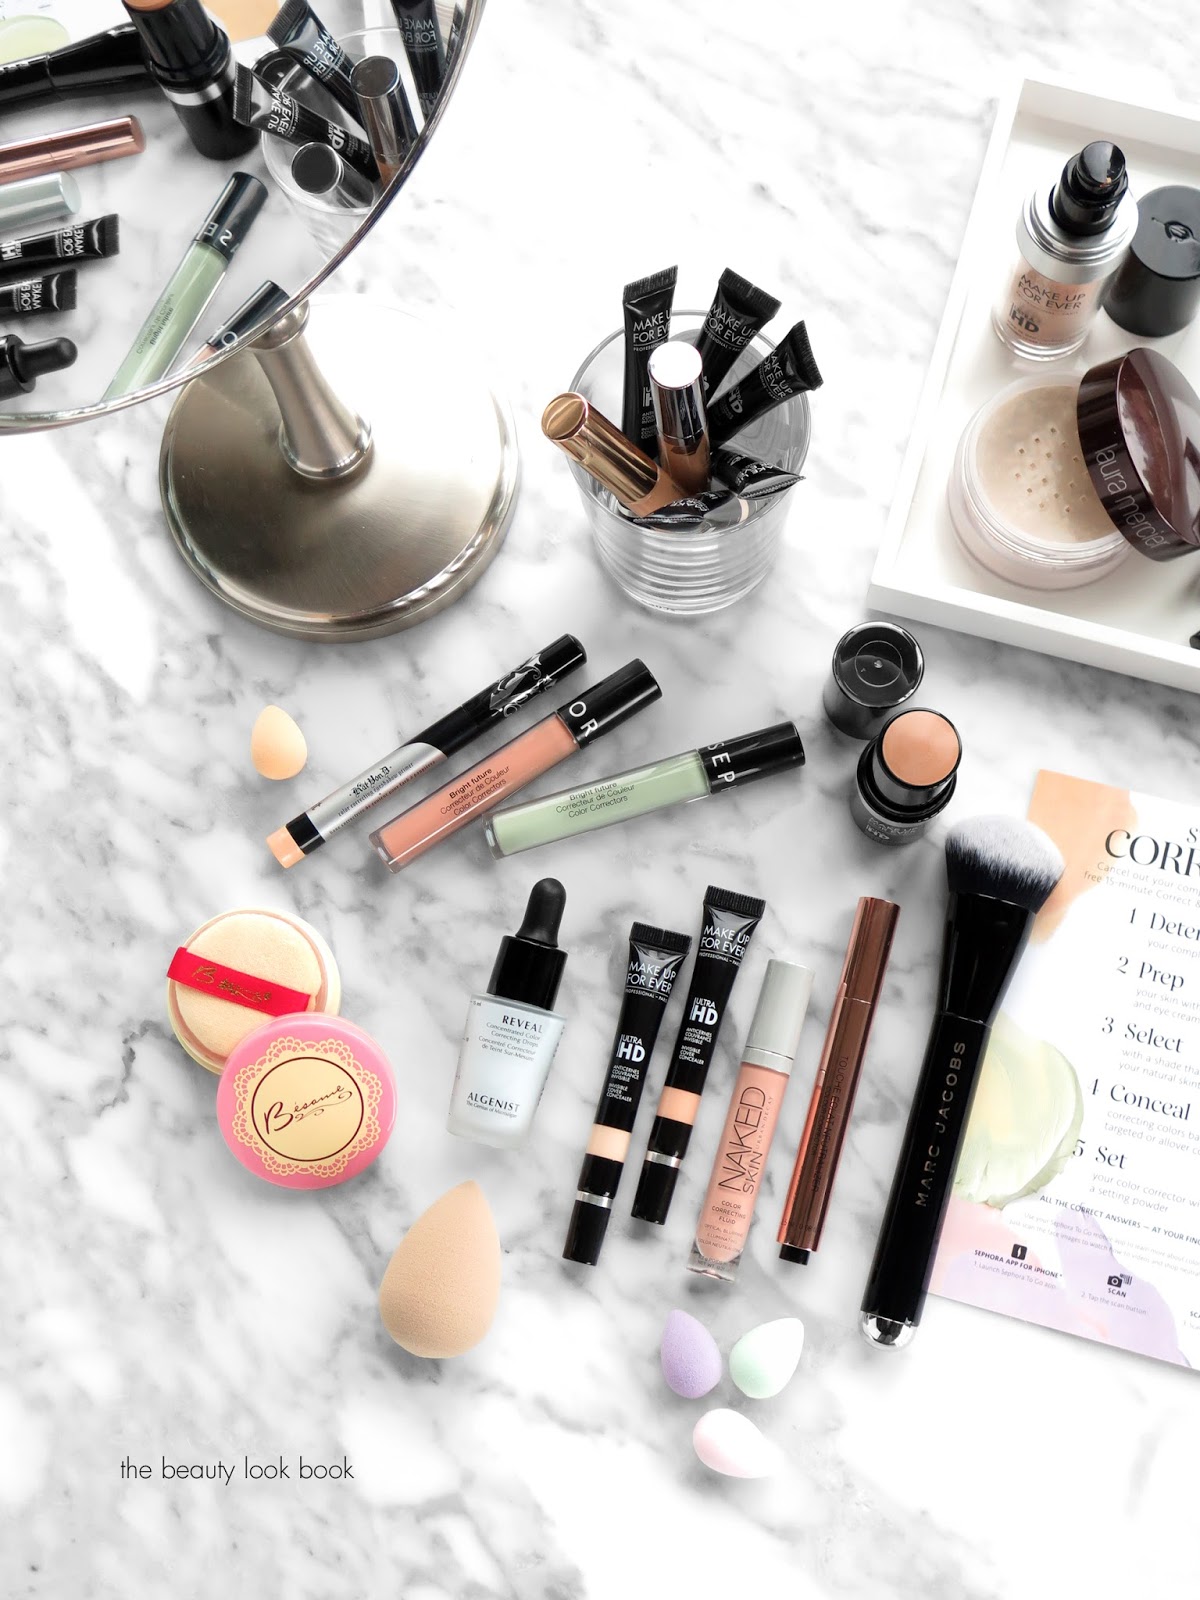
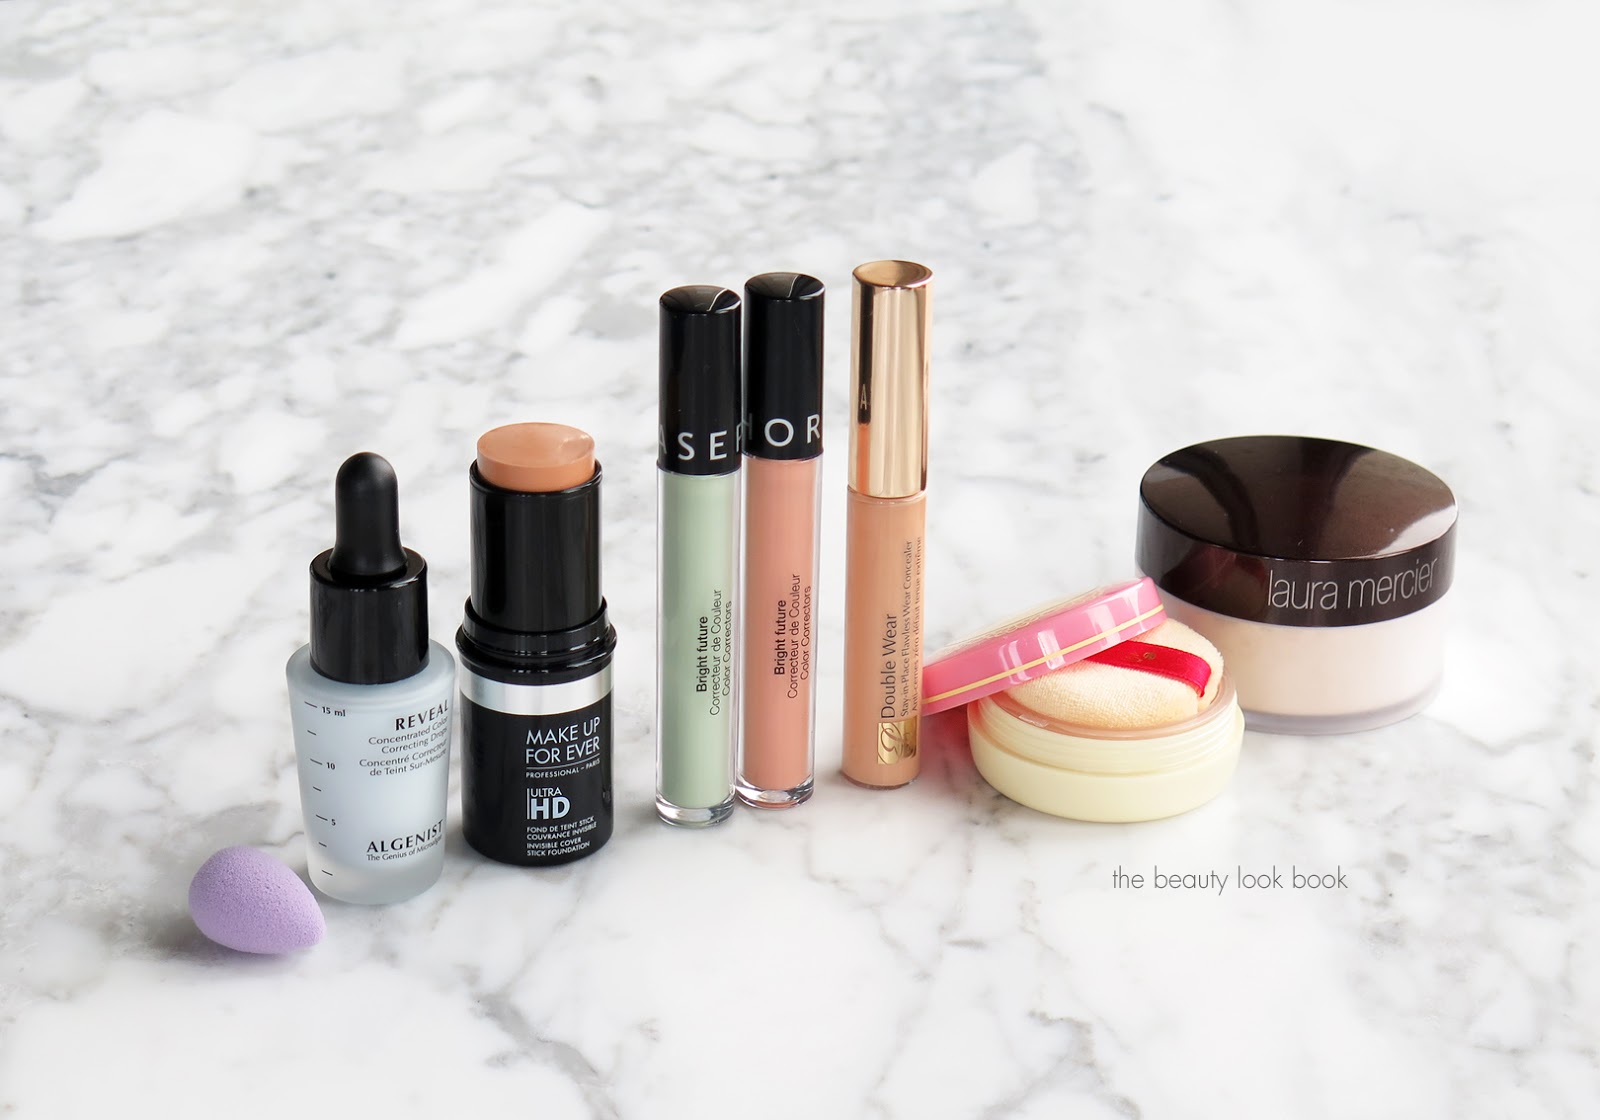
A run through of all the products she used on me from start to finish:
Step 1: Prep the skin
She started by having me remove my makeup with the Ole Henriksen The Clean Truth Cleansing Cloths which are super gentle and non-irritating for my sensitive skin. This one cleans, balances and hydrates in one step which is convenient for on-the-go makeup removal. Next she used the First Aid Beauty Radiance Pads to help with surface texture. She followed with the Caudalie Vinoperfect Radiance Serum and Ole Henriksen Nurture Me since I mentioned my face was prone to irritation and flare ups. Skin felt smooth, nicely hydrated and calmed down.
Step 2: Base
Dre’s theory of using color correcting was to use apply in steps and use it with your current foundation routine. She started by applying the Algenist Reveal Concentrated Color Correcting Drops in Blue to help brighten the overall skintone as a base which did indeed brighten the skin without looking scary blue. Blue helps to neutralize sallow skin. She followed with the Make Up For Ever Ultra HD Invisible Cover Stick in 128 mentioning one’s foundation will do a lot of the color correcting as a starting point to neutralize uneven skintone or dark spots.
Step 3: Color Correct
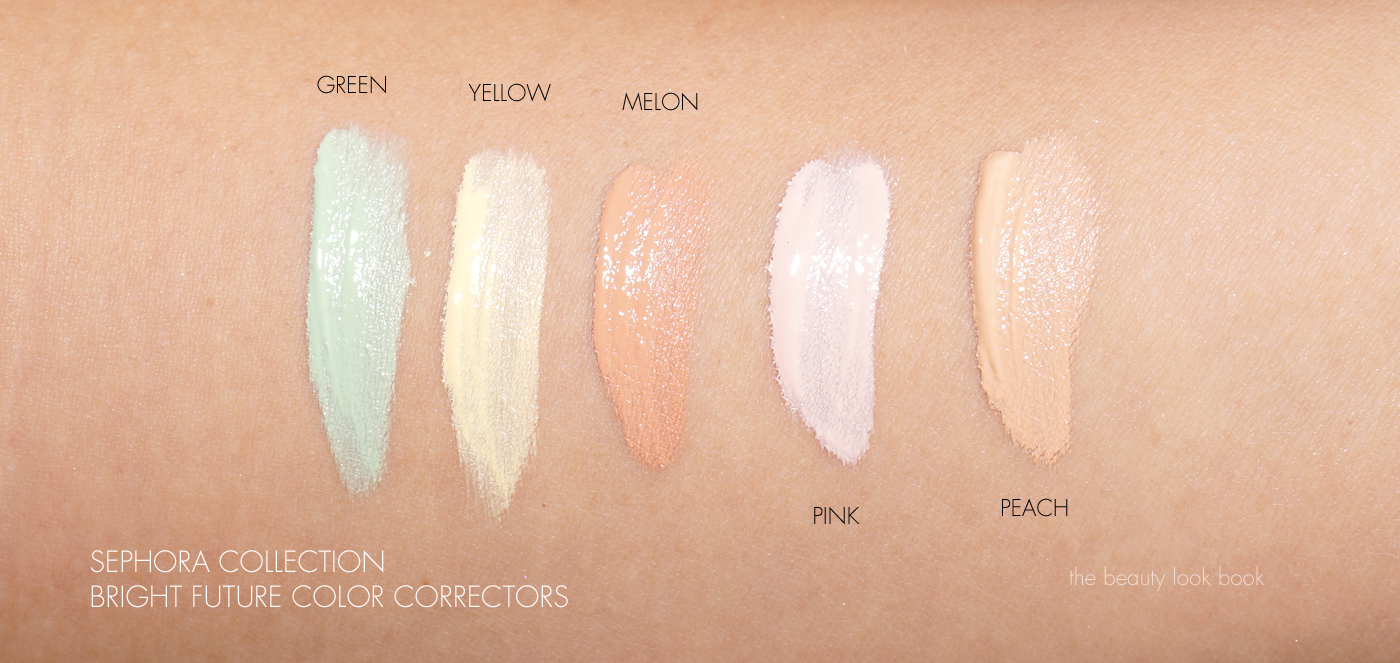
At this point even with a fuller coverage foundation on my skin you can still see dark circles under the eyes and dark spots from acne scars that are healing still show through. Rather than layer on the foundation color correcting helps add coverage without caking on product. I was skeptical but was really impressed with how literally all the dark spots disappeared with a green color corrector and undereye circles disappeared with a peach/melon corrector. She applied the Sephora Collection Bright Futures Color Correctors in Green and Melon. The key here was to apply and let set so that colors don’t get muddied when you blend them wet. For the green she dotted on spots and then blended with a detailed concealer brush in a cross hatch method to help blend and cover naturally. For the melon she applied directly under my eyes in a downward swiping motion and blended with the sponge tip applicator.
Step 4: Conceal, Set and Finish
Once the color correctors have properly set (takes maybe 3 minutes at most, as long as you don’t pile on the creams) finish by taking concealer or foundation and pat it on top. She used the Sephora Collection Pro Foundation Brush #47 which is a more affordable similar version of the Marc Jacobs Beauty Sculpting Foundation Brush to roll and dab on the foundation over the corrected spots gently and then blend everything out gently with a beautyblender. You don’t want to take a sponge or brush and press too hard on the face or else it will drag and mix colors to make it look muddy. The final step she used was to set with a loose powder. She showed me the difference between the Laura Mercier Translucent Loose Powder and also the Besame Brightening Face Powder in Violet (both applied with a puff). She said the Laura Mercier is her favorite (it’s one of mine too) but if I wanted to try something new she recommended the Violet to brighten the skin, for fairer skins she recommended the Pink (which I already own).
Step 5: Add color and makeup
She added a bit of blush and bronzer on my skin so my face wouldn’t look flat from all the base makeup, but I asked her to keep it minimal so I could see how the correctors and foundations performed through the afternoon. We skipped everything else and I was impressed that my makeup lasted well into the late evening without any touchups needed. Her skincare recommendations and application made it so nothing budged or creased or faded. Once I use up some of my moisturizers I will need to buy some of the items she used on me.
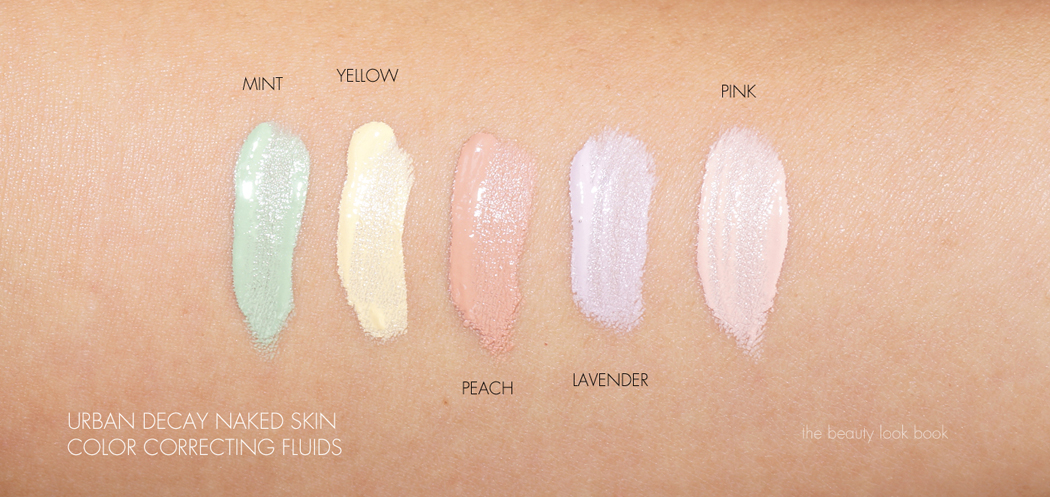
I have never been so impressed with a makeup session as I have been with my visit to Sephora. Dre taught me so many things – I really appreciated her taking the time to go through application tips and recommending products specific to my needs. My brother tagged along to help me take photos and afterwards I asked him if he thought my face looked ok. He said yes, it looked natural and he couldn’t tell that there were any weird colors. So it passed the brother test 🙂 In discussing the different color corrector options, I asked her why she recommended the Sephora Collection Color Correctors over the ones from Urban Decay Correcting Fluids or YSL Touche Eclat Neutralizers or even the ones that come in cream compacts. She said it was a matter of preference – the cream palettes can definitely multi-task with all the options for color correction and concealer, but to keep things simple she said the Sephora Collection correctors were her favorite for consistency, texture and coverage. (I bought one each of the Urban Decay and YSL to test against the Sephora Collection and I’ll say right now she was right.)
Next up is a run through review of everything I bought and tried along with a mini tutorial of how I’ve been recreating the color correcting look to diffuse dark spots and dark circles. Here are the items she used on me during the makeover. I bought all the items she tried with the exception of the Violet powder because I already own the Pink although I’m seriously considering going back to the store to pick it up this weekend.
Left to right are:
Micro Mini Correct Four by beautyblender – there are some new beautyblender options, for the color correcting trend they launched a set of four in different colors, I really like these for blending under the eyes or in the creases of the nose, it’s nice to have different colors on hand to match the correctors so you don’t have to worry about mixing colors together
Algenist Reveal Concentrated Color Correcting Drops in Blue – you can use these alone or mixed in with foundation to help color correct the skin. I’ve been using this as a base, almost like a primer to help counter my sallow undertones with my olive yellow skin. It brightens the skin without looking too blue. You can even mix it in with moisturizer to blend all over to make it a bit more sheer. I really like the way this performs.
Make Up For Ever Ultra HD Invisible Cover Stick Foundation in 128 (looks dark but blends out to a slightly lighter finish, that being said I am getting lighter right now so I will probably have to purchase a different shade soon to mix) is one of the most amazing foundation sticks I have ever tried (it rivals Tom Ford’s) – I’ll have a separate review in the upcoming weeks once I’ve given it a thorough test drive but it offers medium to full buildable coverage that looks amazing
Sephora Collection Bright Future Color Correctors in Green and Melon – After testing this compared to YSL and Urban Decay, I have to say that my favorites for texture and consistency on my face are the Sephora Collection ones, they don’t crease or emphasize fine lines and they have enough coverage and pigment to truly neutralize my face issues, the Urban Decay Naked Skin Color Correcting Fluid in Peach has a similar coverage to the Sephora ones and looks great on the skin but if I don’t have enough primer under my eyes it emphasizes all the fine lines that I don’t want to show up, the YSL by comparison is a lot more sheer in finish and I need more coverage
A quick side note, during my make over I mentioned my favorite under eye concealer of the moment was the Make Up For Ever Ultra HD Concealer and that I liked the ones with peachy tones (mainly R32) to warm up and brighten under eyes, Dre did mention that this was also one of her favorites to use, but she showed me the Sephora Collection in Melon for me to try something new
Estee Lauder Double Wear Stay In Place Flawless Wear Concealer in Warm Light Medium – she used this to highlight my face and I was so impressed with the coverage and texture I had to try it out – it offers smooth flawless coverage and really does stay in place without caking or creasing through out the day
Laura Mercier Translucent Loose Powder – I already own this and have repurchased numerous times, it’s one of my favorite loose setting powders, if you haven’t tried it I will say you need to
A simple step by step mini tutorial showing before and after. I took the tips learned at my appointment to recreate a flawless base at home. I hoped to take an after show last week but the store lighting wasn’t ideal. In the first shot I did prep my skin with a thin layer of foundation, but as you can see dark spots and dark circles are still highly visible:
Below are the tools I recommend using, but you can shop your stash and find what works:
A look at packaging and different applicators for each kind of color corrector that I’ve been testing out ranging from droppers, sponge tips, squeeze tubes and click brush applicators:
Side by side swatches of the color correctors and some concealers:
I hope you enjoyed this overview on color correcting! If you’re a novice like me I hope the rundown of my makeover, all the options I tried and swatches help make the color correcting concept seem less confusing or intimidating. I went into my appointment thinking that there wasn’t going to be much that could be done for my dark spots but I went in with an open mind and learned so much. Sometimes makeovers can be a daunting process especially if you get a pushy artist or one who just doesn’t listen to your needs or who doesn’t care preferences. I really recommend trying to book an appointment at your local Sephora – I am already planning on going back for a second appointment hopefully in the next couple of months because my experience was that good. If you’re in the area of South Coast Plaza try to book one with Dre – she’s awesome. If you can’t make it into the store, there is an online survey on the Sephora Color Correcting Makeup page to guide you and help narrow down the picks according your specific concerns and skin type.
Have you tried color correcting recently or is it something you’ve always done for your base makeup routine? Please let me know what you’ve tried and your thoughts. I always learn new tips and tricks from you and would love to hear about what you have been testing or if you have any favorites.
This post was created in partnership with Sephora. As always all opinions my own. Most products picked out and purchased by me, press samples include the Besame Powder and Make Up For Ever Ultra HD Concealers.
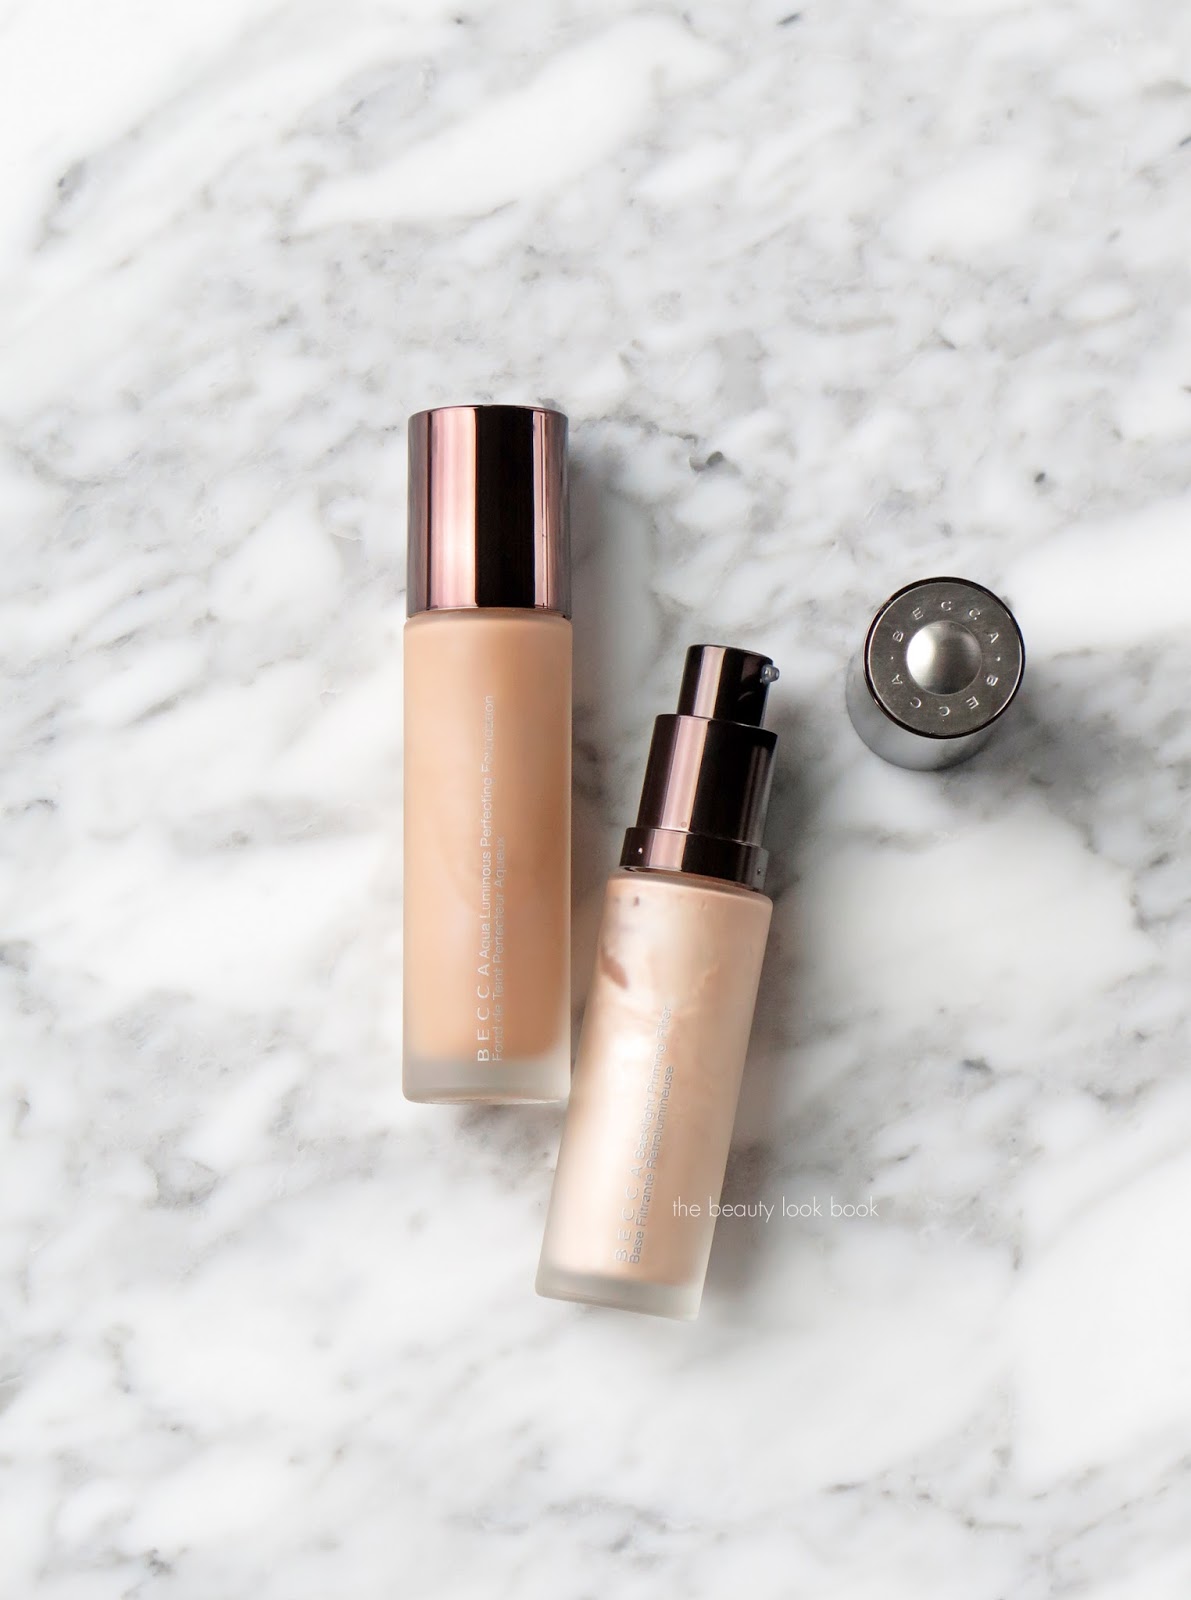
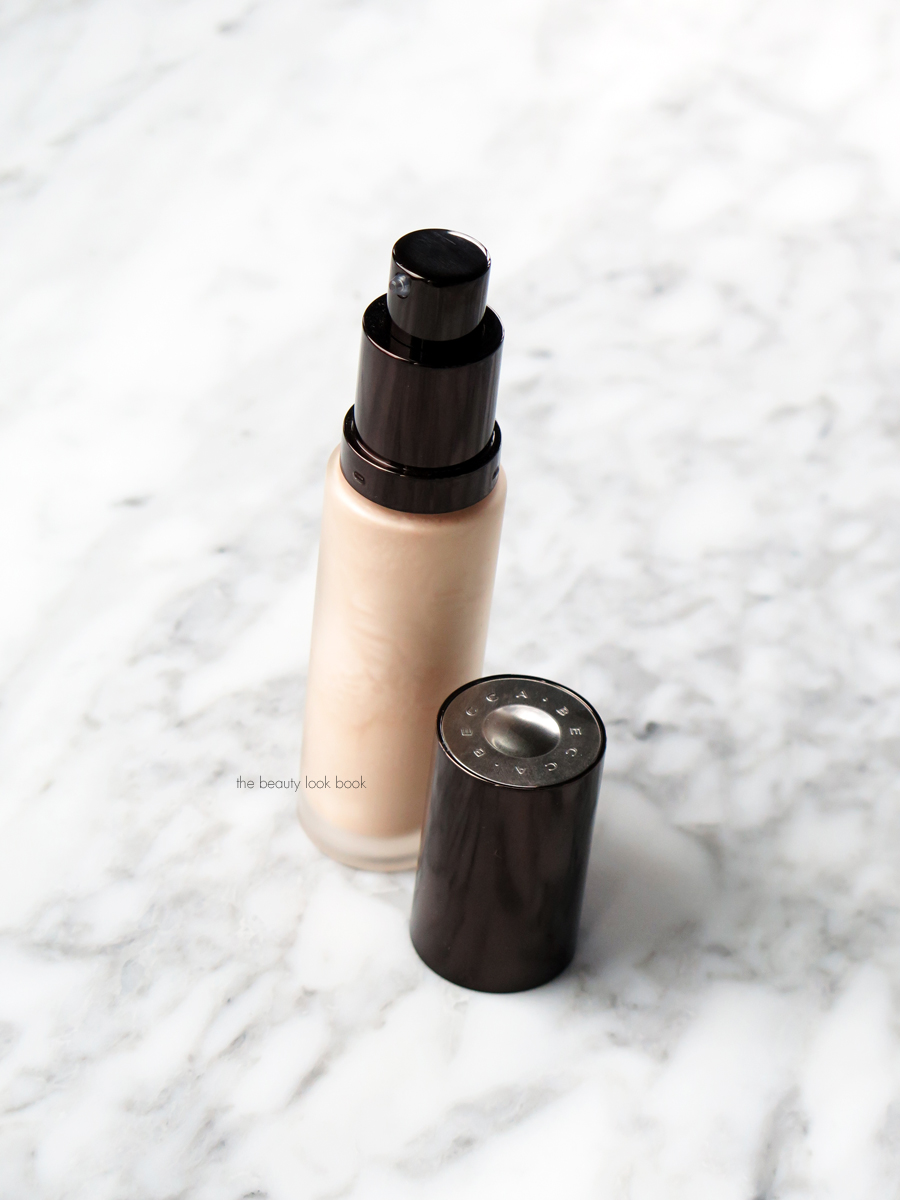
Becca launched a new foundation earlier this year called the Aqua Luminous Perfecting Foundation ($38 for 1 oz) which offers smooth, buildable natural coverage that has a soft glow. I’ve been testing this for two months now combined with the Backlight Priming Filter ($38 for 1 oz) which I actually bought and have used with other formulas since last fall but never reviewed. Today I have a review on both with swatches of all the colors of the Aqua Luminous formula.
For foundation I prefer something that is semi-matte and semi-dewy, basically something that’s in between both ends of the finish range and something that looks natural but also offers at least medium coverage. I don’t have perfect skin so visible coverage is essential for me. I used to use the Becca Sheer Luminous Foundation (original version) and the Foundation Stick many years ago (back in the early 2000s when I was in college and the line was still at Nordstrom). My match back then was Macadamia and I was a die-hard fan of the line until it disappeared from stores for a while. It’s since made a comeback at Sephora and Ulta but I never looked into the foundation reformulations until this year.
Glowy luminous foundations can be hit or miss for me. Many look incredible on my skin for 30 minutes to 1 hour and then turn into an unmanageable oil slick after that which is a shame for me because often times the coverage and color options are perfect. I have normal skin with some areas that are slightly oily and the Becca Aqua Luminous Perfecting Foundation is amazing. It offers everything as described: smooth lightweight coverage, buildable pigment, blurs imperfections and gives the skin an ultra soft glow. It has enough coverage suitable to even out the skin nicely and I didn’t have to pack it on to get the coverage I wanted. Beige turned out to be my perfect match (as in truly perfect, no tweaking required). I still do need concealer or correctors for dark spots or red areas, but that’s the case with most foundations I use anyways.
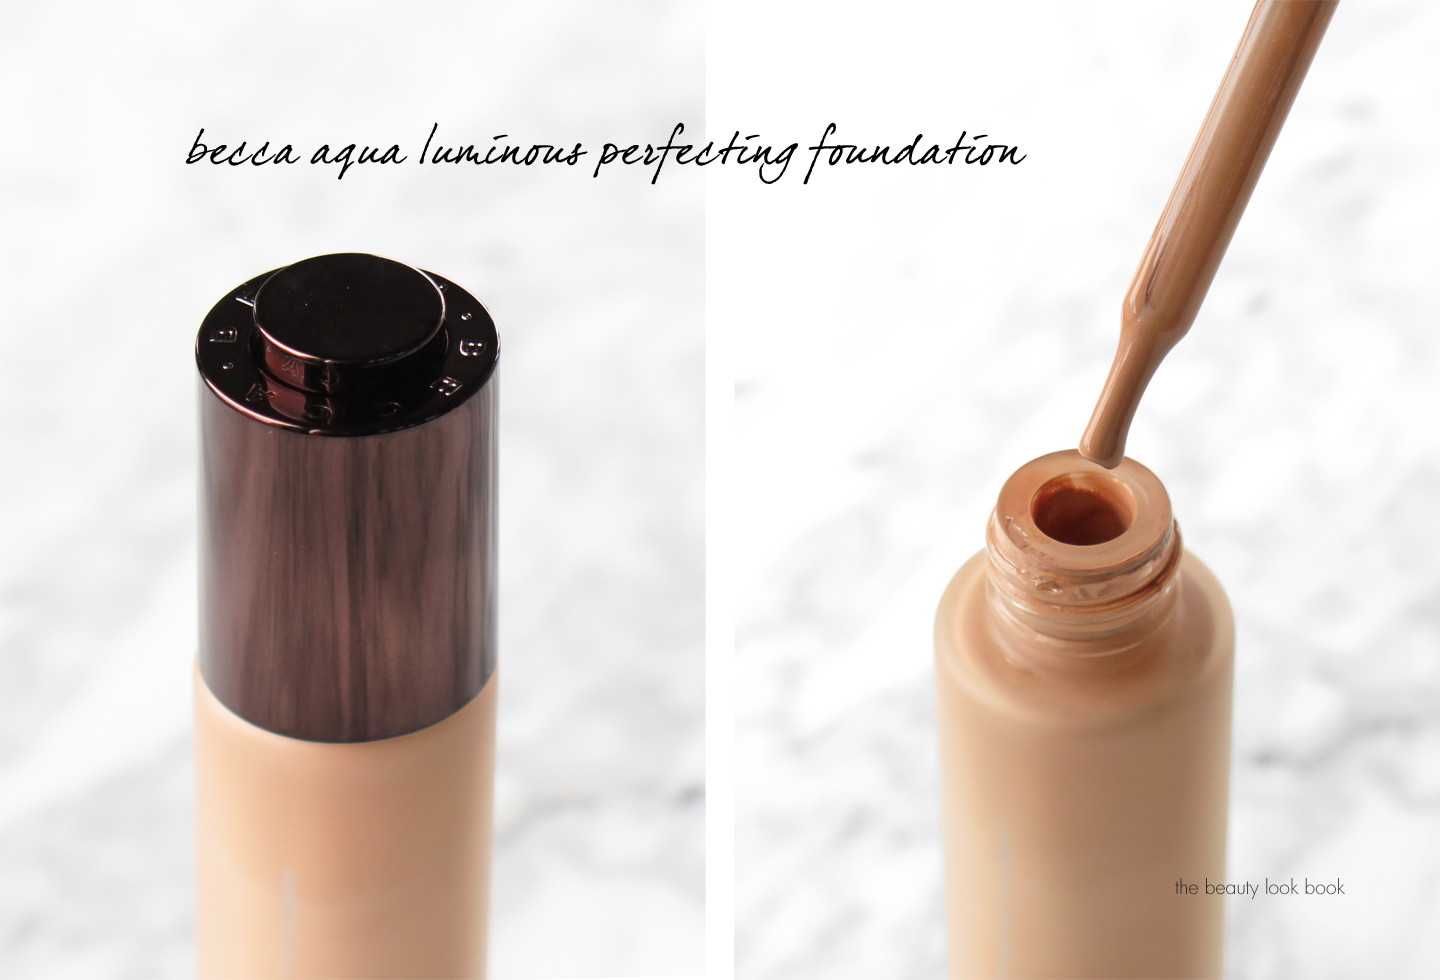
The only thing I do not like about this foundation is the packaging. It comes with a dropper – you twist the cap to pop up the push-down dispenser at the tip and press to push out product. I find it awkward and difficult to use although it’s not impossible and I can overlook it because the formula is that good. In terms of lasting power it holds up well with or without primer. When I went to Sephora to get matched the artist used the Make Up For Ever Smoothing Primer and a beautyblender sponge to apply and it lasted from the time she applied it all over well into the late evening without getting greasy or oily looking. For wear on my own – I’ve tested it by itself, with a number of Make Up For Ever Primers (hydrating and nourishing are what I have) and the Becca Backlight Priming Filter. I think the Aqua Luminous foundation performs well with a number of formulas, a primer definitely isn’t needed for it to look its best. Powder is absolutely needed to set though – otherwise it gets too glowy looking by late afternoon. Some pressed and loose powders that I highly recommend in this post here.
Swatches of all the shades – they are swatched heavily so you can see the color. It blends out to a smooth flawless finish when I use either the Sephora Collection Pro Full Coverage Airbrush #53 brush or a beautyblender (the pink one is the best one, full review here, however I am testing the new nude). The color range is wide but there are definitely some big jumps in between shades. I’m thrilled that Beige is my perfect match.
A few comparison swatches:
Next is the Backlight Priming Filter which is a pearly liquid primer designed to create a base for makeup. It has a very soft luminous finish with a lightweight almost whipped almost liquid texture. I love the packaging pump as it’s easy to use and no fuss. I found it lightweight, non-clogging, non-irritating and luminous. It did create a nice glow and I like using this primer with other foundations but as a person who doesn’t really like primers in general, I didn’t find this essential to creating a flawless base. When the weather was warmer and we had a few heat waves I found this to be too moisturizing for my skin and it left my face looking a bit too dewy. With normal or cooler weather here in Southern California it performs better. In terms of primers though – this is one of the better ones I’ve tried in terms of smoothing the skin and creating a nice canvas for foundation, concealer and powder.
A quick look at Beige and the Primer swatched side by side:
Bottom line both are extremely good in terms of performance. I will be repurchasing the foundation once I’ve used it up. For the primer I’m not sure I find I love it enough to repurchase – I’m still searching for the one that changes everything for me. Still I have no regrets buying it and will use it to the end.
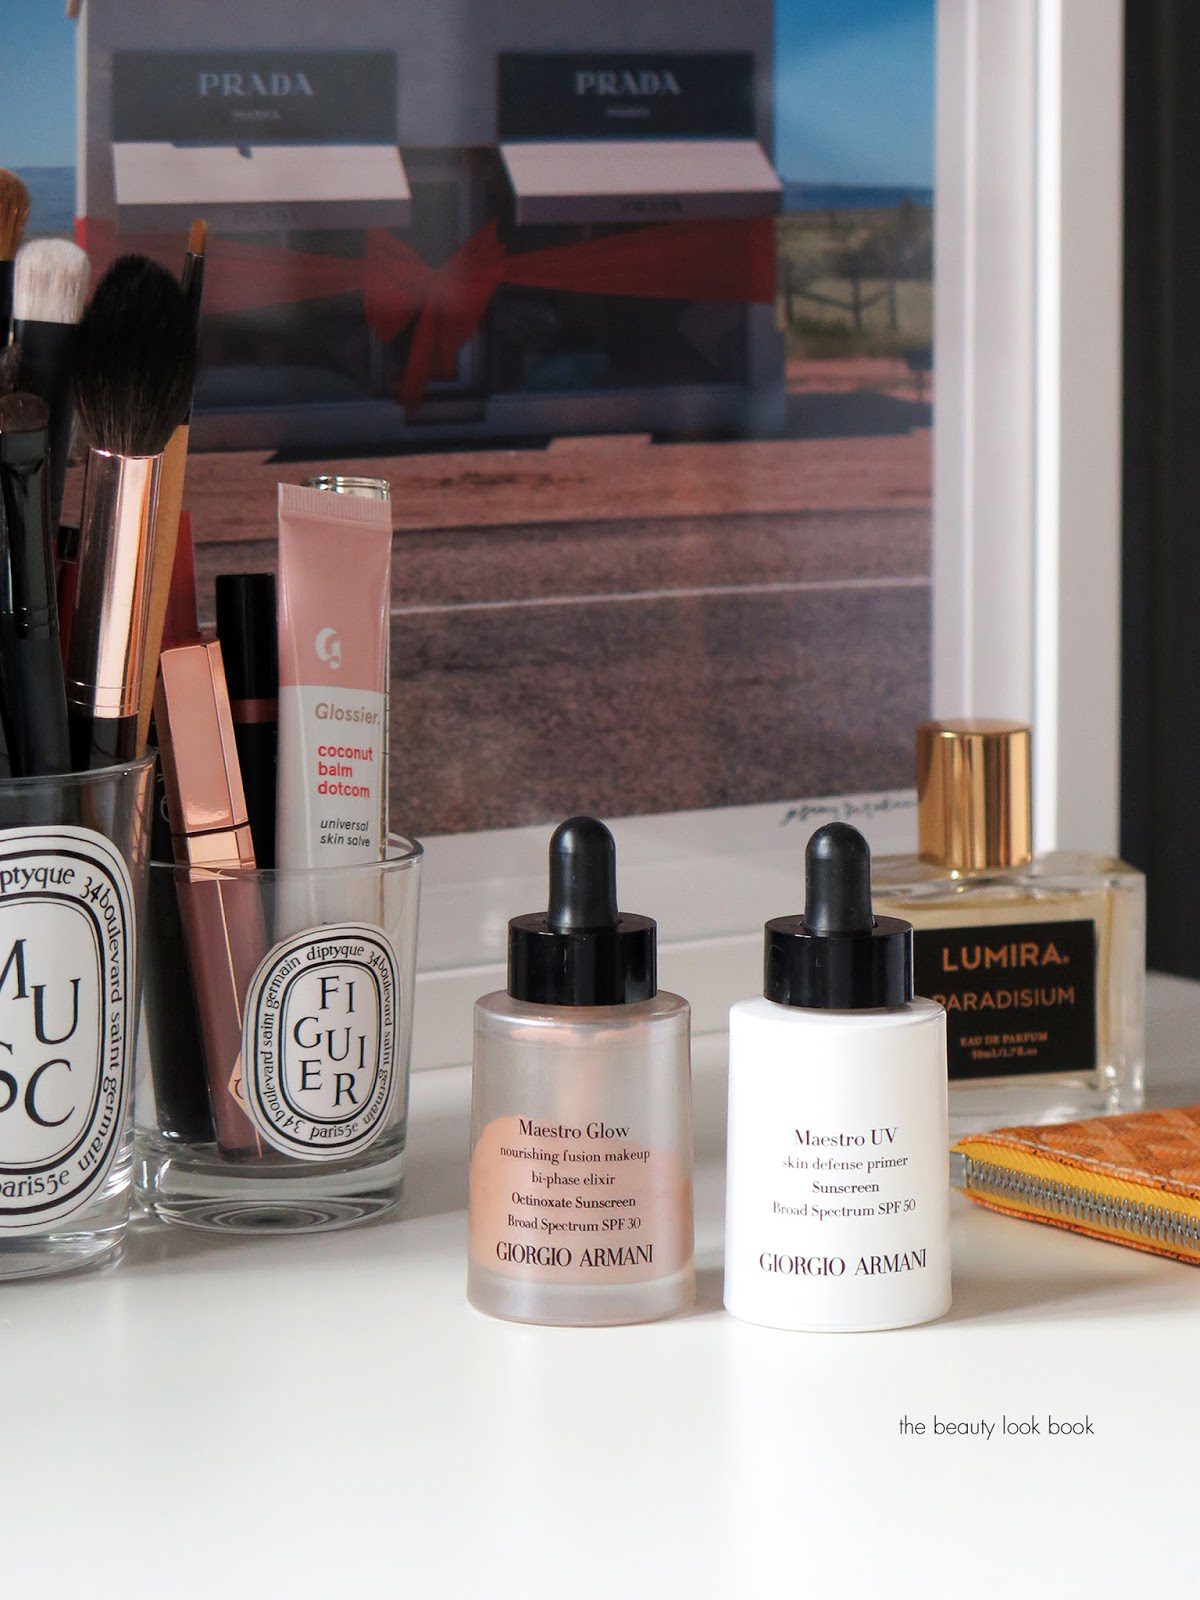
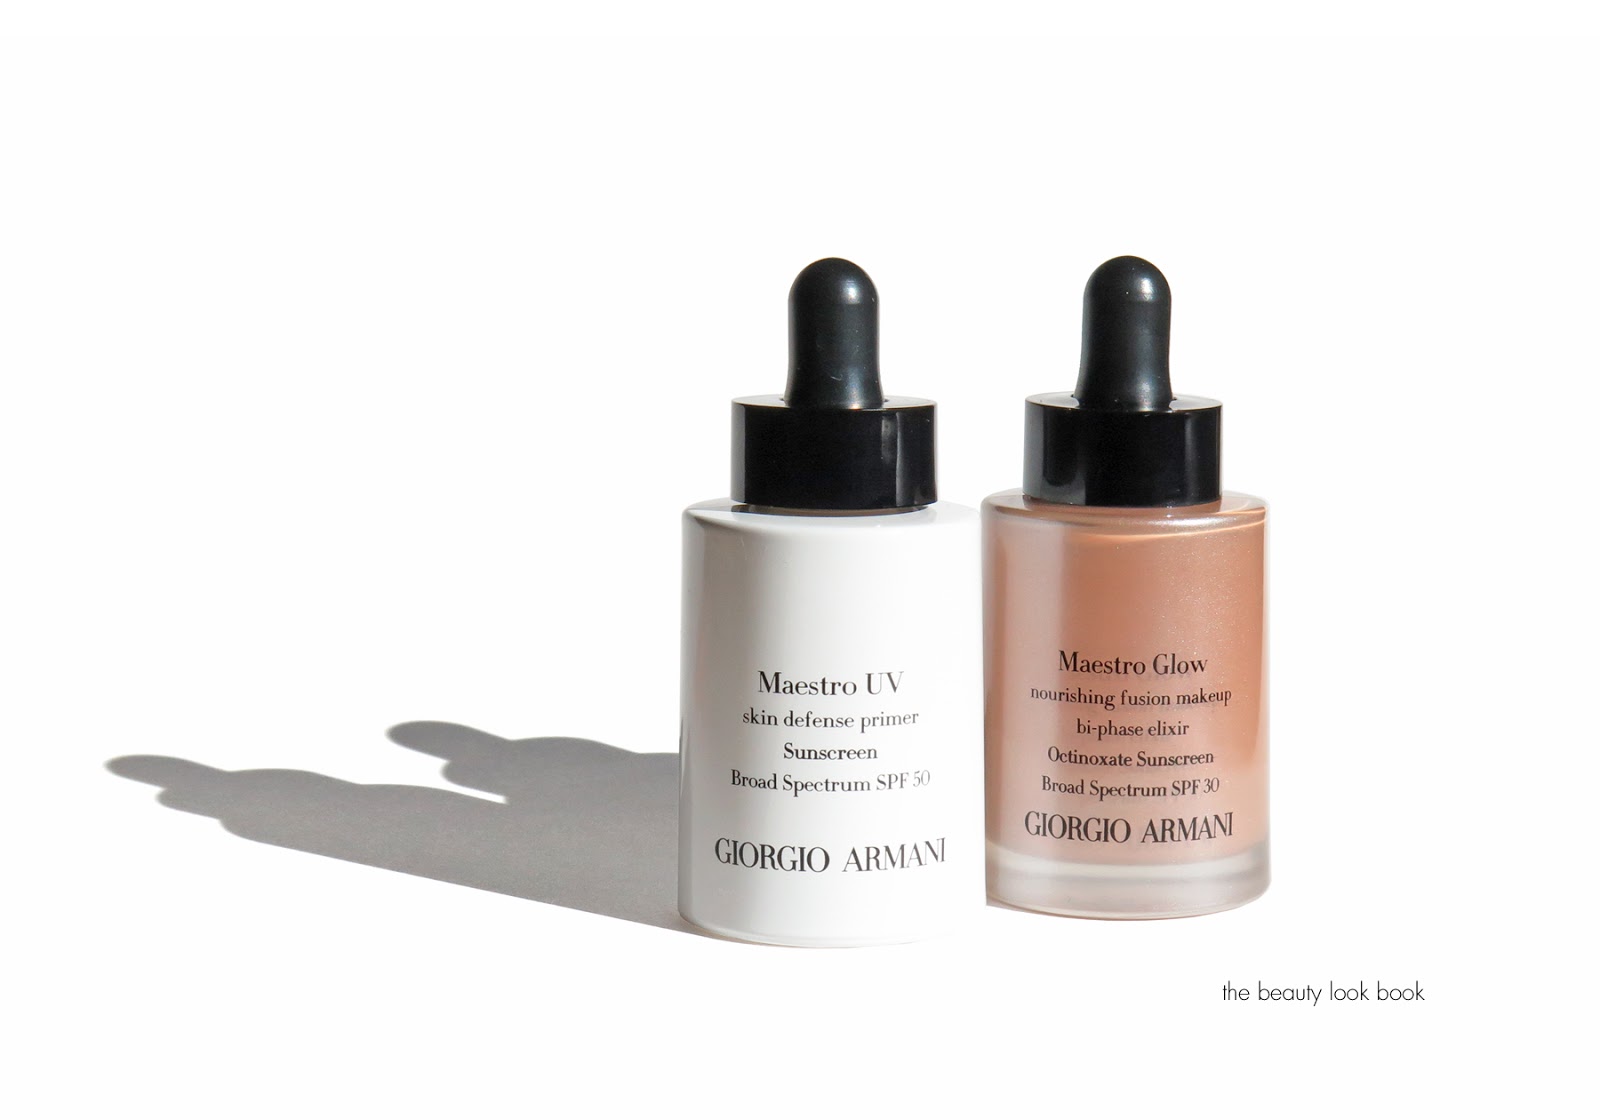
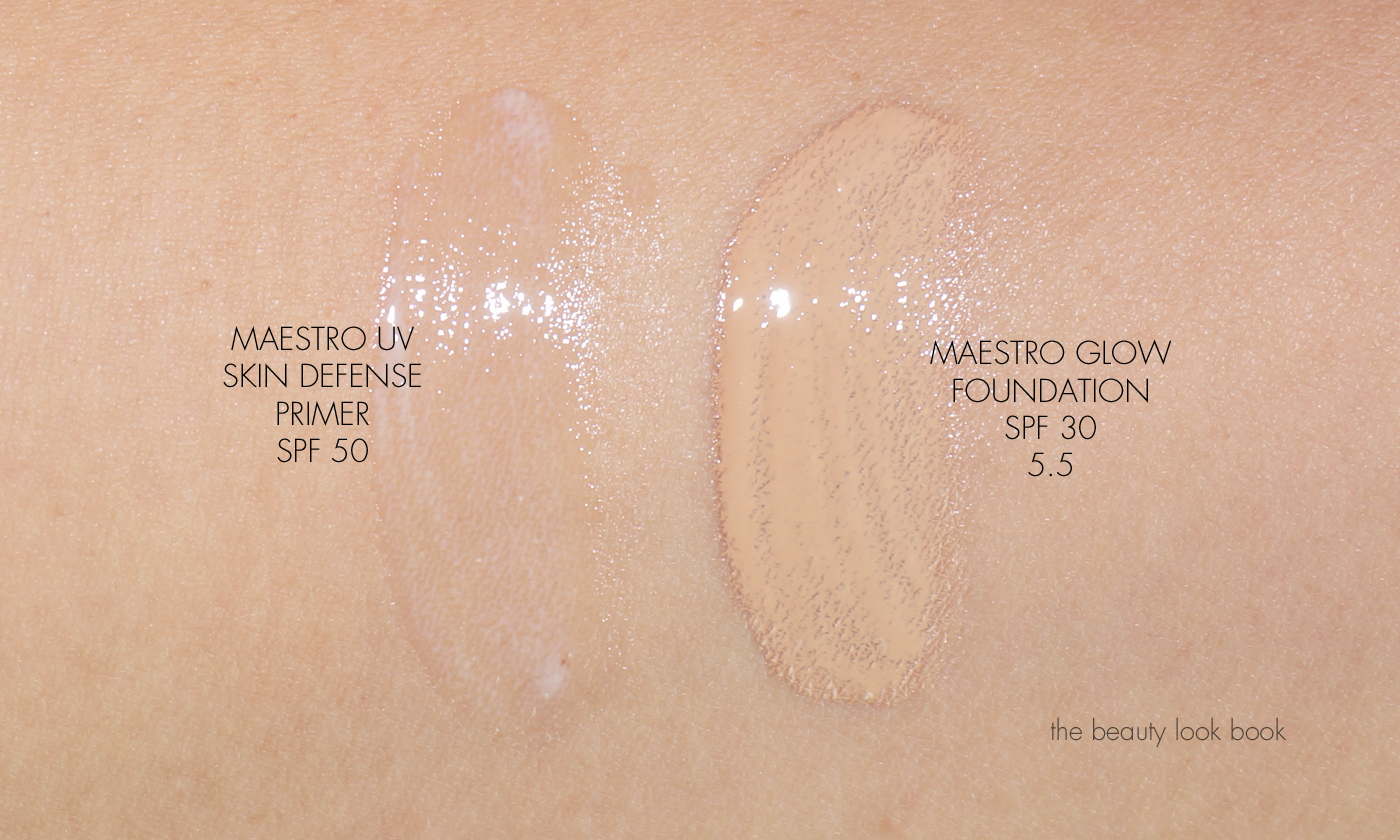
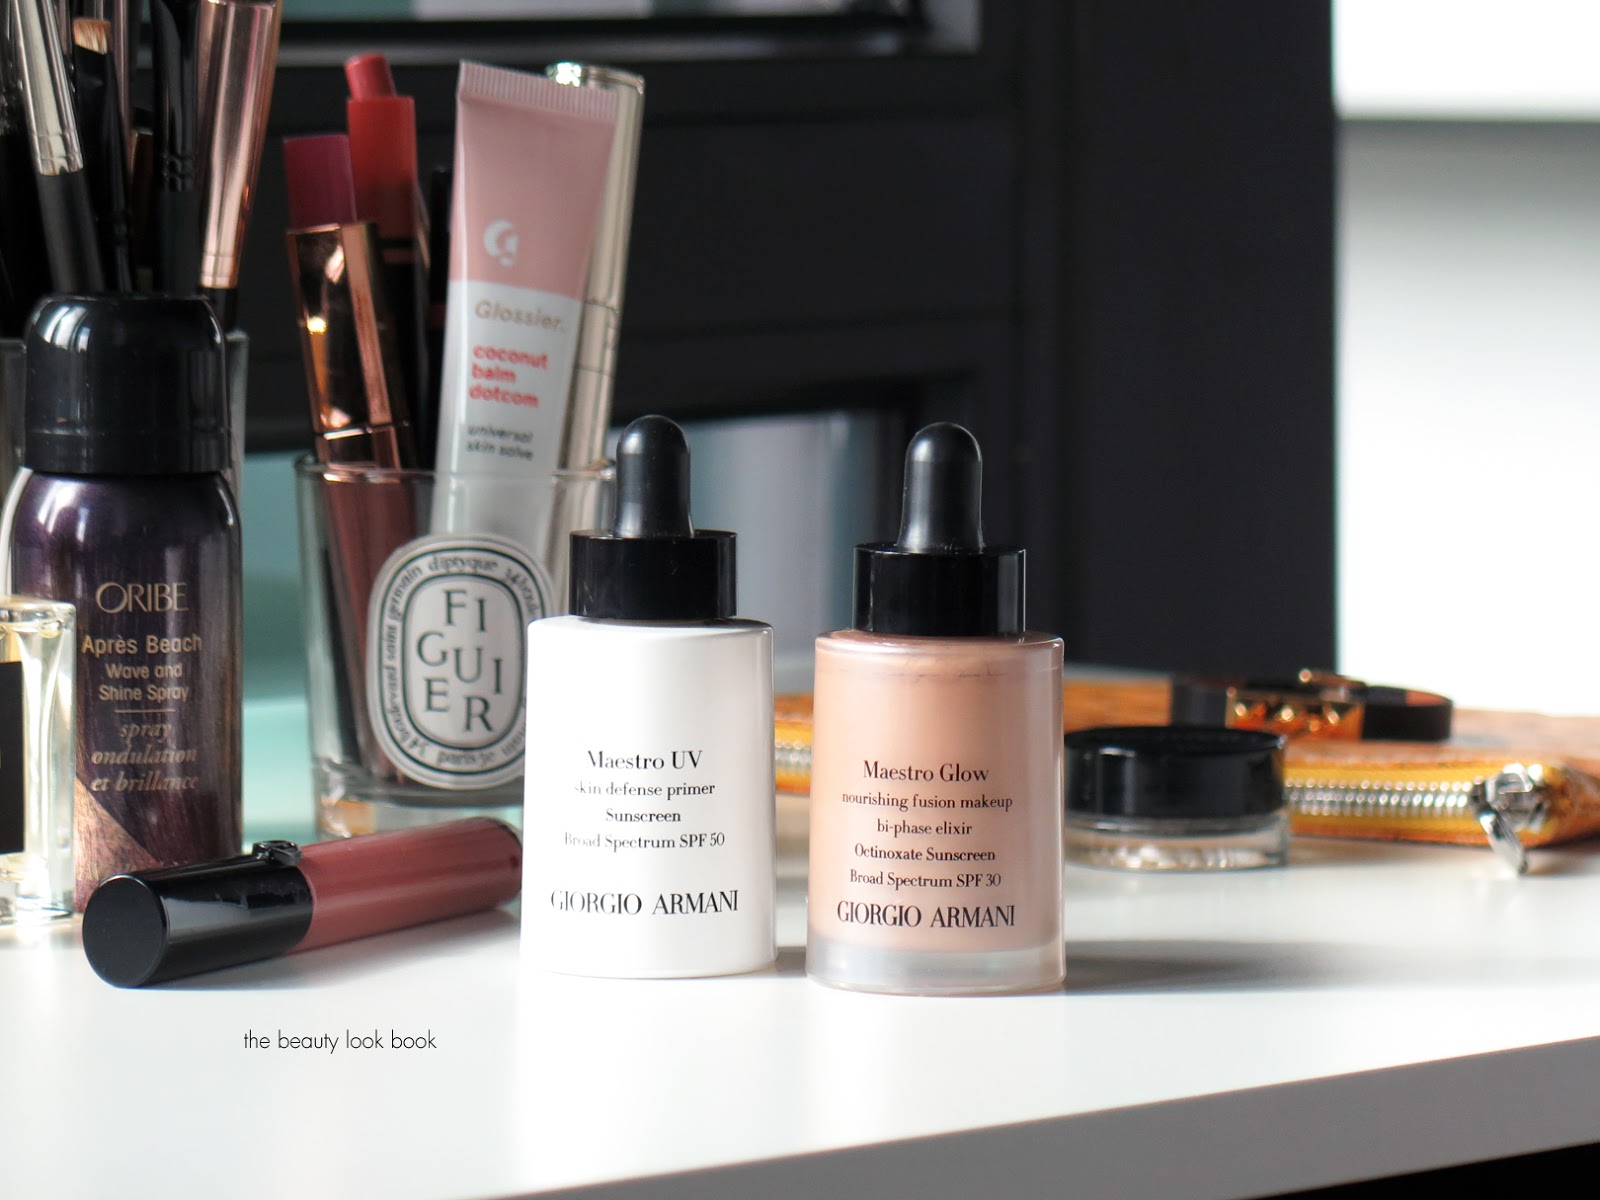
This is the season of glow foundations and many of you have been anxiously waiting for my review on the new Armani Maestro Glow Nourishing Fusion Makeup Foundation SPF 30 ($64 for 30 ml/1 fl oz) and the Maestro UV Skin Defense Primer ($64 for 30 ml/1 fl oz). I’ve been putting these to the test for a few months now – I appreciate your patience as it has taken me a long time to post this review. I had very high hopes for both as I’ve been a fan of a few Armani foundation formulas. The description of the Glow Foundation seemed absolutely perfect described as a bi-phase foundation that gives a rich glow with a thin silky texture. It’s infused with oils and pure pigmented to nourish the skin. As soon as I saw it launched, I stopped by my local Nordstrom for a shade match, after trying a few shades I found 5.5 was the best for me. At the counter the artist also applied the Maestro UV Skin Defense Primer which has Broad Spectrum SPF 50. I explained my hesitation with white sunscreens because they almost always leave a white cast on my skin. She assured me this one did not have any residue or white cast and she was right.
The combination of both resulted in a very natural luminous glowy look. The formula of the Maestro Glow is very sheer but it evened out the skin to a soft dewy glow. Even with powder foundation set on top, it looked natural and glowy without being too greasy. Coverage-wise it’s too sheer for my personal taste, but it still evens out the skin. By the time I got home I saw tiny little red bumps surface on my face. I thought it was possible the cleanser and toner she used to remove my makeup caused it (it’s often something I react to). So I let my skin clear up for a week before I tested the new foundation and primer just to make sure.
Quick thoughts on the Maestro UV Primer – it disappears completely on the skin but makes the foundation apply better and smoother. Not just the Maestro Glow but a number of other formulas as well. Unfortunately both the primer and foundation caused a really bad allergic reaction on my super sensitive skin. Tiny little red dots and bumps form along my cheeks and forehead. I tested both on my face for 4 days to make sure and my skin just got worse. After that I took another week break from both to let my skin heal and tried the foundation separately, hoping perhaps I was just allergic to the primer. No luck. I’m allergic to both formulas – so for these I have to give them a thumbs down which is a shame because the finish and look of both is really really good. It looks like skin but better and even though these are very hydrating and moisturizing I found the formula wasn’t too rich for my normal combination skin and the lasting power was pretty good. I haven’t tried every Armani foundation formula, but the ones I have tried didn’t cause any allergic reactions – however it’s probably been at least 4-5 years since I’ve tried one of the regular foundations and since I haven’t kept up on new launches I don’t know if the formulas of any have changed.
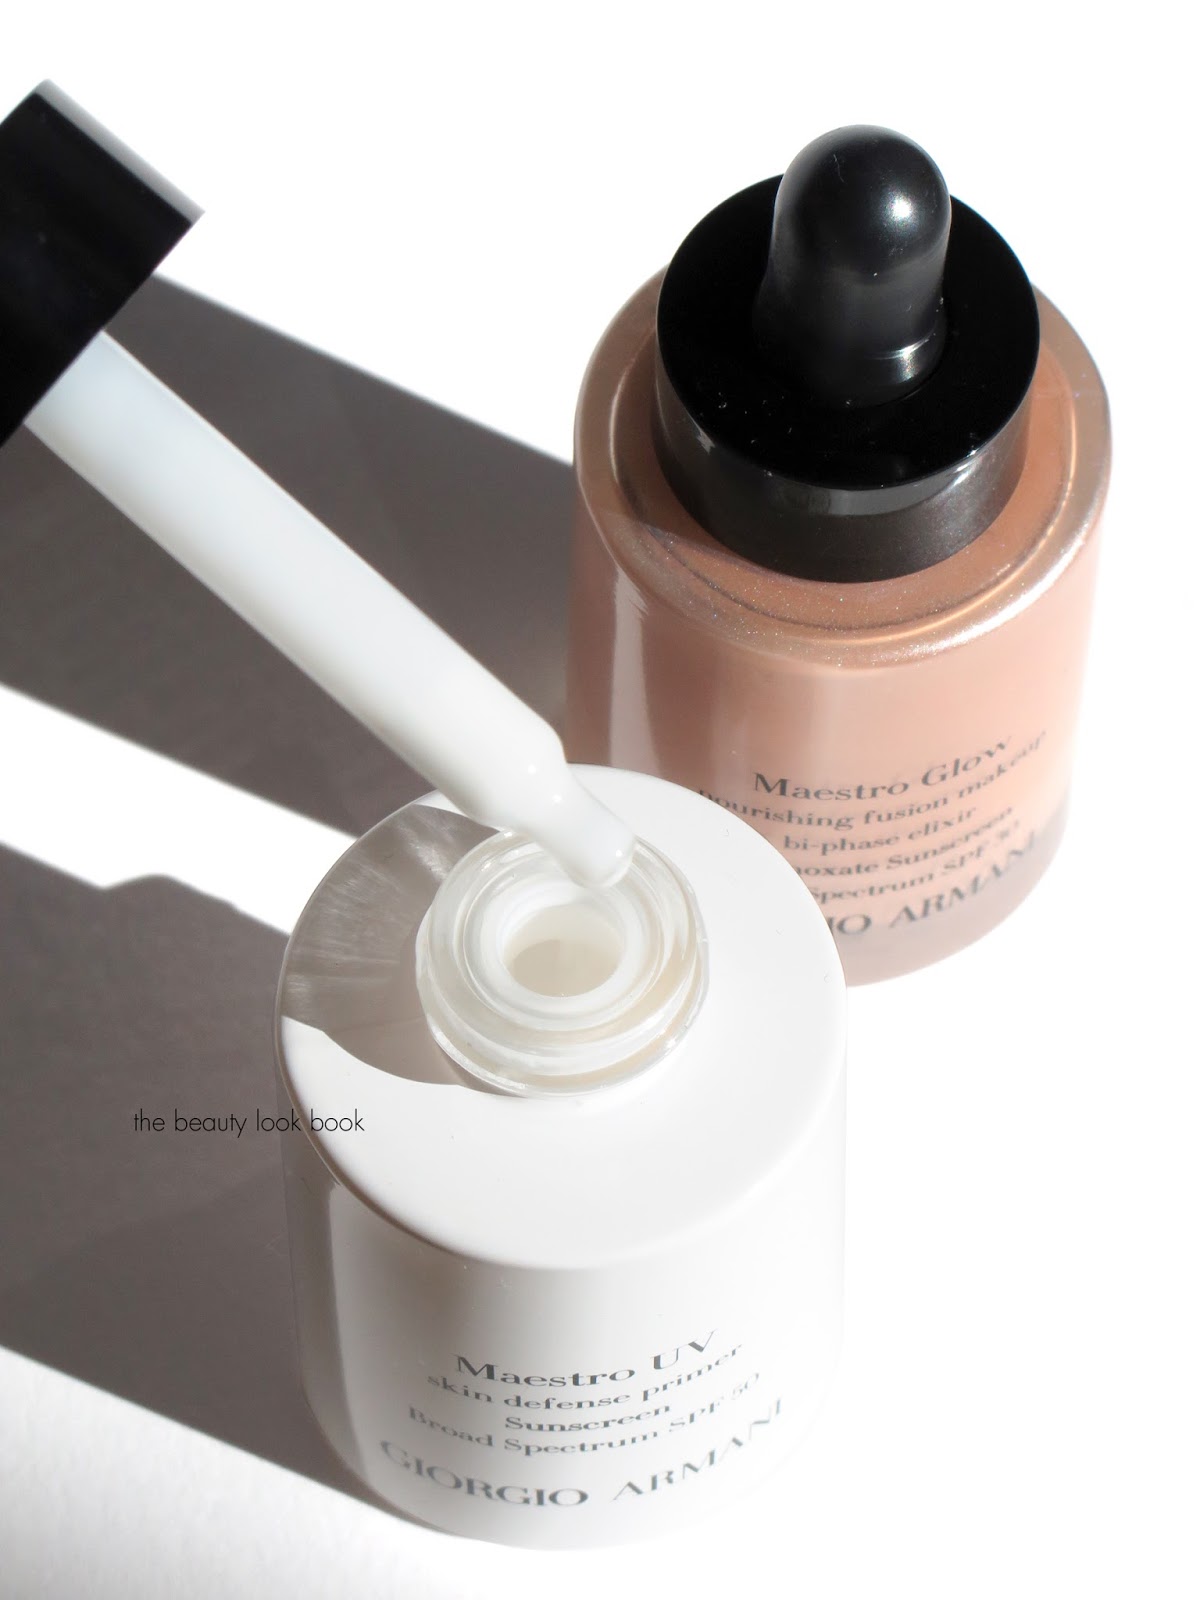
In case you still want to check these out a closer look at both and swatches. For the Maestro Glow foundation since it’s bi-phase you have to shake it up to mix the oil and pigment:
Because the formulas don’t work for my skin, I can’t give these a positive review. In testing these I tried application with a beautyblender sponge which I found was better than any foundation brush. After the last round of testing it took my skin around 2-3 weeks to heal completely and for the bumps to disappear. If you have very sensitive skin you may want to do a patch test first. I do recommend you read other reviews though because this new formula has worked on a number of other people. Depending on your specific skin type your mileage may vary. Allergic reaction aside, if my skin didn’t get bumps I still would give this a lukewarm review – I personally need coverage for foundations. I don’t need 100% full coverage but something that can be built up to medium is what I look for. The Maestro Glow is sheer – it’s not transparent, but just a tiny bit too sheer for my taste.
Have you tried either of these yet? Do you have a favorite Armani foundation formula? I purchased both of these from Nordstrom but you can also find these at all Armani retailers now. I’m undecided whether or not to return these even though Nordstrom has a good return policy. One of my friends has super dry skin and loves all the Armani formulas, I’m going to ask her if she want to give these a try.
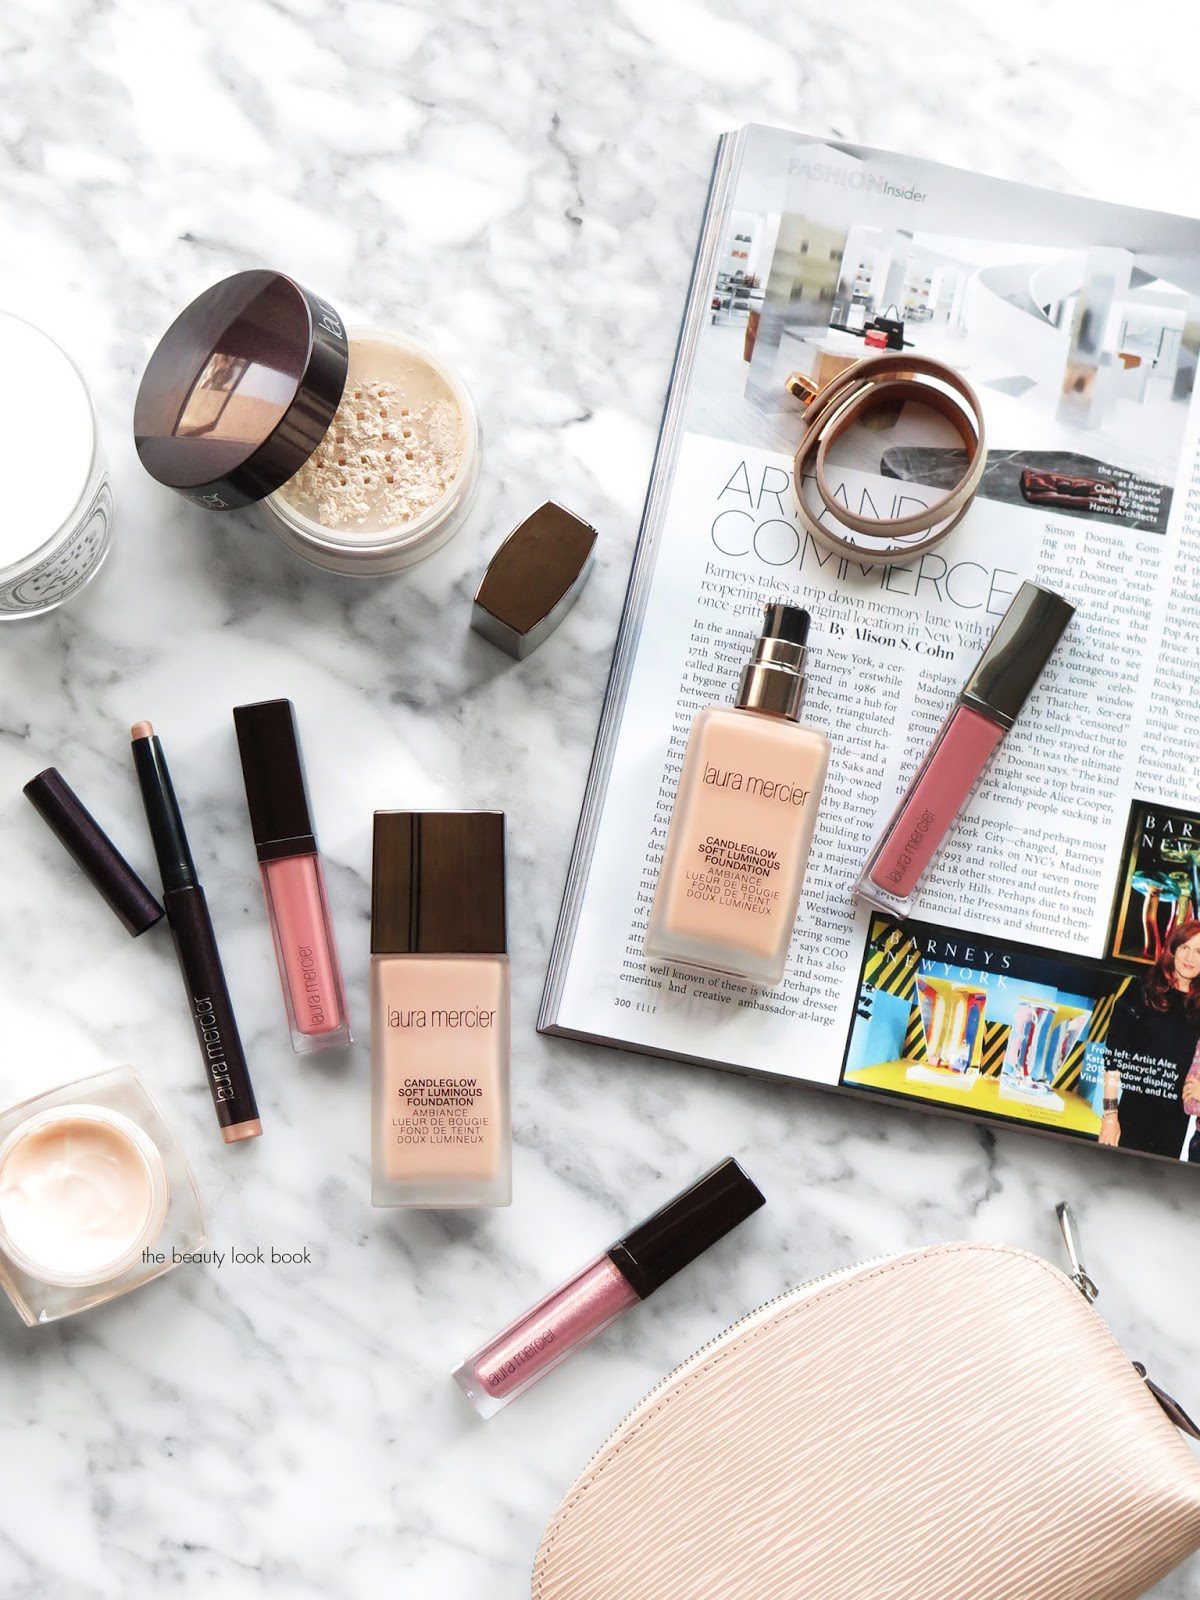
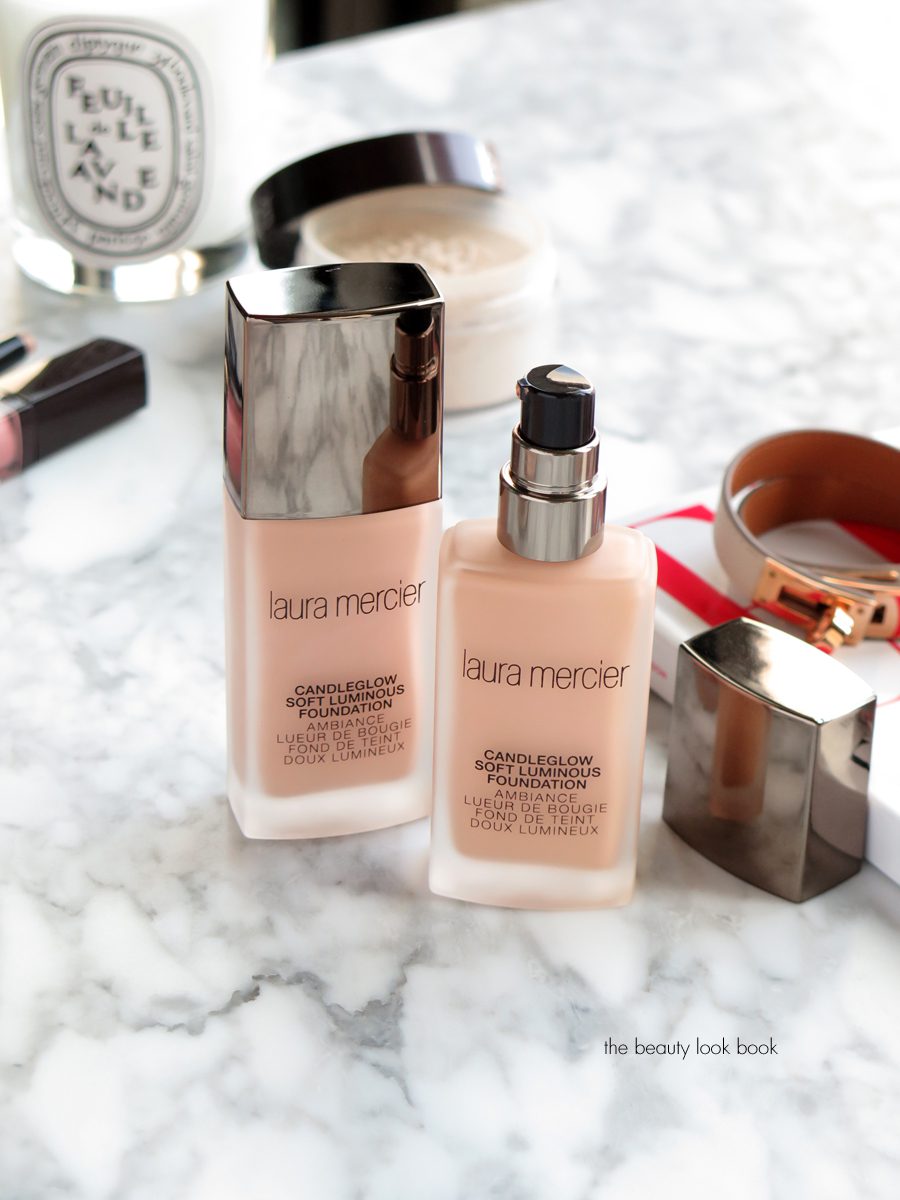
Laura Mercier launched a new foundation formula earlier this year called the Candleglow Soft Luminous Foundation ($48 for 30 ml/1 fl oz). I’ve been playing with this formula for a few months now, testing a few shades over different bases and trying to see how it wears compared to other glow foundation formulas and I’ve found that it is one of the most luminous foundations I’ve ever tried. The Candleglow Foundation comes in 24 shades and is described as having a sheer to medium finish with buildable coverage. I find it to be on the sheer side with a noticeably dewy finish. I love a good glow, but for me the foundation finish is a bit too dewy on its own and needs a soft powder to set. It’s dewy but not greasy looking. Unfortunately once you add any kind of powder, the dewy glow disappears which kinda defeats the purpose of the product, but you still get a natural looking finish. (I’ve been setting with the Translucent Loose Setting Powder.) The formula is described as a hydrating formula – I did find it to have a hydrating feel but it’s a very lightweight formula and doesn’t feel heavy.
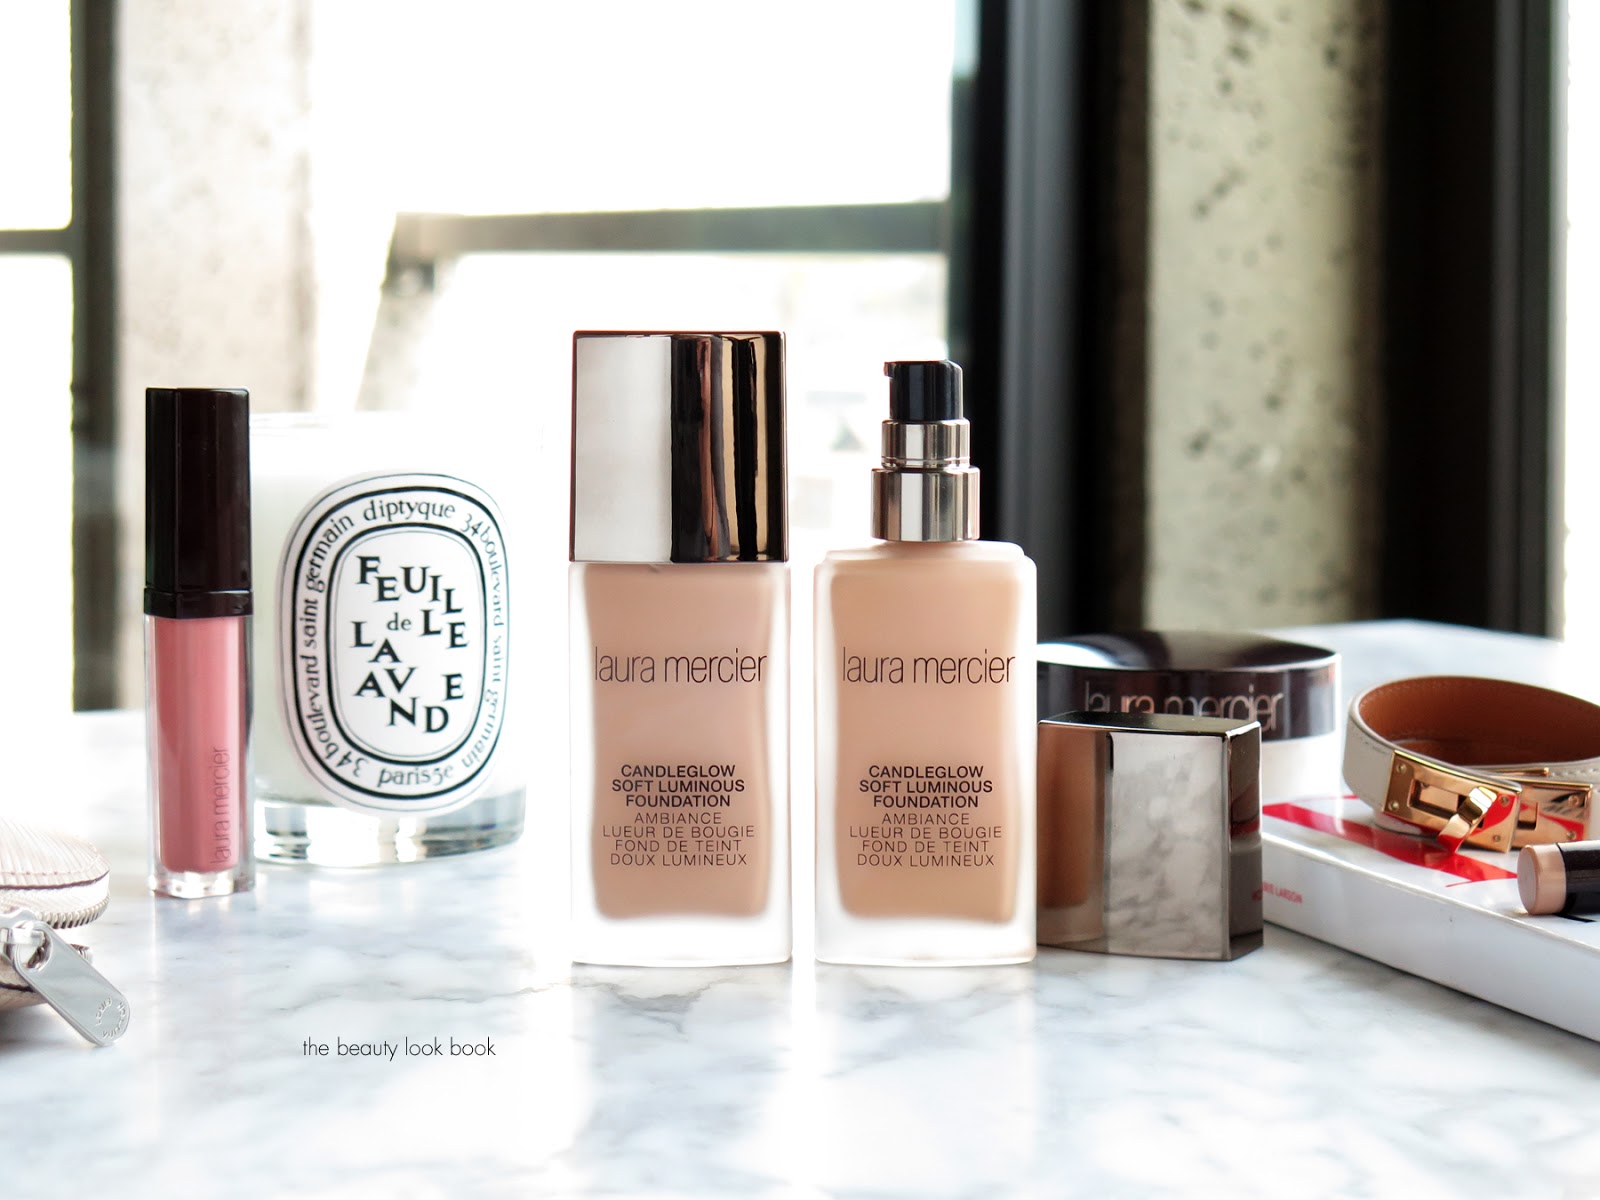
Comparing it to other formulas, the new Candleglow Foundation is not quite as sheer as the Laura Mercier Tinted Moisturizer, but definitely sheerer than the Flawless Fluide and Silk Creme Oil Free Formula. The packaging of the new foundation is well designed – I think it’s the best one yet from Laura Mercier. It comes in a sleek glass bottle and a very well designed pump dispenser. It’s very sturdy and has a nice simple streamlined look which I really like for an easy to use no-fuss kind of look. For me, I need three pumps of product to have enough to apply for my whole face. I like using the Sephora Pro Full Coverage Airbrush #53 brush with this formula, but you can use fingers or a sponge too. It glides on smoothly and evens out the skin in a very sheer natural kind of way. I couldn’t detect any scent which is a plus for those with sensitive noses.
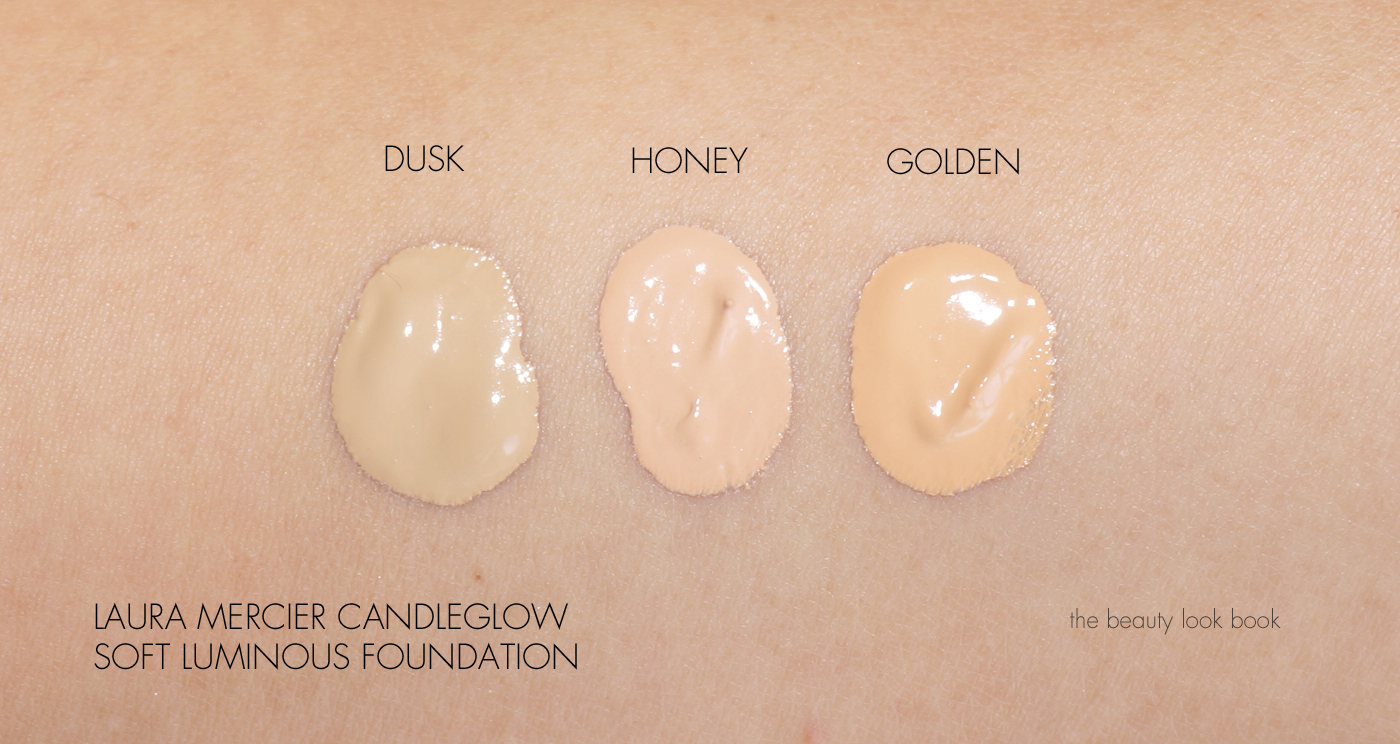
Since the formula is on the sheer side, it makes the colors more forgiving so you don’t need a 100% exact match which is exactly what I need with this line. When it comes to Laura Mercier foundation shades, matching is always so incredibly tricky for me. I’ve made several visits to the counter to get matched for past formulas. Every single time I’ve been to a counter, I’ve been matched to a different shade. My Flawless Fluide match was Honey when I was last matched and it’s worked for quite some time. If you recall my original review, you might remember my surprise since it’s very pink in undertone. I have olive/yellow skin and Honey should be too pink, but somehow when it is blended out on my skin, it is an exact match. For the new Candleglow Foundation formula, Honey works well on my skin, but Dusk also works too. Dusk by comparison is more olive and cool-toned but it oxidizes on my skin so it adjusts to match my neck exactly. Golden worked on me a couple of months ago when I was a bit darker, but I’m losing my tan so it’s just a tad bit too dark for me. My perfect match happens when I mix all three shades, but I find myself reaching for either Honey or Dusk most. The formula is pretty forgiving. If you know what your shade is in the Flawless Fluide formula, your Candleglow shade should probably be the same.
I would say for a natural glowy foundation/base, my favorite is still the NARS Pure Radiant Tinted Moisturizer because it’s not like a traditional tinted moisturizer, but has that lightweight feel. For me the NARS gives me just the right amount of natural coverage on days I only need a light base. It lasts all day without getting too dewy or greasy looking. Comparing the NARS to the Laura Mercier Candleglow, I prefer the NARS by far. The NARS wears better for my normal/combination skin. I’m in between colors, but the colors match my skintone better. The NARS also lasts longer and doesn’t get as dewy as the one from Laura Mercier.
I’ve also been testing the Armani Maestro Glow Foundation and Becca Aqua Luminous Perfecting Foundation (both of which I’ll review soon). I’ll have a more detailed comparison in the following posts, but I will say right now out of all the newest glowy foundation launches this year, my favorite is the Becca, followed by Laura Mercier. The one from Armani unfortunately has been a fail for me (details soon).
If you like sheer to medium coverage with a dewy finish I think you’ll like this one. It works for my normal combination skin but I think it would be better suited for those with normal to dry skin. Overall I found it held up very well considering how dewy/glowy it was. I did get a little shiny in the Tzone by 1-2pm – but it was easy to fix with a bit of a touch up. It’s sheerer than I prefer right now because I have spots I like to cover up – but you can fix those with a spot concealer (some of my favorites in this post here). If you’re one who doesn’t like a glow because you find formulas tend to get too dewy by late afternoon, you will probably be better off checking out the Flawless Fluide formula from Laura Mercier or the NARS Velvet Matte Skin Tint. A huge plus for me with the new Candleglow formula is that it didn’t cause any irritation or breakouts for my super sensitive skin (many foundations clog my pores or cause tiny little bumps all over the face). You can probably experiment with different primers or bases to see how it lasts or wears. I found that primer didn’t make much of a difference in application or lasting power. It works just as well over a regular moisturizer.
Bottom line I the Laura Mercier Candleglow Foundation a solid performer – but may be too dewy in finish for some. Given the sheer coverage and the non-perfect state of my complexion, I do find I need to add something on top of certain areas to give me the coverage I need, but it’s definitely worth checking out for those who want a natural looking glow.
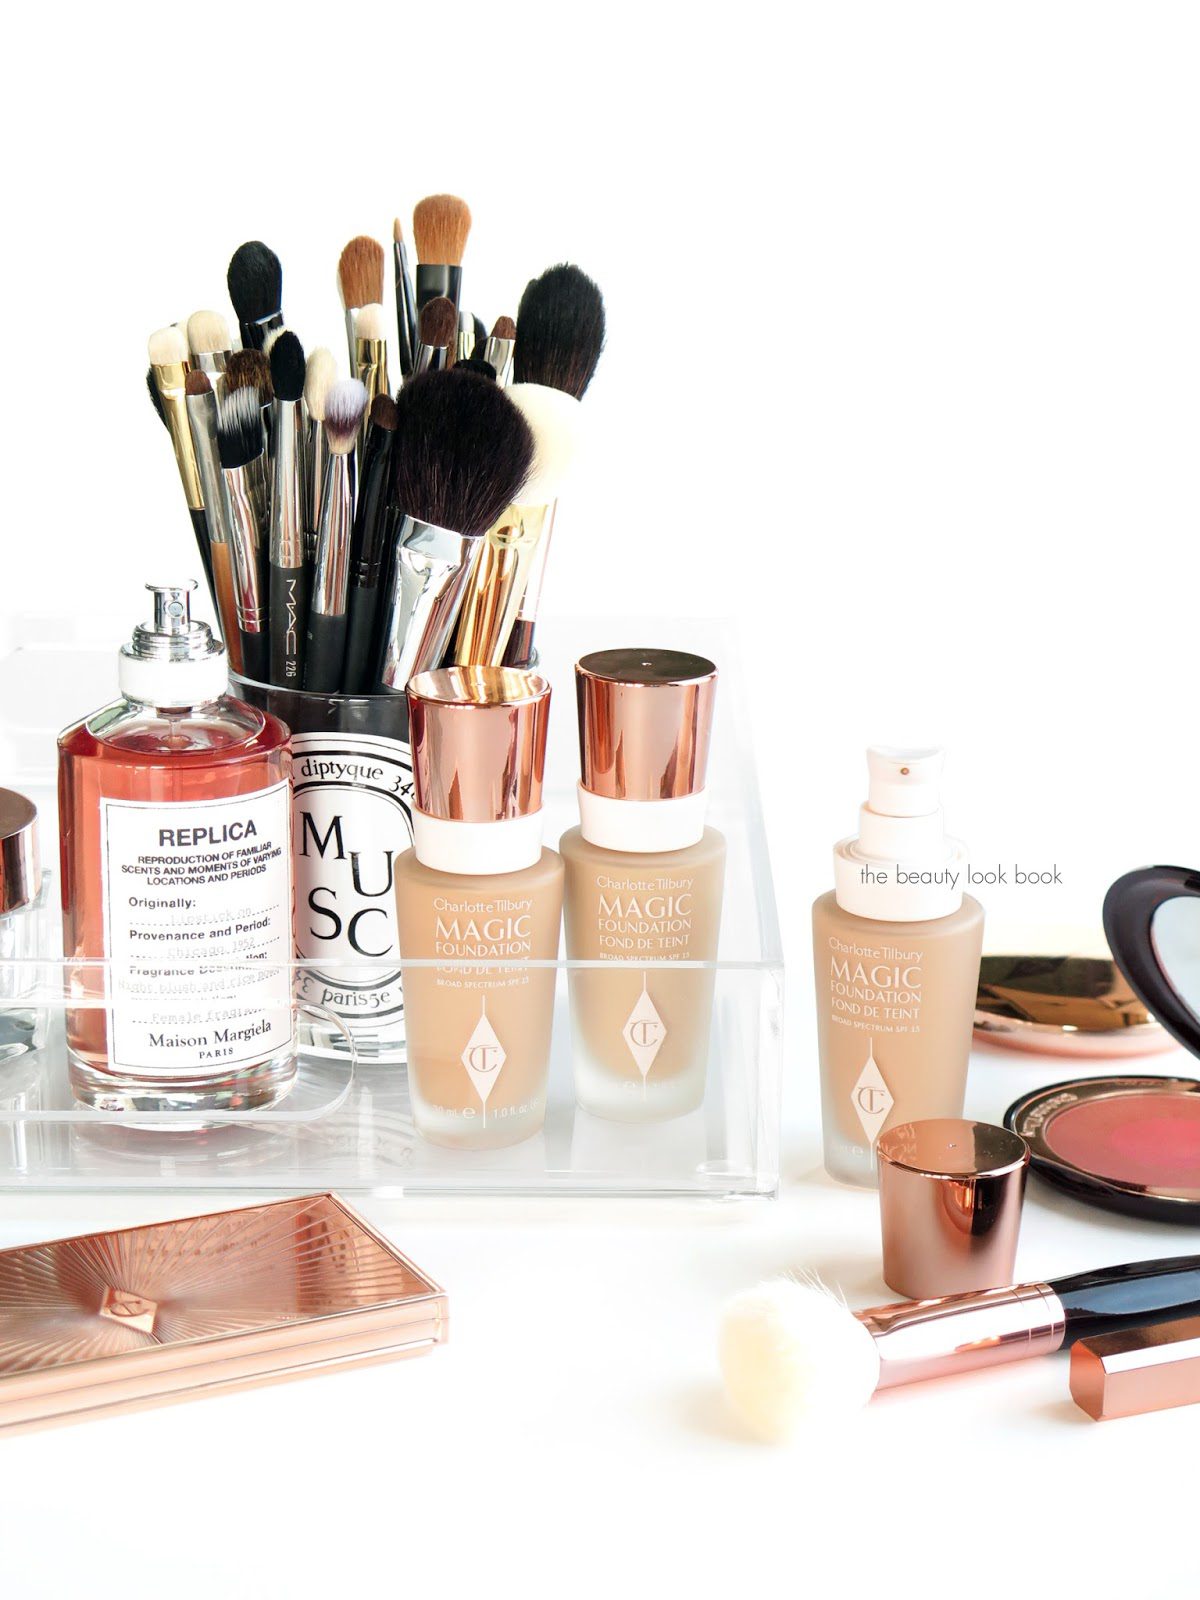
There are a number of new foundation launches this year and I’ve been working my way through testing several different formulas and brands. One of the formulas that I’ve been most excited about is the Charlotte Tilbury Magic Foundation ($44 for 30 ml/1.0 fl oz, made in Italy). This is described as a long-lasting foundation with flawless poreless coverage. It does indeed minimize the look of pores, covers dark circles and gives the skin a more brightened look. There is a new brush that launched called the Magic Complexion Foundation Brush ($55) which I’ve also been playing with. Thoughts on this one in this post as well.
The Charlotte Tilbury Magic Foundation comes in 15 shades and has an SPF 15. It’s packaged in a glass bottle with a plastic pump dispenser. I find two pumps sufficient to cover the entire face. There are a number of glowy foundation formulas on the market this season – I’m all about the glow, but for foundations I prefer a finish that isn’t too dewy because I have normal combination skin. What I like the best about the new foundation from Charlotte Tilbury is the formula brightens my skin, has enough coverage to covers imperfections and dark spots, and has a natural luminous look without being too dewy. I still need to set with powder, I’ve been using either the Laura Mercier Translucent Loose Powder or the Charlotte Tilbury Airbrush Flawless Finish Skin Perfecting Powder #2. With either one I get long-lasting wear, it lasts all day long well into the afternoon with minimal touch ups needed (just a tiny blot on the nose for me).
It’s recommended that you use the new foundation in conjunction with the other
Charlotte Tilbury face products such as the Magic Cream, Mini Miracle Eye Wand and Magic Complexion Foundation Brush for the best looking
skin, but I find you can use it over a wide range of moisturizers or
combine it with other concealers. It’s a pretty versatile formula that
offers medium to full coverage. It evens out the skin and offers smooth
flawless coverage.
In terms of color and formula, many know that I had a hard time finding a good match in the Light Wonder Foundation Formula. My closest match winter match was either 4 or 5, but I found I had to mix colors. During the summer I got a lot darker and found 7 to be my best match. Right now for the Magic Foundation formula, I can get away with either 5 or 6. The color adjusts and warms up slightly on the skin after it sets. It doesn’t oxidize too much which is good, but it will warm up a tiny bit.
Some swatch comparisons below. The corresponding shades for the Light Wonder vs Magic are pretty similar. I find the Magic Foundation 5 to be slightly less pink than the Light Wonder 5.
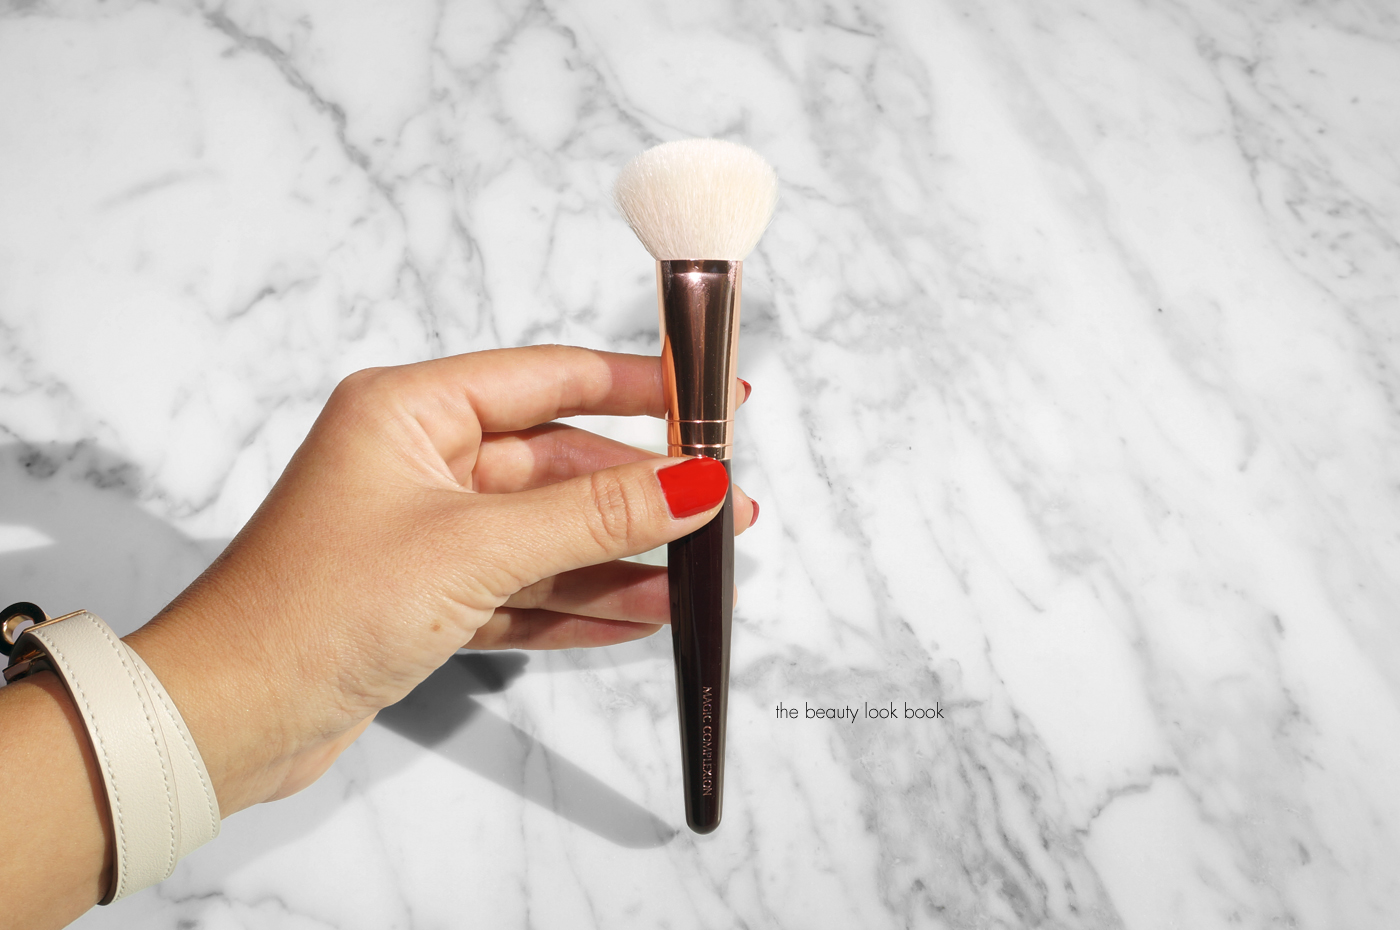
Next up are some thoughts on the new Magic Complexion Foundation Brush.
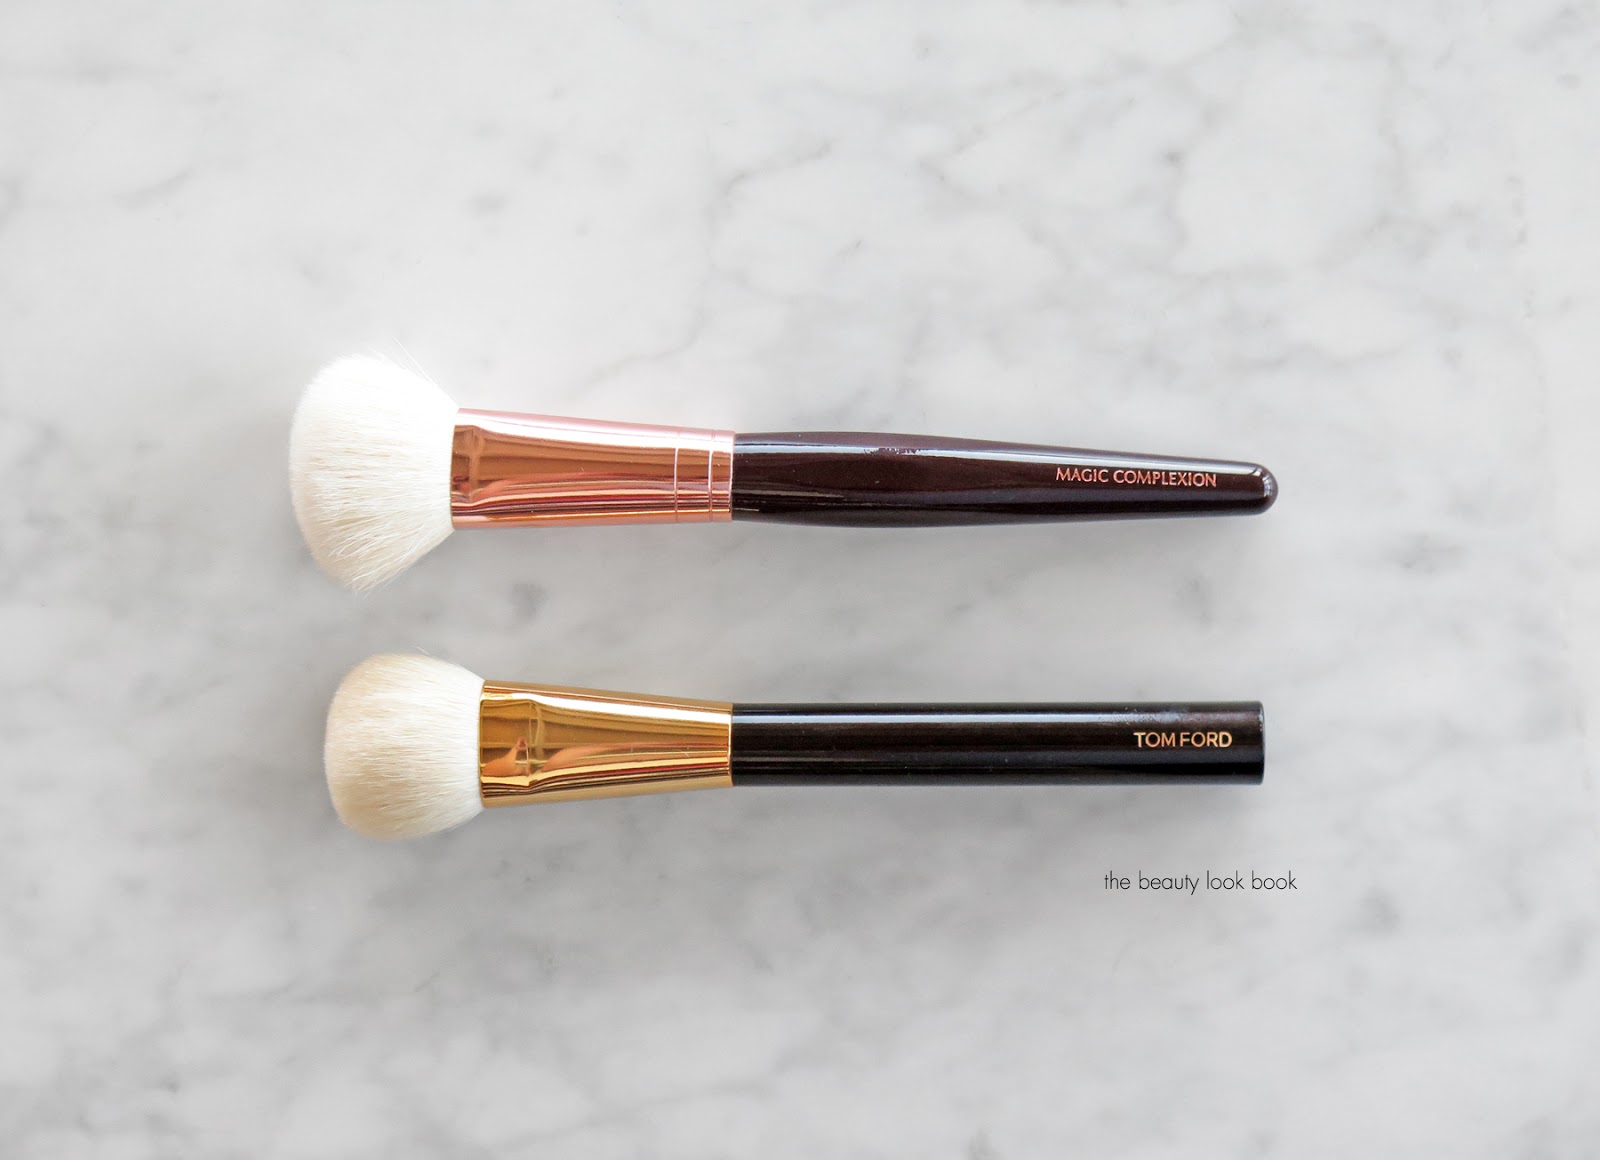
I had high expectations for the Charlotte Tilbury Magic Complexion Foundation Brush as it seemed very similar to the Tom Ford Cream Foundation Brush but priced at a much more affordable price. When I opened the box I was disappointed to see loose hairs flying everywhere. It shed like crazy however after I washed it, the shedding stopped. The ends of the brush look like they have been machine cut. Comparing this to the Tom Ford, the Tom Ford Brush is significantly softer, better made, and seems to be of better quality overall. That being said, the Charlotte Tilbury Magic Complexion brush does perform just as well as the Tom Ford. It buffs the foundation into the skin for a streak-free flawless finish. If you’re looking for a foundation brush that’s soft and will buff in product to a smooth finish, I think it’s something worth looking into. The one from Charlotte Tilbury has a looser fluffier feel that isn’t quite as dense which I find makes it easier to smooth over the larger areas of the face in a circular motion. Here’s a look at both after they’ve both been washed and dried.
In terms of how to apply the Magic Foundation, I think you can use fingers, a beautyblender sponge, or any foundation brush. In the week I’ve been testing this formula, I’ve been using the new Magic Complexion Brush and it’s been working well (that is once I washed it).
Overall I give the new Magic Foundation formula a huge thumbs up. For me I don’t detect any noticeable scent which is a plus. It has sunscreen but doesn’t irritate my super sensitive skin. It has enough coverage to even out the skin and cover my under eye area so I don’t need concealer (but I still use it). Lasting power is good. Finish is more on the natural matte side and looks like your skin but better. I really love the formula of the Magic Foundation – even more so than the Light Wonder and as someone who likes decent coverage but want something that still looks like skin, I’m thrilled with this one. The Magic Complexion Foundation Brush is nice to have, but for me it’s not a must. I do really like the way it performs and I was relieved that the shedding stopped once I washed it. You can use the tools in your current beauty kit to get similar results.
You can find both the Charlotte Tilbury Magic Foundation ($44) and Magic Complexion Brush ($55) online at Charlotte Tilbury now (expected to launch at other retailers soon). Right now Charlotte Tilbury’s website has an exclusive set called the Magic Foundation Kit ($110) which has the brush, foundation of your choice and a mini magic cream.
Have you tried either of these new launches yet? If yes, what did you think? I’d be curious to know what color you’re matched to if you have!
Both the Charlotte Tilbury Magic Foundations and Magic Complexion Brush were sent courtesy of Charlotte Tilbury for review consideration.
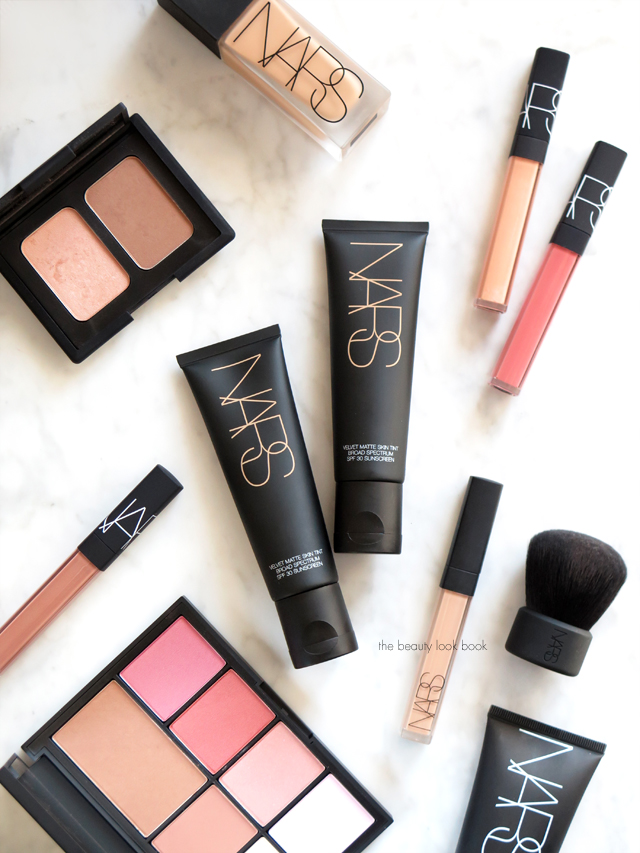
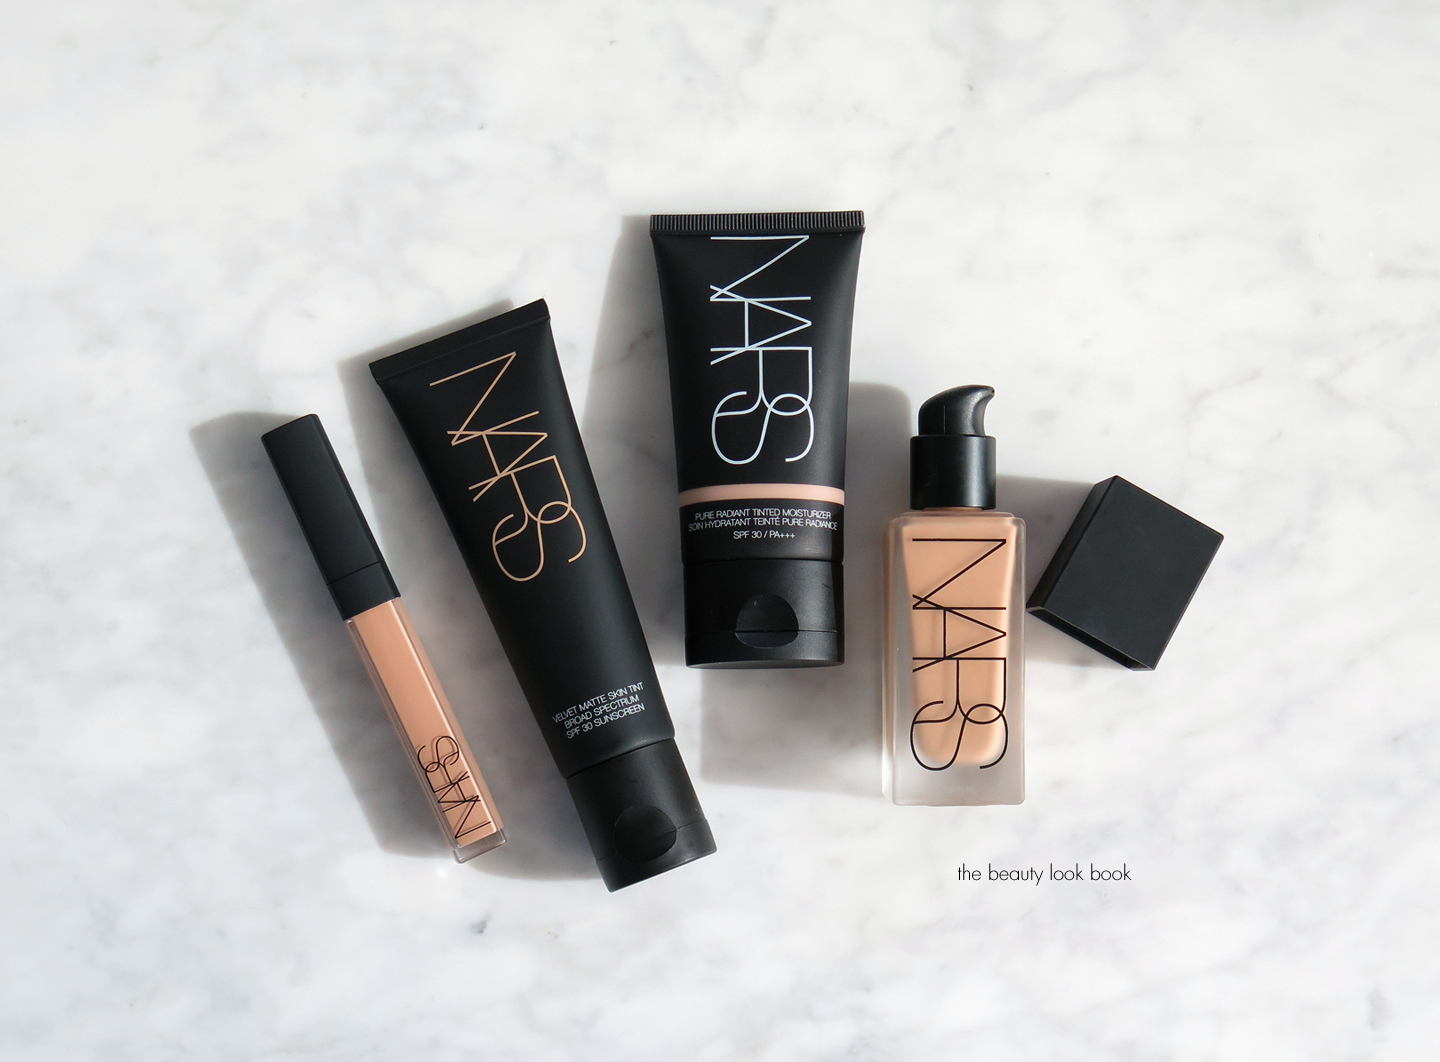
Today NARS is launching their new Velvet Matte Skin Tint ($44 for 1.7 oz/50 ml). I am a huge fan of NARS foundations and face products and this new one is quite amazing. Long time Beauty Look Book readers know that I adore the Pure Radiant Tinted Moisturizer because it’s not like a traditional tinted moisturizer but more of a natural looking skin tint that offers medium buildable coverage with a slightly dewy sheen. Anytime someone asks me for a recommendation on a natural foundation, the NARS Pure Radiant Tinted Moisturizer is the first one on my list, but many of my friends are hesitant to try it because they think it will be too dewy for their normal/combo to oily skin (I still think it’s suitable for oily skin). Well the new Velvet Matte Skin Tint offers the same kind of beautiful medium buildable coverage and natural finish – but without any glow and with a slightly velvety matte finish.
The Velvet Matte Skin Tint (oil-free) comes with broad spectrum SPF 30 just like the Pure Radiant Tinted Moisturizer. The texture is similar in that it’s easy blend, applies smoothly, covers redness and evens out the skin. It dries to a velvety finish without looking flat or too dry like the name matte often implies. It’s like skin but better and on me it’s lasted an impressive amount of time. All day without separating, fading or creasing. Coverage is medium – enough to even out the skintone but not too heavy. It allows your skin to breathe so to speak and feels slightly hydrating but still weightless.
In addition to evening out the skin, it has Rose Fruit Extract to minimize pores and control shine. Vitamins C and E and broad spectrum SPF to protect the skin from environmental stress.
It’s pure love.
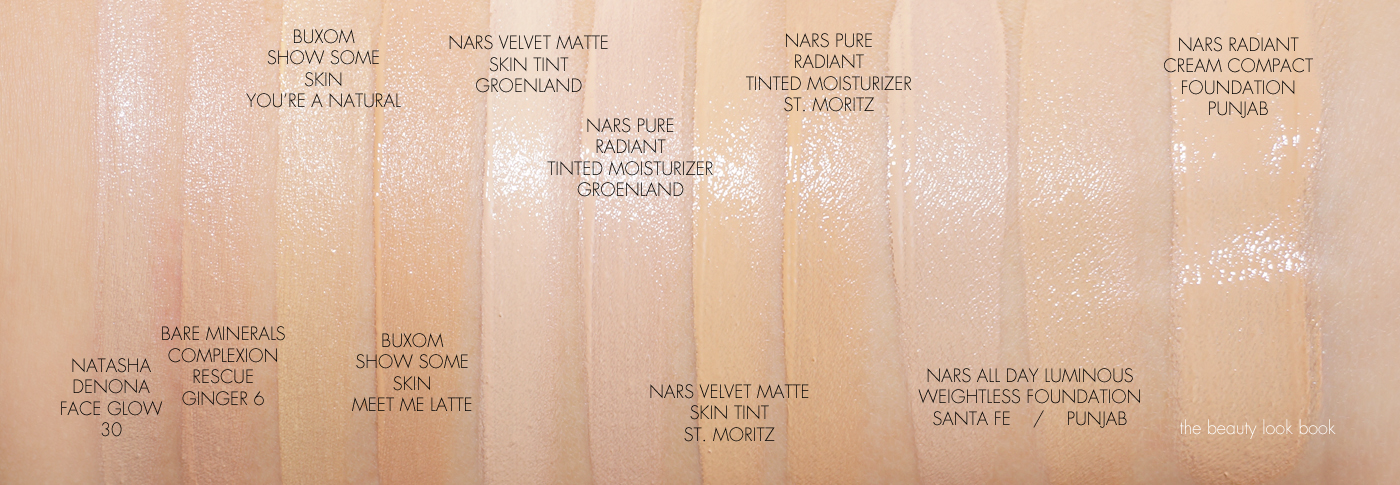
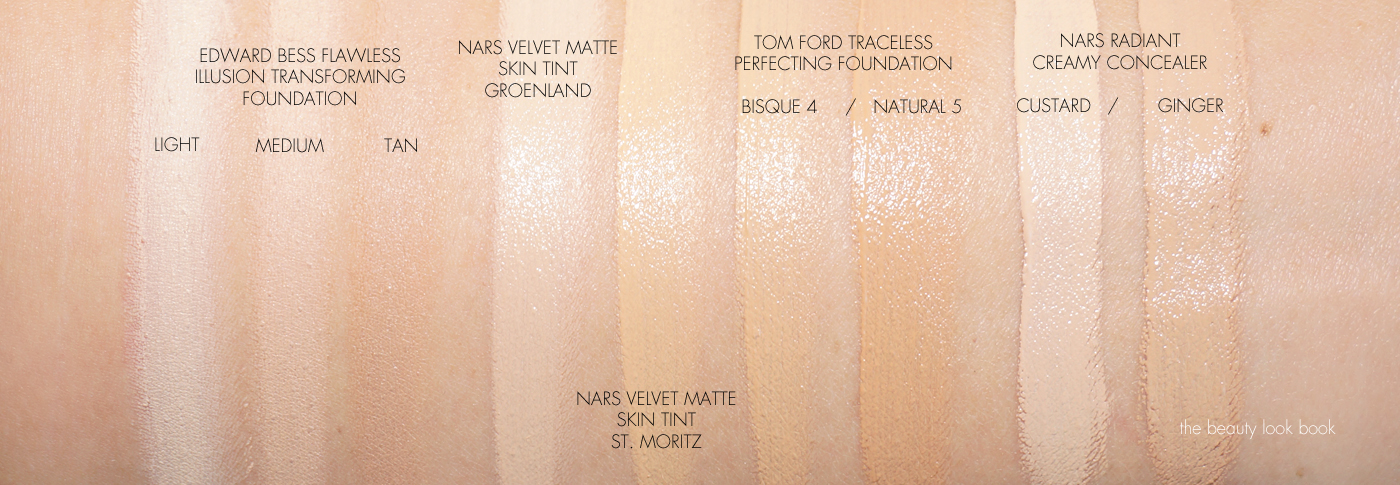
For the Pure Radiant Tinted Moisturizer, I have alternated between
two shades in Groenland and St. Moritz. Right now I am in between shades but am a closer match to St. Moritz because I still have some of my summer tan.
St. Moritz is my summer shade and Groenland is my most-of-the-year
shade. I found that the Velvet Matte Skin Tint colors in corresponding
shades look slightly different when swatched but once you blend it out
on the skin, they are identical. So you should be able to use the same
color of Pure Radiant Tinted Moisturizer and Velvet Matte Skin Tint. For reference you can find swatches of all the colors on Karen’s blog at Makeup and Beauty Blog.
First a look at the packaging differences of some of the foundations. The Velvet Matte Skin Tint comes in a sleek squeeze tube similar to the Pure Radiant Tinted Moisturizer, but it’s slightly skinnier and longer in size.
Here are two sets of swatch comparisons to Groenland and St. Moritz:
Bottom line amazing and definitely worth checking out. It’s just as good as the Pure Radiant Tinted Moisturizer without the glow, but still natural looking. You can find the Velvet Matte Skin Tint now online at NARS and at NARS Boutiques. It will launch at Sephora, Nordstrom, Barney’s New York and all other NARS retailers starting February 1st.
Do you have any NARS foundation favorites? (P.S. I’m behind responding to e-mails and comments, but will catch up later on Sunday this weekend, I’ve been super busy this past week and I’m also attending IMATS for the first time today!)
The Velvet Matte Skin Tints were sent courtesy of NARS for review consideration.


