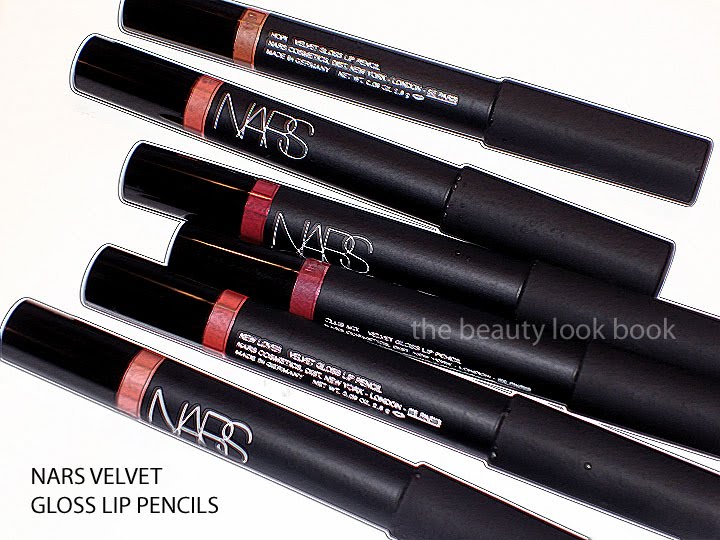
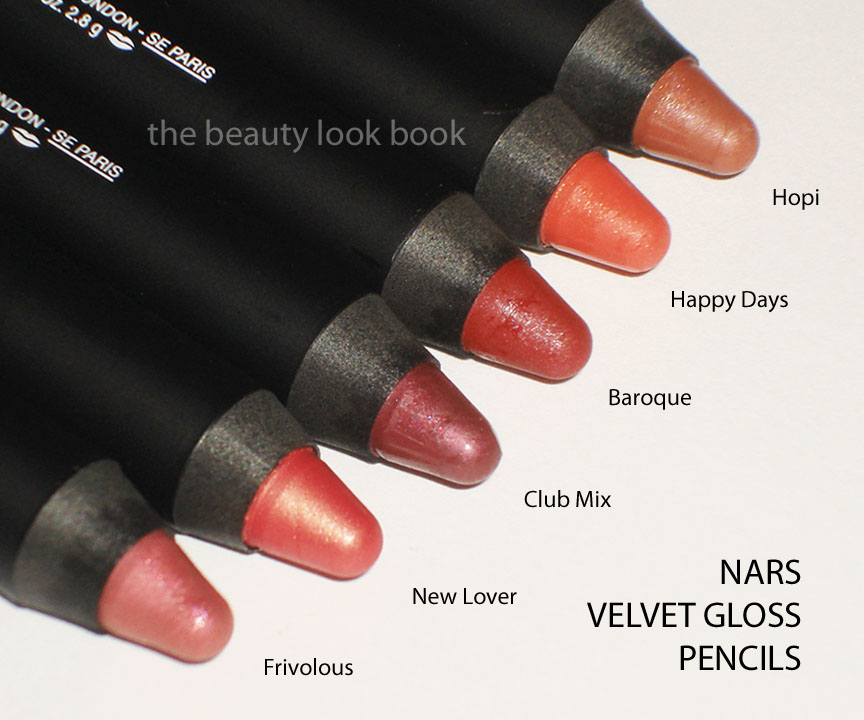
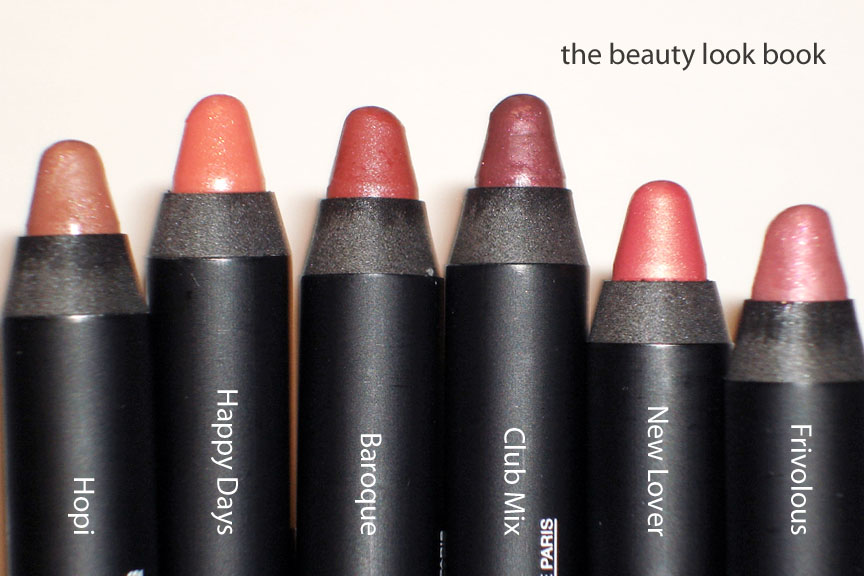
The newest items from NARS: Velvet Gloss Lip Pencils, $24 each. All photos my own. I loved all the colors so much I had to get one of each. The finish is similar to those MAC Lipglass Pencils from the In 3D collection back in 2007. I have on Club Mix today and it’s a lovely plum with a pretty sheen. With the exception of the two lightest shades, Hopi and Frivolous, the other colors have decent pigment. They do have a natural finish so if you’re expecting a high impact type of pay off you might be disappointed. The texture is smooth with a soft gloss finish. I have yet to try Hopi/Frivolous on the lips. I am hoping to do lip swatches this weekend with a more detailed review. In my excitement I didn’t double check the boxes to see if these came with sharpeners. I know NARS Lip Pencils usually do not, however at $24 each it would have been nice, especially for a chubby stick. I’m not in love with the price but the formula and finish is lovely and the colors are just beautiful.
* On the nails, Chanel Rose Paradise Le Vernis (has been reviewed here)
I have mixed feelings about NARS Multiples. They have consistently received glowing rave reviews year after year by beauty editors as the ultimate multi-tasker. I like the idea of a multi-use product but find these too emollient to wear on the eyes. I find these need a bit of work layering either over or under powder to extend the lasting power. I know it seems odd that one would apply a cream product over powder, but the creamy consistency allows easy blending to create a highlight glow.
My first NARS multiples were Malibu (a dusty brown pink) & Copacabana (a pale white frost). I loved combining them using the pink brown on the apples of my cheeks and the pale white dabbed on top blended up towards the temples for a dewy glow. Today there are 3 variations of the Multiple Stick: the regular Multiple, the Multiple Bronzer and Multiple Tint.
Discontinued shades include Waikiki (dark bronze), Ibiza (yellow), Sumatra (dark purple), Mauritius (deep brick red), Cannes (gorgeous plum mauve frost) and Antibes (shimmery pale lilac).
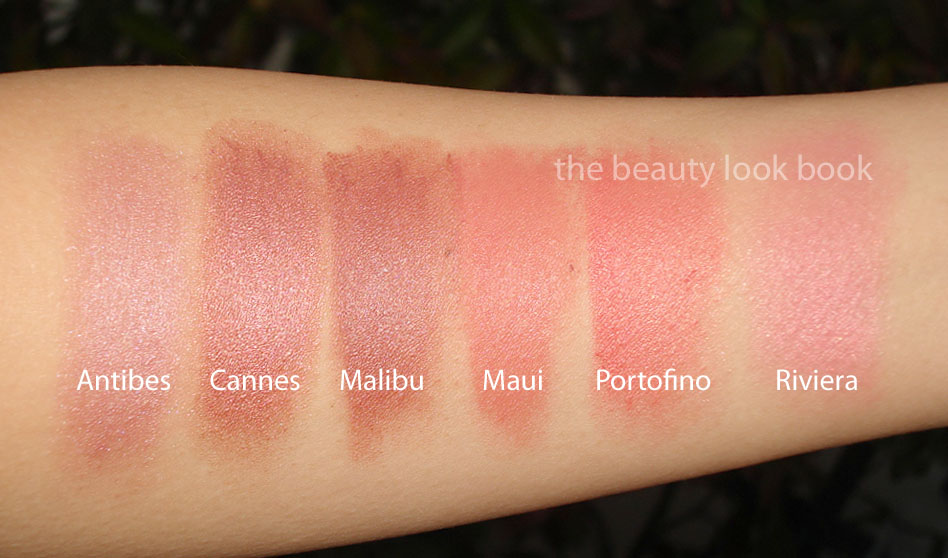
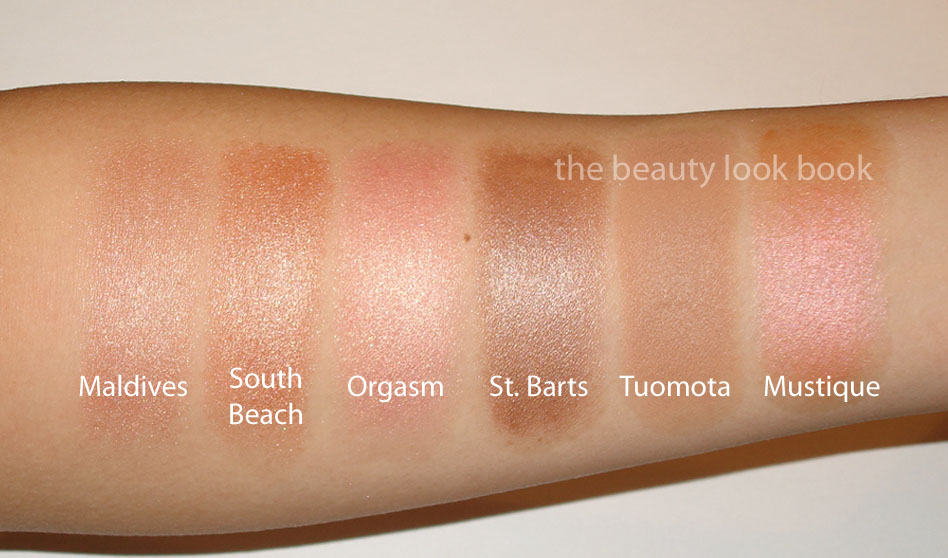
Shades that I have include: Antibes, Cannes, Malibu, Maui, Portofino, Riviera, Maldives, South Beach, Orgasm, St. Barts, Tuomota (Bronzer), Mustique, Copacabana, Luxor, Turks & Caicos Tint, Cadaques Tint & Beverly Hills Tint. I wear all on the cheeks or temples. I have used Luxor and Copacabana on the eyes before as a subtle highlight but prefer regular cream shadows.
The Regular Multiples: These are hit or miss with the creamy texture. I find Maui/Riviera/Orgasm to be drier in texture making them a bit harder to see the color. I have recently replaced a few shades that were near use-up (yes, it is possible to use one up) and it seems that the scent is slightly different but I cannot confirm if the formula has changed. My top 5 favorites are Antibes, Cannes, Mustique, South Beach and Portofino. The colors are visibly shimmery. I wouldn’t recommend them for oily skins.
The Multiple Bronzers: Being a huge fan of Laguna bronzer, I was excited to try the Bronzer Multiples. These however were a disappointment. The flat color makes my skin look ashy and fake.
The Multiple Tints: LOVE these! I reviewed each shade previously before and still love using them. My past reviews are linked here Beverly Hills and Cadaques and Turks & Caicos. I believe these were Limited Edition – I’m not sure if you can still find these instore?
Here are the shades I own plus swatches:
Overall like, but the lasting power is not always the best for the regular formulas need work with layering/combining of powders to make them not disappear by lunchtime. Believe it or not I’ve used up an entire Malibu and South Beach =)
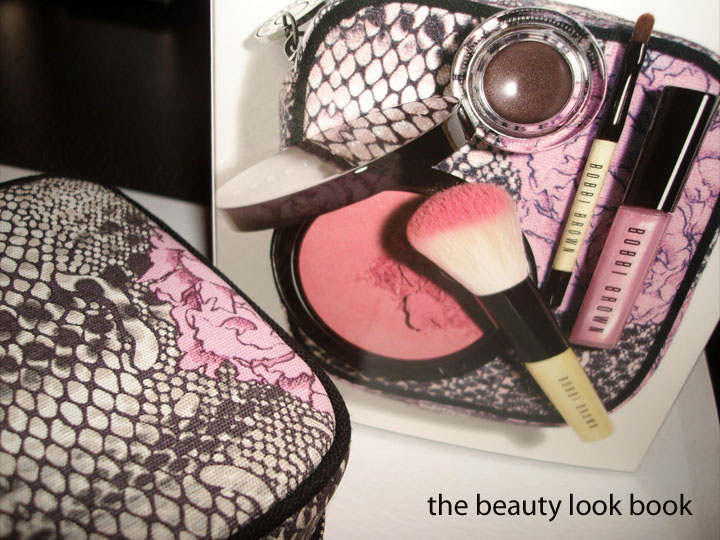
There are a few previews of the upcoming Bobbi Brown & Tibi collaboration for the Peony & Python collection floating around the web. We finally have our first glimpse from Neiman Marcus in an exclusive preview set which includes the following ($95):
Pink Peony Illuminating Bronzer (new) – a cool pink with gold flecks
Black Mauve Long-Wear Gel Eyeliner (repromote) – taupe purple bronze
Two Mini Brushes
I bought this mainly because of the new Pink Peony Bronzer & the cute zippered pouch it comes in. Pricey for just 2 things but I am nearly out of my Pink Lilac gloss and can easily re-gift the Black Mauve Shimmer Ink gel liner. To breakdown the cost by full-sized individual product, Illuminating Bronzers $33 + Gel Liner $21 + Brightening Gloss $22 = $76, which means you pay $19 for the pouch and two mini brushes. Unfortunately the two mini brushes are pretty crappy – the blender brush sheds like crazy and the gel liner brush is too small in the handle to get an easy grip with your hand. Pretty disappointing.
As disappointing as the brushes are, the colors are beautiful Pink Peony is a cooler and slightly deeper version of Maui & Antigua Illuminating Bronzers. I thought Antigua/Maui were pinkish, but Pink Peony is more of a true pink while the others are warmer. Pink Peony is also a more pigmented version of Pink Sugar Shimmer Blush (which goes on sheer on me). Here are the comparisons:
Black Mauve Shimmer Wash is a repromote. Bobbi Brown Gel Liners are among my favorite for gel liners. Here it is compared to a few other brownish & purple colors from Bobbi Brown. If you haven’t checked out Black Mauve Shimmer – definitely do!
The Brightening Glosses are sheer but luminous. I love these alone, over liner or over lipstick for a soft sheen. The texture is smooth and semi-thick, but not too sticky. They do have that annoying bristle brush which can get messy from inserting back into the tube. I love everything about Bobbi Brown’s glosses from the small simple packaging and texture and scent but I keep hoping one day she will change the brush tip.
All the comparisons swatched:
Overall lovely! If you don’t have the gloss or gel liner I think it’s a decent deal. As much as I hate the brushes in this set, I find they are usable and ok for touch ups – just far below the quality of her full-sized brushes. Brands need to take lessons from Laura Mercier who produces wonderful mini brushes in her sets & palettes which I find are of excellent quality (not identical to her full size, but still very very good).
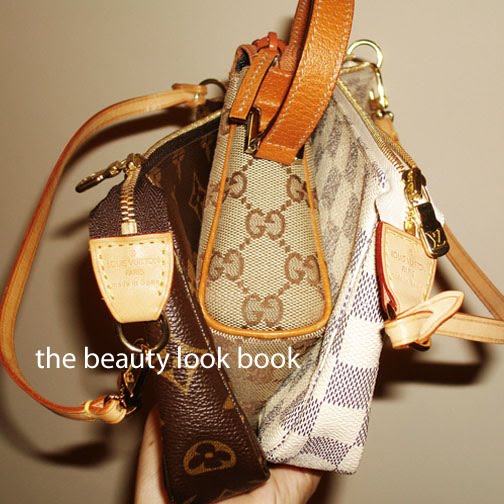
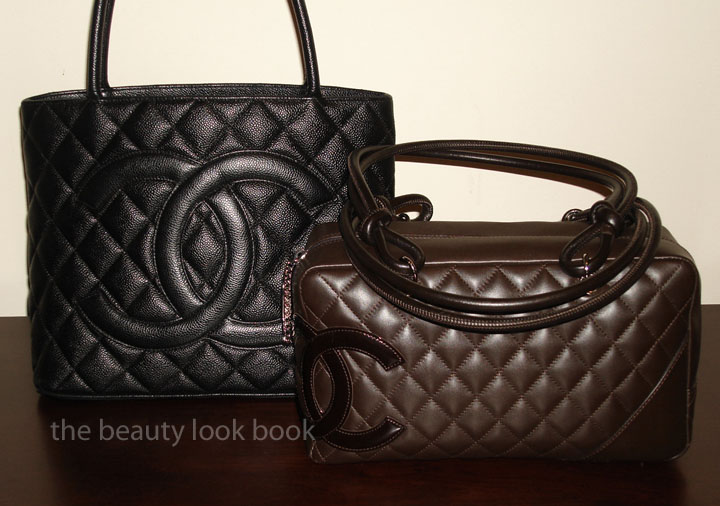
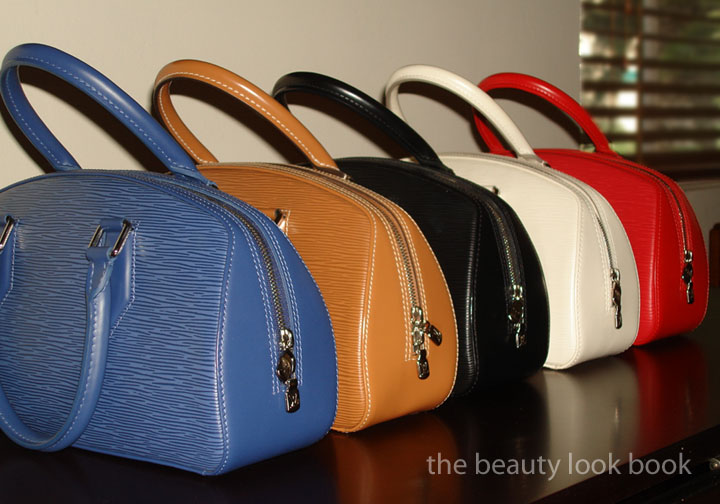
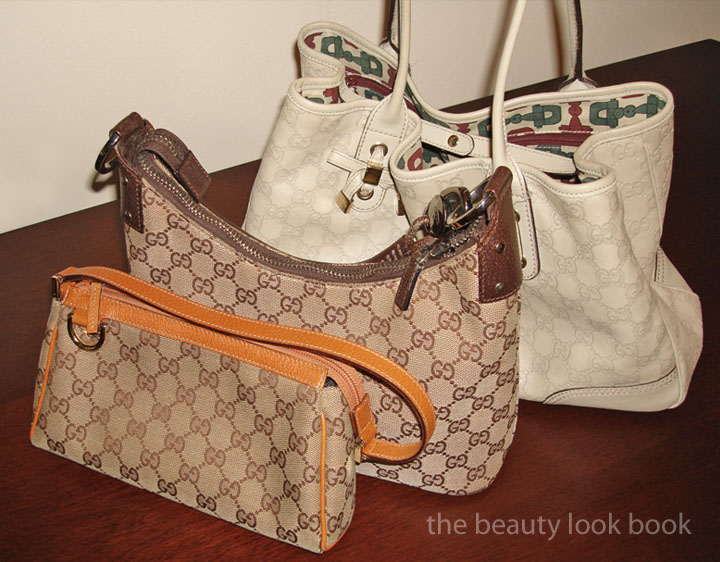
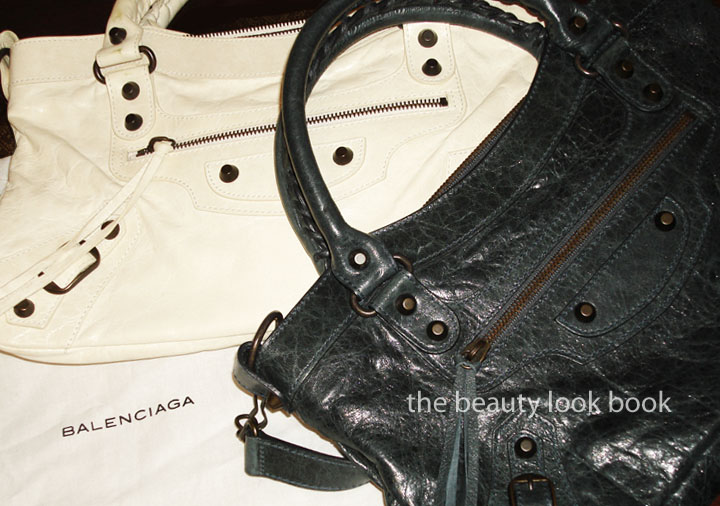
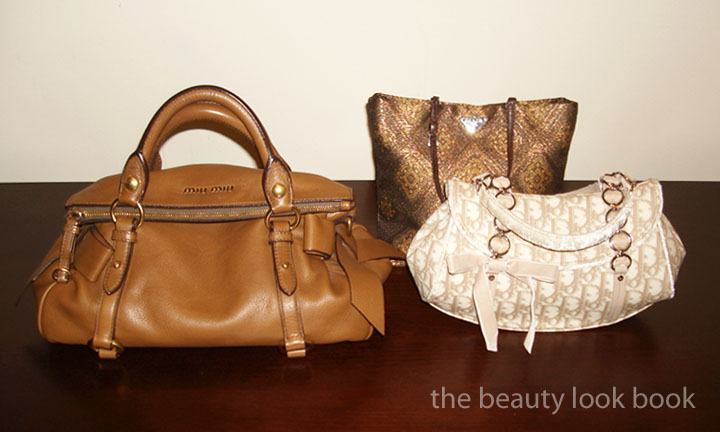
Per request, my purse collection plus some bits of random thoughts relating to purses and handbags. In my collection are leather goods from Balenciaga, Chanel, Dior, Gucci, Louis Vuitton, Marc Jacobs, Miu Miu and Prada. Most purchases were made several years back between 2003 and 2008.
Handbag care tips: I rely on The Purse Forum by brand, style & type of material for tips. Different leathers with different finishes need to be handled differently. Some lighter shades or lacquered finished leather goods are prone to color transfer from dark clothes like denim. Some softer leathers are prone to scratching and marks. Scratching and creasing isn’t necessarily bad – some leathers are made to look worn as you use them. When my bags are not in use, I usually keep mine in their dustbags, away from heat and sunlight. Leaving them exposed for a short period of time won’t ruin them as long as it’s away from moisture and direct sunlight, but I just like to be safe rather than sorry. For lighter bags, there are some Apple Garde products that help you clean, protect and seal leather. I’ve always been careful using these since they are not appropriate for all kinds of leather. Also note that spraying bags with a sealant can alter the color slightly (usually darkens the color). Check out The Purse Forum threads for more information.
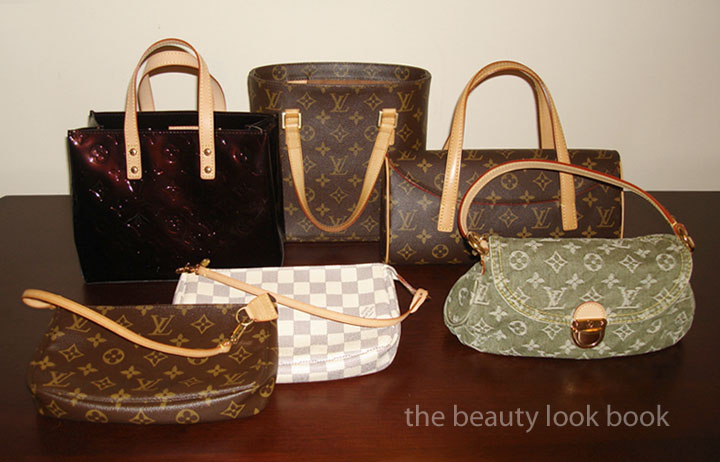
My purse history: My first designer purse was a large nylon Kate Spade tote gifted by my sister for my high school graduation. I didn’t really get into purses until my last years in college and I started collecting piece by piece from 2003 to about 2008ish (my first major purchase was the LV Vavin PM, no longer made). Once I quit my job to go back to school I put myself on a purse ban and did not make any purchases until after graduation late 2010 with the addition of a few Marc Jacobs pieces (large singles and little stam).
My purse and handbag preferences: I think my taste has evolved since my early 20’s. I used to like the LV and Gucci monogram styles because I felt the patterns and shapes were versatile for any occasion whether it was for a casual lunch, going to run errands, shopping at the mall or taking to work. However I soon learned that not all people are logo or monogram friendly and a few hurtful snide comments here and there made me rethink my daily styling. I do not and never have dressed for others or based on what others think, but as a few close friends and family members told me – I needed to learn to be sensitive and be aware of how my appearance affects others. On the flipside, there were those friends who would tell me not to care about anyone else and that I should wear what I want to wear.
I’m not the person who likes to draw attention to myself, so I did take the advice to heart. I began to look at other more subtle styles. I also started to look for bigger sizes. However, being 5’3″ it can sometimes be a challenge to find a style that is a decent size but not too large that it overwhelms my body. I think I’ve accumulated a good balance in styles, shapes, sizes and colors. This is the last year I’ll be in my 20’s and these days I’m not as purse crazy and prefer the non-logo bags or ones with very subtle lettering.
My handbag and outfit styling: I change my handbags frequently, usually a different one every few weeks. Most of my purses are neutral so it’s easy to coordinate purses with outfits. I don’t always have outfit successes. There are days when I just grab what’s clean and if it fits it’s ok with me and I’ll run out the door looking like a mismatched nightmare. For the days when I do try to think things through, I don’t always know in advance what will look good, I just know it when I see it. Keeping things simple makes things easier.
Have I kept all my purses? Any regrets? Have I sold any? There are definitely a few purses I purchased in the past that I now have those “what was I thinking?” thoughts. I have not sold any before, although I have passed on a few to my cousins (not featured). Regrets? Yes. If I could do it all over again I would have avoided LV all together and purchased pieces from MJ instead. There are some gorgeous classic MJ pieces I would love to own that are no longer made.
Photos, swatches and what I’m coordinating with the Armani Spring 2011 items. Picks include: Pink Light Micro-fil Powder for Spring 2011, Rouge d’Armani #518 and the new La Femme Bleue Blush Palette.
*Update Friday Evening* What a week! TGIF a million times over. The Spring 2011 Collection from Armani is lovely and fresh with soft feminine pinks for lips and cheeks. I viewed the eyeshadow quad as the misfit in the collection – lovely and vibrant and very original, just not for me. I ended up with the classic soft pinks – gorgeous and naturally flattering, but dupeable and a bit unoriginal. Photos are separated by Spring Product Picks first, followed by comparisons all the way at the bottom.
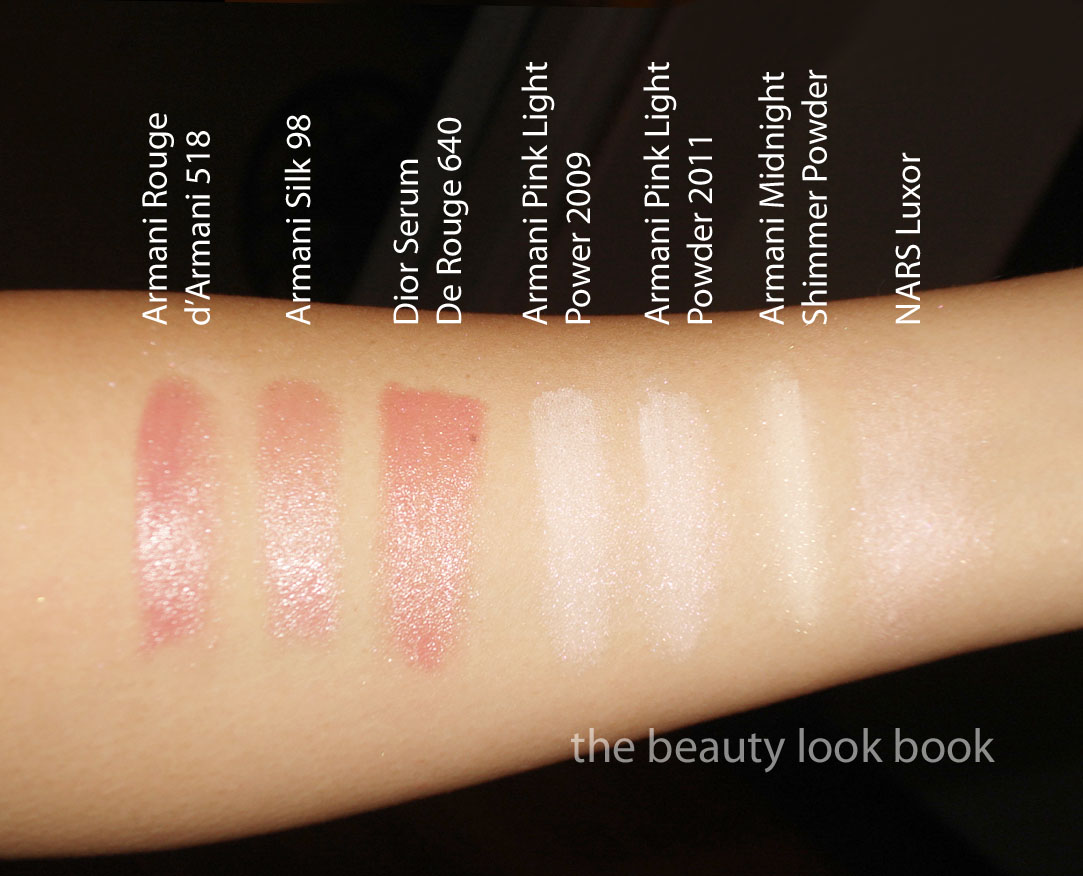
#518 Rouge d’Armani is extremely close to last spring’s Silk Lipstick #98 and Dior’s Serum de Rouge in 640. It’s a lovely soft cool pink but I found it applied a bit streaky and uneven. It took a bit of work layering combined with a brush for me to get an even application. I like the effect but it’s been done before. The texture is smooth and creamy and those who avoid Armani Lipsticks because of lack of staying power – the good news is the Rouge d’Armani formula does last longer. The finish is natural with a soft shine. No detectable scent.
The Spring 2011 blush was the item I was anticipating the most. I’m a huge fan of Armani blushes for their subtle natural finish. They are soft and light but noticeable on my skin and I love the way they look when layered over a soft cream highlighter. The Spring Blush is a soft powder pink with a luminous glow. There’s a soft silver sparkle that you can barely see. The finish of this blush is very natural. More comparisons down below.
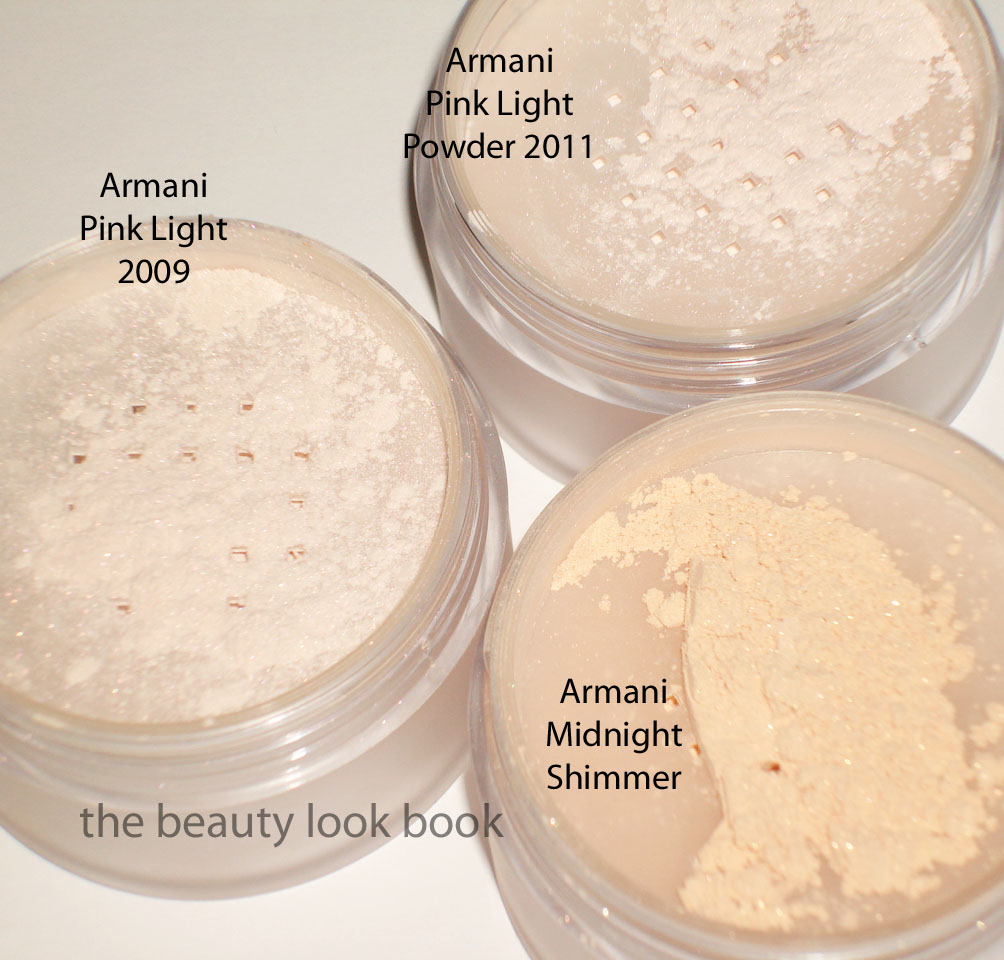
I was a bit disappointed to find this season’s Pink Light Powder is the exact same as 2009’s Pink Light Powder. I think my sister will be happy to take this off my hands. If you missed out a couple years ago, definitely try to find a counter to try this. It’s like their Fluid Sheer #7 and NARS Luxor in a powder form. It’s a soft opalescent pink that is beautifully luminous and gives that glow from within effect. I love this layered over other blushes to add shimmer. It’s really lovely without being too sparkly or frosty. Can’t rave enough even though I wish this was slightly different than the previous release, it’s still an awesome product.
What I’m wearing with the Spring 2011 items today:
Several readers have asked for tips on how I pick out nail polish colors for tips and toes. I’d like to open this up to hear how you coordinate your nail polish too! My personal style is on the conservative side and I work in a corporate office environment with a business casual dress code. I rarely match my fingers with toes for nail polish, although sometimes I will use shades within the same color family. My nail polish picks are usually spur of the moment picks based on mood. Often times I cannot decide on my own so I photo-text a picture to my sister to help me decide or I bring 3-4 bottles of my own to the salon and ask for assistance with coordination.
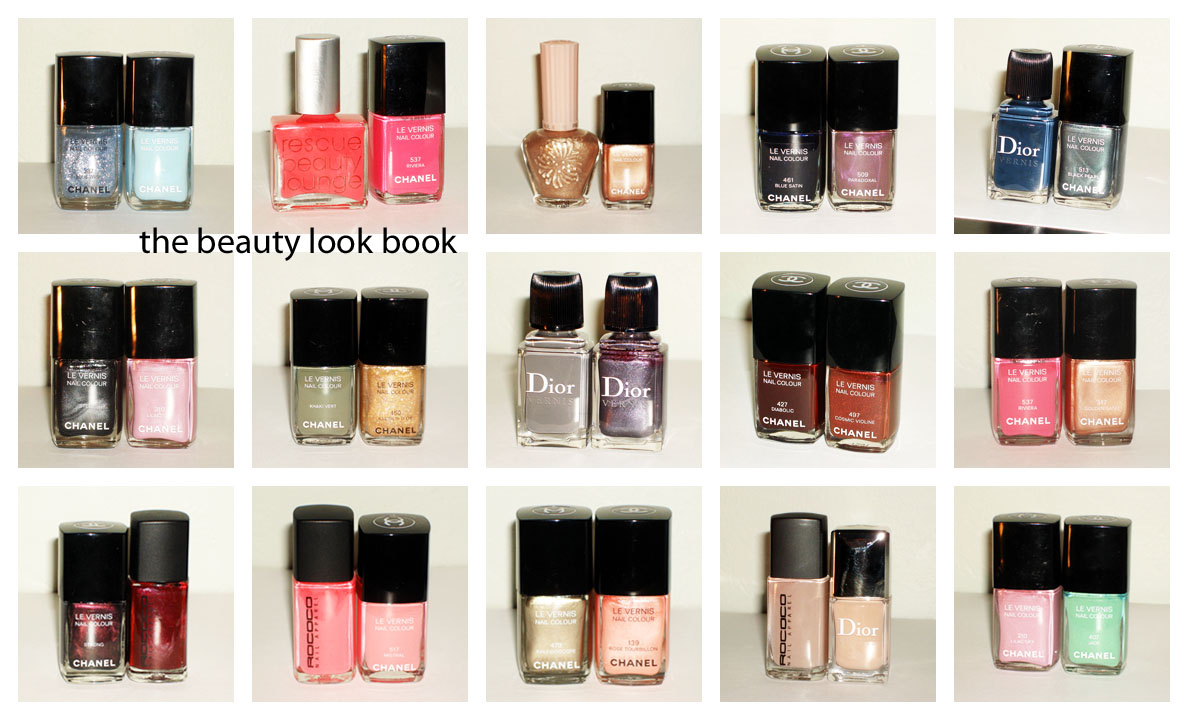
I’m usually open to trying anything. I’ll mix creams with frosts, brights with pales, darks with lights, blues with greens, corals with pinks etc. Often times I’ll use similar colors, just with slightly different variations like a cream grey and a shimmery grey. Swatch testing on fingers or holding the bottles next to each other help me figure out which colors go together. Some combinations are total failures (like Jade + Lilac Sky). There are a number of mani/pedi posts I’ve featured before if you search through the archives you might get some more ideas. Below are a few I’ve done before. There are way too many for me to remember most.
Swatch testing on my fingers to see which is a yay or nay combination:
Left = nay, right = yay! (purple on fingers, steel on toes)
Holding the bottles next to each other, Left = Nay, Right = Yay! (green on toes, beige on fingers)
My nail polish picks are usually spur of the moment, but if I try to think more about my method, I would have to say my picks usually revolve around the following:
1) Is it during the week or nearing the weekend? If it’s during the week I’ll try to keep the brights or non-neutrals on the toes (less visible and more forgiving to wear those super bright shades). If it’s nearing the weekend then I’m more brave in wearing non-neutrals.
2) What time of year is it? Southern California has great weather year round, but I still prefer brights in spring/summer and darks/reds during the fall/holiday season.
3) What am I in the mood for? I often like to mix something old with something new. My nail polish moods usually revolve around my clothing moods. For clothing I go through waves of color phases. Sometimes I’m all about gray, sometimes I like adding a pop of color to neutrals, sometimes I just can’t get enough darks.
A few other frequently asked nail polish questions:
1) Are my mani/pedis done by myself or at a salon? Mostly at the salon (75%), occasionally on my own (25%).
2) How often do I get my nails done? It varies depending on how busy I am, but it ranges from once a week to once every other week.
I’ve gushed over and over again raving that Armani’s Eyes to Kill Mascara is my holy-grail-life-changing type of product. I have medium length lashes that are super straight which makes them look shorter than they really are. After discovering the magic of eyelash curlers I still found it challenging to find the right mascara for my eye shape and lash type: one that thickens, lengthens, defines and does not smudge, flake or irritate my eyes, and most importantly, one that also holds the curl.
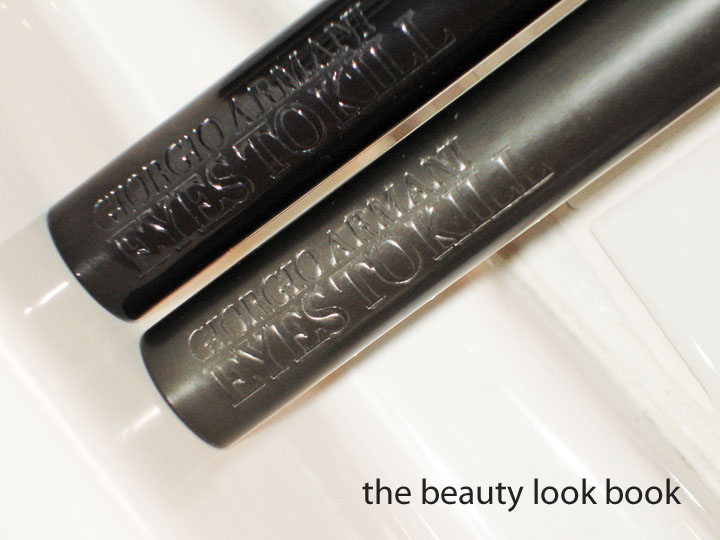
Armani’s Eyes to Kill was the answer to my seemingly never ending quest for the perfect mascara. There are a number of other mascaras I like, but none had the wow-factor like Armani’s. It’s also interesting to note that I’ve been a long-time Armani fan, but I hated every single previous mascara release from the brand. So I was skeptic when I first tried Eyes to Kill, especially at a jaw-dropping $30 per tube, but I’m glad I did. I actually tried a mini sample first before buying a full-sized tube. The heavy weight sleek black tube makes it feel worth it when it’s in your hands.
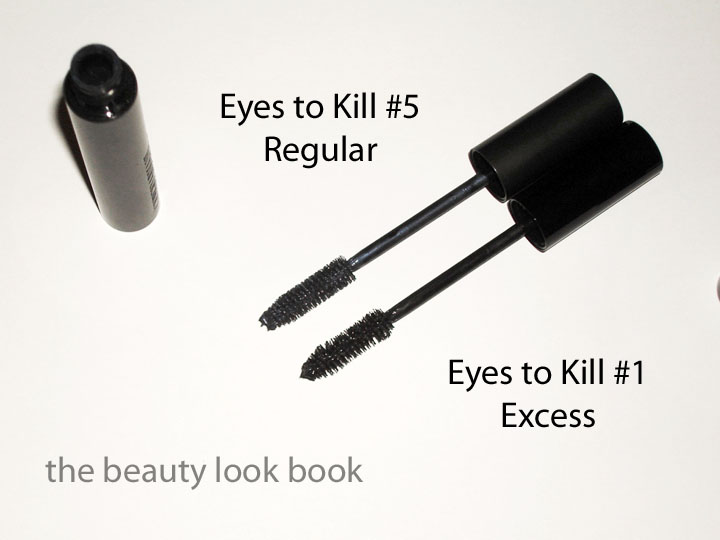
Left = Excess, Right = Regular
Armani has since released 2 other variations, a waterproof version and Megan Fox’s Eyes to Kill Excess. I never tried the waterproof version – my experience with waterproof versions is that they tend to be too harsh on my lashes, the formula is just too thick and dries to a consistency that makes my lashes feel brittle. Not to mention they are a huge pain to remove from the eyes in the evenings. The new Eyes to Kill Excess has a killer slogan, “exceptionally volumizing mascara, drop dead seduction in a single stroke.” As soon as I opened the e-mail about this, I had to try it out.
So how do they compare? You can read more detailed product information about the Eyes to Kill Excess formula on Armani’s website (linked here for your convenience). I will start by saying that I prefer the regular formula, read on to find out why. Here is what I noticed about each:
Eyes to Kill Regular: According to Armani, “Dress the eye with powerful, plush, voluminous lashes. Fine, fluid Microfil technology creates intensely captivating lash texture. Micro-waxes combined with a fineness agent allow for smooth and easy application, revealing weightless volume and length.”
I’m featuring my #5 Blue Grey Night in the photos, but mainly rely on my #1 Steel Black (currently missing in action). The formula dries to a stiffer finish which holds the curl and lasts all day (unless you start crying or are splashed with water). There’s also something about the texture of the mascara + the big bristles that grabs onto your lashes coating them evenly and fully. This results in thick lush lashes for me. The #1 Steel Black doesn’t look like a true black when wet, but applies darker than what you see resulting in a true black finish. Finding a true black is hard for me – many brands have black mascaras that dry down to a greyish finish making my lashes look ashy. Even though my lashes are black, I’ve often had better success with dark brown mascaras. I love the way the sleek heavy tube feels – it’s simple, straight and nice to look at.
Eyes to Kill Excess: Seems to be the exact same in bristle shape/size to me. The difference is in the formula which, according to Armani contains “The fusion of a Wax™ Complex and the new texturizing agents creates a fluid and creamy texture that glides onto the lashes and allows for an easy, homogeneous application.” Also, the Excess formula is supposed to be a darker black color than anything they’ve made before.
My personal observations is that the Excess is a great mascara. I definitely notice that it’s a deeper more dramatic true black. I also notice a difference in formula in the sense that it’s more creamy and less stiff. There is no smudging or flaking. It holds the curl and lasts all day. I personally found that I had to pump the brush a bit inside the tube to get more product on the brush for a better application. On me it clumped a bit the first few applications. I had to experiment with my application technique to get a smooth finish and thick even look. It definitely has a softer feel on my lashes. The packaging is still heavyweight and sleek, it just has a glossy finish on the tube.
Regular vs. Excess: Because I have such wimpy lashes, I need all the help I can get. The Regular formula has a stiffer, thicker, more volumizing dramatic finish, but I can definitely feel like I am wearing mascara. If you have sensitive eyes and found the Regular formula too much for your lashes, but still want a similar finish with a weightless more natural feel, try out the Excess formula. Unfortunately the Excess only comes in 1 shade, black.
My review might seem odd since the Excess formula has been marketed as a darker more dramatic version of the Regular Eyes to Kill. I like them both.
Summary comparison of the features for the Black shades (sorry for the confusion, I can’t find my regular Steel Black right now):
Color: Both are true blacks, Excess is a deeper darker black
Volumizing: Regular is more volumizing
Defining: Excess is more defining
Lasting Power: Same, all day, but not waterproof or cry-proof
Texture: Regular is thicker
How it Feels on the Lashes: Regular is stiffer more dramatic, Excess is softer and more gentle
Smell: Same scent, not noticeable once on the eyes
Overall Effect: Regular has more of a wow-factor, Excess has a darker blacker finish
Brush Size & Shape: Same, although in the photo, the blue seems fuller (it just has more product on the bristles from more frequent use, the excess has only been used 4 times so far) – this can show you the difference in formulas though, the regular just seems to adhere to bristles and lashes better
Both retail for $30. I usually buy mine from Neimans or Bloomingdales. At this time I don’t know if the Excess is limited edition or not. I can only say that I hope they keep the regular formula. I don’t regret buying the Excess and have no intention of returning it. Sometimes it’s nice to have variety.
If you have tried either, what are your thoughts? Experiences? Rants or raves?
For your reference, my other mascara loves include DiorShow, Dolce & Gabbana, NARS Volumizing, Estee Lauder Projectionist, Clinique High Impact Mascara, MAC Plush Lash, Kiehl’s Marvelous Mineral Mascara, Shu Uemura Basic.
Mascaras I’ve tried and did not like include MAC Zoom Lash, all of Chanel/Bobbi Brown, Laura Mercier Thickening, Lancome Definicils, YSL Faux Cils, Trish McEvoy High Volume, Le Metier Waterproof, Clinique Naturally Glossy, Clinique Lash Doubling, Benefit BADGal (note – this is based on my own personal experience). In general I do not like waterproof formula mascaras.
There are a number of mascaras I’ve tried that I’m indifferent to – ones that weren’t great but weren’t bad. Too many to mention, although I definitely haven’t tried all types or brands.